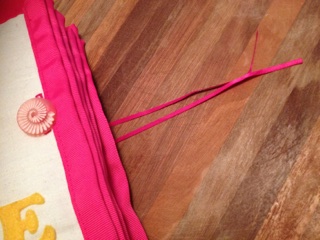
Normally you would put a closure on a book before you finish binding and doing your cover... But I couldn't decide whether/how I was going to do it and kept going anyway. They say necessity is the mother of invention, so here is my solution:
As I was pondering how I was going to make a closure for my finished book without making it look terrible with stitching showing all over it, I came across these display cuff-links.
They inspired this closure idea for when you have already bound your quiet book, but find that you really do need to be able to close it and don't want to waste your energy re-sewing the cover.
Thread the ribbon through the button that you want showing on the top.
Then thread both ends of the ribbon through all of the buttonholes. Turn the book over and thread on the second button.
Tie a knot in the ribbon, then do a double-knotted bow so it can't come undone.
Done!
Here is Tahlia keeping herself busy barricading the kitchen while I was book binding.
As I was pondering how I was going to make a closure for my finished book without making it look terrible with stitching showing all over it, I came across these display cuff-links.
They inspired this closure idea for when you have already bound your quiet book, but find that you really do need to be able to close it and don't want to waste your energy re-sewing the cover.
Materials Needed to create a Post Binding Quiet Book Closure:
- Two large buttons
- short piece of ribbon or elastic
- thread
- sewing machine with buttonhole function
- one tiny button if using a one step buttonhole function
If using a one step buttonhole function, first do a practice buttonhole for both your small and large buttons. That way you can work out the length and center your buttonholes along the edge you want to put the closure on. Make large buttonholes along every page edge except the last, where you will make a very small buttonhole. This will ensure that the buttons and ribbon cannot fall out and get lost.
Remember to change buttons in the measurement end of your one step buttonhole foot at the appropriate times! Also, I found that the button would often pop out of the foot when I removed each page because they were fairly thick. Watch out for that, or your buttonholes will get progressively smaller.
Instructions for how to use a one step buttonhole function can be found towards the end of my Easy Peasy Lei Flower Quiet Book Page.
Use a seam-ripper to open up the buttonholes. I sewed the buttonhole on this counting page twice since I would be cutting through a ribbon on the page.
Thread the ribbon through the button that you want showing on the top.
Then thread both ends of the ribbon through all of the buttonholes. Turn the book over and thread on the second button.
Tie a knot in the ribbon, then do a double-knotted bow so it can't come undone.
Done!
Here is Tahlia keeping herself busy barricading the kitchen while I was book binding.
Has this solved your problem of how to add a closure after you have already bound your quiet book? Comment below!


No comments:
Post a Comment
Please post a comment: