I will eventually have posted enough Easy Peasy quiet book pages that you can make a whole book full... this is number 5!
You might notice that it is very similar to my last post Matthew 24 - Gospel to the Nations Quiet Book Page. I made them at the same time, although I made two of this version for a couple of books I made for some friends.
This page is suited to the toddler age I reckon, and it is great because there are no loose pieces. And no loose pieces means that they can't get lost!
This page was actually my sister's idea which I have copied. She made something similar for a page in a book she gave to a friend, and when I asked her to share her pattern with me, she said she didn't make one and that she didn't even take a photo before she gave the book away! Not happy, Jan.
My sister's page differed a little from mine, as she had an entrance to the tunnel at both ends (you can easily flip my template and make it an entrance at both ends if you like). She also had a mountain over the tunnel which it went through. I suppose that is better because there is actually a need for a tunnel in that case, but I wanted an Easy Peasy page and here it is...
How to make my Train and Tunnel Pull-String quiet book page:
Materials needed:
felt scraps in gray
thread to match
window blind sample in stone colour to tie in with felt
I used a pen to copy the template onto the back of my felt (just remember to reverse it if you want the tunnel on the same side as the template). Cut out the tunnel, sew it down to the same felt, and cut it out again.
Measure the amount of ribbon you need to circle the tunnel easily and cut and melt the edges - see my post on How to Stop Ribbons Fraying.
Lay the ends of the ribbon on top of each other beneath the train button and sew it on in place. You can sew by hand or follow the instructions in last fortnight's post for the zig zag settings on your machine. I used a little hot glue on the back of the stitching just to be sure.
Position your tunnel on your background page with the ribbon running through it. Sew down the tunnel along the top and bottom edges, leaving the inner side of the entrance and the side edge of the exit open to allow the train and ribbon to slide through.
Cut out the stone sections from your blind sample and hot glue them around the entrance to your tunnel.
Matthew 24 is a well-known but I believe largely misunderstood chapter.
Memory Verse: “And this gospel of the kingdom will be preached in all the world as a witness to all the nations, and then the end will come.” Matthew 24:14, NKJV.
Materials needed to create the Gospel to the Nations quiet book page:
about 40cm of 9mm wide ribbon, preferably with edging that resembles train tracks
train button
hot glue and glue gun (optional)
sewing thread to best match the page
scissors!
Use the colouring page as a template and create pattern pieces by cutting out each piece. Print it as many times as you need to.
Cut out the large world circle of blue felt - sew it down to more blue felt and cut it out again.
Choose a green felt that goes well with your blue felt, and a ribbon for the train. I would have chosen the black ribbon with white stitching above, but it wasn't quite long enough. I think it looks a bit like train tracks.
Cut out the land pieces from the green felt (remember to place them upside down if you are planning to draw around them so the drawing is on the wrong side). Position them on your blue world and sew down.
Measure the amount of ribbon required to circle the world easily and cut and melt the edges - see my post on How to Stop Ribbons Fraying.
Lay the ends of the ribbon on top of each other beneath the train button and sew it on in place. You can hand sew or set your machine to zig zag setting and adjust the width to fit the button holes and set the length to zero and sew. I added a little hot glue to the back of the stitching just to be sure.
Position your world on your background page with the ribbon around it. Sew down the world along the top and bottom edges, leaving the sides open to allow the train and ribbon to slide through.
Finished!
Difficulty Level = Easy, plus No Sew version.
A very easy quiet book page! Just use hot glue wherever sewing is recommended for a no sew version.
Key Learning Areas and Skills
Matthew 24 - it is our job to take the Gospel to the nations
Imaginative Play - pull the train around the world and take the Gospel to the nations
String Pull - pull the train around the world and watch it disappear behind the far edge and re-appear at the other
Fine Motor Skills - all quiet books encourage fine motor skill development
Hand-eye Co-ordination - all quiet books encourage hand-eye co-ordination
Much of this chapter is about the destruction of Jerusalem and The Second Temple in 70AD. The Parable of the Fig Tree is about this too, and is often misunderstood. Perhaps the most important sentence in this chapter relating to the very end of time in which we find ourselves is that the gospel will go to the nations, and then the end will come.
It is our duty to take the gospel to the nations, not to worry about what terrible things may befall us. Jesus promises to be with us to the very end of the age - so what do we need to fear? I feel it is selfishness which drives us to prepare for the end by buying property in the country or hills so we can run to it in the future trials. Selfishness is never something that should be motivating us, therefore the theology behind it must be wrong.
Ultimately, what we need to worry about is if we took the gospel to the nations. If we spent all our time worrying about our future instead, it will be something to be ashamed of - but if we spend our time preparing others to enter Heaven, God will take care of us and we won't need to worry about anything that may or may not happen to us down here. In reality it doesn't matter - God can resurrect, restore, and re-build.
In Amos chapter 3, Amos preaches to the Israelites about how they have treated God's messengers. Even though they are not willing to listen to the prophets and have told them all to shut up, Amos is more afraid of not listening to God than listening to them - and their efforts to shut him up will be futile.
Memory Verse: “Surely the Lord God does nothing,
Unless He reveals His secret to His servants the prophets.
A lion has roared!
Who will not fear?
The Lord God has spoken!
Who can but prophesy?” Amos 3:7-8 NKJV.
Materials needed to create the The Lion Roars quiet book page:
felt in light brown, hot pink, light pink/very light brown, black and white
6 black grommets and tool set - I used 3mm inside diameter (perhaps 5mm height)
2mm elastic in black or gray - I used 3 lengths of about 20cm
two round buttons for the eyes
various ribbons in orange, gold, yellow, red and browns for the mane
two 33mm white horn buttons for the teeth - I bought this in colour 4 (not an afiliate link)
sewing threads to best match the page
scissors!
Cut all the pattern pieces (you can use these to help with positioning pieces later).
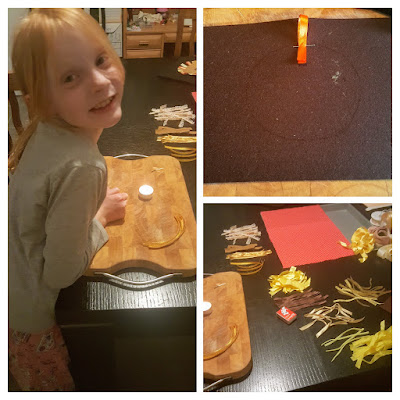
Cut the ribbons into lengths about 12cm long and melt the edges - see my post on How to Stop Ribbons Fraying. Sew them down as a mane under where the lion's head will be. I used a lot of zig zag stitch to sew things down underneath where they wouldn't be seen.
I often make more than one page at a time. The extra sewing is not too bad when you don't have to change thread colours, and that way I can have extra pages for presents and a practice run before sewing the real thing.
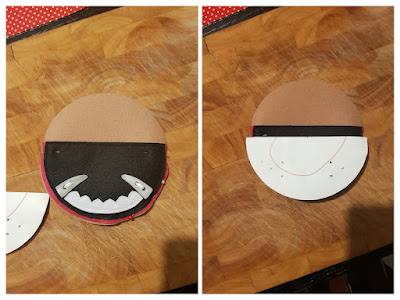
Sew the inner ears to the outer ears and then the outer ear to more felt and cut them out. Sew them in position too.
Cut and sew down the white teeth to the pink inner mouths about 5mm from the edge to allow the sewing machine foot to pass later on.
I cut out the mouth from black instead of pink, but thought it might make a good experiment to do it that way too. I took a photo so you can see and compare and decide which way you prefer.
Sew on the white horn buttons to form teeth making sure that the upper and lower jaws will close without the teeth impeding on each other.
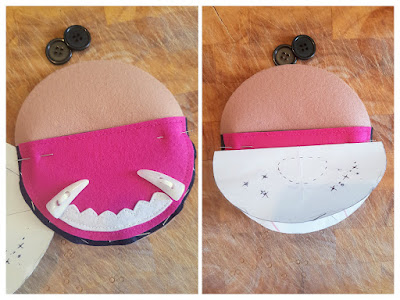
Then sew the pink inner mouths to black outer mouths (upper and lower) and sew the lower mouth/jaw in place.
Sew the nose to the head and insert the grommets. Thread the elastic through from the front to the back and back to the front through the opposite grommet. When you pull the top right whisker it should shorten the bottom left and so forth. Knot the ends to prevent the whiskers pulling out. I taped mine down out of the way so I could sew the next section.
Using matching threads to the mouth and head (match the felt not the spool and bobbin), sew the upper mouth/jaw to the head underneath where the nose and whiskers are along the outer edge only (otherwise you will have a sewn line across the lion's face), stopping about one centimetre short of either end.
Place the head in position and fold back the top section so you can attach the inner jaw lining using zig zag stitch. Sew the head using normal stitch to attach the head on top of the mane and ears along the outer edge meeting your previous sewing at the jaw.
Sew on the buttons as eyes.
Finished!
Difficulty Level = Intermediate
The hardest part of this page is sewing the the top mouth section together with the teeth already handsewn on - just make sure you leave enough room for the sewing machine foot to pass.
Installing grommets can be intimidating, but once you try, they are easy and make you very satisfied with your efforts! The following YouTube tutorial by Irina Sorokina from My Craft Quiet Books should help.
Eyelets and grommets - My Craft Quiet Books
Key Learning Areas and Skills
Amos 3 - It is better to listen to God than man
Imaginative play - open and close the lion's mouth and give a big roar (ok, so this page may not be so quiet!)
Pull Strings - do you dare to pull the lion's whiskers?
Fine Motor Skills - all quiet books encourage fine motor skill development
Hand-eye Co-ordination - all quiet books encourage hand-eye co-ordination
Amos chapter 3 contrasts Amos chapter 2 where the prophets of God are silenced by the people.
Amos has a healthy view of God and man however, and knows that when the lion roars you better be scared. And when God speaks, Amos prophesies!
If there is something we need to know about beforehand, we are assured God will (or has) let us know. Amos is warning Israel, Judah, and their neighbouring nations about the coming destruction of Assyria and Babylon. But of course the coming destruction prefigures the coming destruction of the entire world at the end.
When the lion roars, we would do well to listen. God has told us the end from the beginning and continued telling us all through the middle. God makes no move without telling us - just like a parent warns their children that if they don't eat their dinner they won't get desert. The end should come as no surprise to anyone who has been listening.
God Reveals His Secrets To His Servants (Amos 3:7)
The memory verse for this chapter is one of my treasured verses. I have been researching the Second Coming for a while now, and here, God claims that He will do NOTHING without telling us first.
It is a very common belief that Jesus will surprise everyone at His second appearance, but I have found that God tends to be very predictable. And I think that is because He is trustworthy, and repeats Himself in so many patterns in an attempt to get things through to our distrusting selves.
History has followed the pattern, so will the future.
Jesus fulfilled prophecy to the minute at His first coming - he died at the time of the evening sacrifice on Passover, having entered Jerusalem on the 10th of the month, just as the lamb set aside for the purpose must have done. Why would He not fulfil prophecy exactly at His return?
The spring feasts were fulfilled at His First Coming - I believe the fall feasts will be fulfilled at the Second Coming.
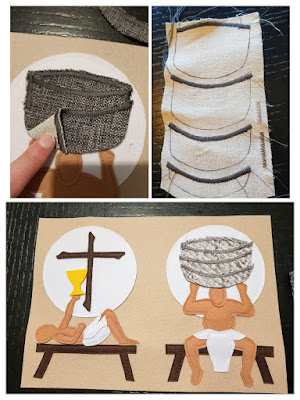
In Genesis chapter 40, Joseph correctly interprets the dreams of Pharaoh's Chief Baker and Chief Butler.
Memory Verse: “Then he restored the chief butler to his butlership again, and he placed the cup in Pharaoh’s hand. But he hanged the chief baker, as Joseph had interpreted to them.” Genesis 40:21-22 NKJV.
Materials needed to create the The Baker's and The Butler's Dreams quiet book page:
felt in dark brown, yellow, white, mint, light blue, mauve, light tan and tan
wadding scraps
gold grommets and tool set - I used 3mm inside diameter (perhaps 5mm height)
1mm elastic in mint, purple, and yellow - I bought these (not an affiliate link)
vine leaf beads
grape cluster beads
colourful bird beads - I bought these (not an affiliate link)
three small buttons
material suitable for the white baskets (don't choose anything too thick or it will be difficult to sew)
sewing threads to best match the page
hot glue and glue gun
scissors!
Cut all the pattern pieces (you can use these to help with positioning pieces later).
Use the template to help you position your pieces before sewing
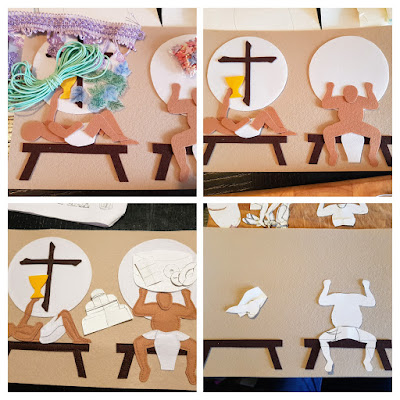
Cut and sew down these pieces in the following order using matching thread - benches, butler's rear leg, butler's front leg, baker's legs, butler's head, dream circles, butler's outstretched arm, butler's torso, butler's bent arm, baker's torso with arms, baker's head, side loincloths, middle loincloths, pharaoh's cup (in butler's hand), and vine.
Draw basket outlines onto the wrong side of your basket material. Sew a very tight zig zag stitch along the top edges of all three basket outlines (excluding the basket base). Cut out the baskets, being careful not to cut any of the stitching. Sew the base basket onto the baker's dream circle using a very tight zig zag stitch along the top edge only. Lay the largest basket and top of the basket base and sew both edges down with a tight zig zag stitch till just below where the next basket's top edge will sit. Lay the next basket on top and repeat this process. Lay the smallest basket down and sew all the way around with a tight zig zag stitch from one side to the other, catching all the baskets along the bottom edge.
The material I was originally using was rather thick so I did a test to see if my machine could handle all the layers. It could, but to my dismay I read the story again and discovered that the basket was white!
I had to change my basket fabric... thankfully everyone on my Facebook page comments liked the white baskets better. That was encouraging because I liked the look of the dark basket better, but I do like to get all the details as correct that I can. Although the baskets being white may imply contents of white bread... but scholars are not sure, and I had already made the bread (including some white bread).
I also tried a quilted calico fabric but I think it would have been too thick
Use the pattern pieces to mark where you need grommets and install them (see video below).
Tie a grape cluster bead to the end of some green elastic and thread on a couple of leaves. Thread the elastic through the horizontal grommets along the vine adding beads to the elastic as you go. Finish by tying the end to the last bead. The elastic end should look like a tendril. Repeat this process with another length of green elastic along the vertical grommets of the vine.
For the birds eating the bread, thread three coloured elastics through the grommets from the back on one side of the baskets, adding a bird bead before re-entering the same hole. Continue threading the elastic through an opposite hole on the other side of the basket and add another bird before re-entering back through the grommet. Thread both ends of each elastic onto a button and tie the ends together. The button will prevent the knot from being pulled through the grommets and onto the right side.
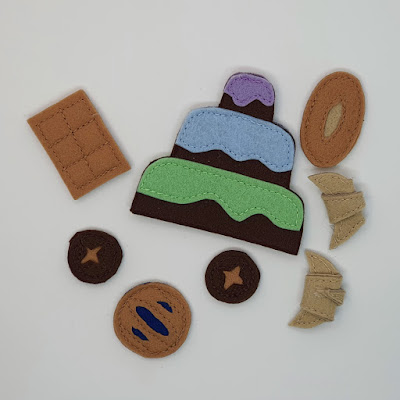
To make the dark rye bread rolls, cut out the top pieces and sew onto tan felt around the slits. Cut them out and sew to another dark background then cut them out again.
Repeat this process in a similar fashion for the oval bread and pie. For the pull-apart rolls, cut out the top and sew down onto another piece of felt with a piece of smaller wadding in between. Add stitching down the long centre and two lots of stitching down the shorter part to add the 6-pack detail, then cut them out.
For the croissants, cut out the top pieces and sew them onto another piece of felt and cut them out. Roll them up using a small amount of hot glue to keep them in place.
Of course the baker would have been anticipating Pharaoh's birthday and have made him a cake. So cut out two cake pieces and sew the icing pieces on. Hot glue the cake together along the sides and top edges, leaving the bottom edge open to form a finger puppet.
Fill the baskets with the baked goods.
Finished!
Difficulty Level = Intermediate
The hardest part of this page is sewing the basket. It's not that bad!
Installing grommets looks difficult and scary, but once you try, they are easy and make you very satisfied with your efforts! The following YouTube tutorial by Irina Sorokina from My Craft Quiet Books should help.
Eyelets and grommets - My Craft Quiet Books
Key Learning Areas and Skills
Genesis 40 - this page is all about faith versus works
Imaginative play - squeeze the grape clusters into Pharaoh's cup
Pull-string - help the birds peck the bread from the baskets
Fine Motor Skills - all quiet books encourage fine motor skill development
Hand-eye Co-ordination - all quiet books encourage hand-eye co-ordination
Whilst researching and making this page, I learnt something exciting and amazing.
As a child I had thought the point of this story was to show Pharaoh that Joseph's dream interpreting skills could be trusted. But now I could tell something strange was going on in this chapter.
When morphing text into an image, I find myself asking lots of questions. One simple question I never thought to ask when reading this story before was "What kind of bread did the baker have in his basket?"
There are two kinds of bread in the Bible - flatbread and leavened bread. And since leaven (or yeast) is used to represent sin due to it's ability to puff something up (like pride), and flat bread was used as an offering, I thought it was important to know which kind of bread featured in the baker's dream. Can you guess?
I looked up the Hebrew word used for bread and discovered that actually there was no word for bread. The bread was implied and used in the translation, but was not used in the original. Originally, the baker filled his basket with "deeds". When translated, his deeds were assumed to be bread (I guess it follows since he was a baker). As I mentioned above, the fact that the baskets were white may imply that the bread they were filled with was white too, although this is speculative. I also did a little research on the kinds of bread that ancient Egyptian bakers made - and discovered that they often shaped it into a crocodile. This led to the discovery that Sobek bread is so-called after the Egyptian crocodile god Sobek because the pull-apart bread buns resemble a bumpy crocodile's back - so I made sure to include a 6-pack bread bun in the basket.
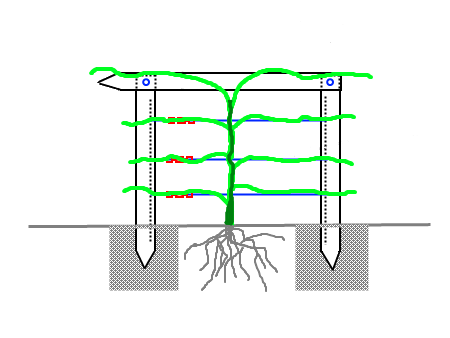
Having grown up on a farm with an orchard, I knew that grapevines are grown on a trellis, with branches being trained to grow opposite each other in straight lines. So when I envisioned how to draw a vine for the butler's dream, it quickly occurred to me that this vine was growing in the shape of a cross! Imagine a smaller grapevine growing on the trellis below - it has only reached the second wire and the branches being trained on the first wire are still quite short.
Image Source - Grape Vine Trellis by Deep Green Permaculture
Even after these discoveries it still took me a little while to understand properly, and I'll admit a little googling did help. There was bread and there was wine, a cross-shaped vine and death on a tree... but what exactly was the hidden story in the dreams?
Herein is the answer:
1. The butler's dream represents FAITH in the saving blood of Jesus
2. The baker's dream represents WORKS because he relies on his own deeds
The results are not realised until the third day, which is also no accident. Of course Jesus rose on the third day, but I think this relates more to the Millennial Day Theory - where each day of creation represents a thousand years of Earth's history. I have given a summary of what I think the days represent in the devotional on my Genesis 1 - Days of Creation Quiet Book Page. The death of Jesus happens toward the end of the fourth millennium, and this seems to start a second way of counting the days. You can either count from one to seven, or you can count from one to four and then start again from four and count another three days. I believe this is what Hosea 6:2 is referring to "After two days he will revive us; on the third day he will restore us, that we may live in his presence." Three millennial days after Messiah's death on day 4 will be the resurrection and restoration. And this is prefigured by Pharaoh's birthday gesture to the butler on the third day - he lifts up his face and restores him to his former position. Of course, those who rely on their deeds will be destroyed just as the butler was by Pharaoh also on the third day.
Concept drawing
The fact that it was Pharaoh's birthday is also interesting, although it was likely his inauguration/rebirth day which was shared by all Pharaohs and not a birthday as we would celebrate.
There is a Jewish tradition that a groom is a king for his wedding day (and the bride a queen). Whilst many Jews did not recognise Jesus as the Messiah at His first coming, Christians believe this may be because He came the first time as the Suffering Servant (similar to the Jewish Messiah ben Joseph - see Isaiah 53 - Messiah ben Joseph Quiet Book Page) and will not show Himself to be King Messiah (Messiah ben David) until the second coming - just like the story of Joseph and his brothers. Joseph did not reveal his true identity until the brother's second visit to Egypt. We believe that Jesus will be crowned King around the time of the Second Coming, and this concept is also portrayed in the story of the Song of Songs where Solomon is crowned king on the day of his wedding (Song of Songs 3:11).
Who would have imagined that the age-old debate of faith versus works would be found explained in the book of Genesis?!! Like the butler, I definitely choose faith in the blood of Jesus rather than relying on my yeast-filled deeds like the baker.