Showing posts with label pocket. Show all posts

Thursday, 22 October 2020

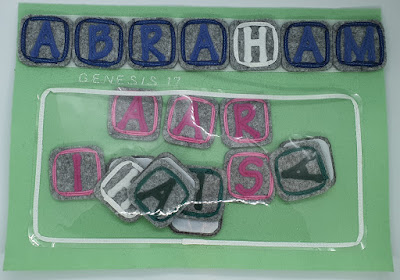
Genesis 17 - Abram becomes Abraham Quiet Book Page

 In Genesis 17, God establishes a covenant with Abram and changes his name to Abraham, and Sarai becomes Sarah. 


Memory Verse: “No longer shall your name be called Abram, but your name shall be Abraham; for I have made you a father of many nations.” Genesis 17:5 NKJV.

Materials needed to create the Abram becomes Abraham quiet book page:

  • A4 felt background sheet - I used mint
  • my free Genesis 17 - Abram becomes Abraham Bible Quiet Book Template Pattern
  • gray hard felt
  • white felt and coloured felt in two (or three) colours, or alphabet felt in those colours, or
  • a method of cutting letters - see my Letter Cutting Hacks post
  • 5mm ribbon in matching colours to your white and coloured felt
  • sewing threads to best match the page
  • diaper hook and loop tape material (like velcro but doesn't wreck felt so much and is wider and can be cut to the size needed) - I bought this (not an afiliate link)
  • clear plastic - you can use tablecloth plastic or sheet set packaging
  • scotch tape and paper
  • hot glue and glue gun
  • scissors!
Firstly, cut out as many alphabet blocks as you need for the names you are making from the gray hard felt. I used: YHWH (4 blocks in white), ABRAAM (6 blocks in blue), SARAI (5 blocks in pink), and TALIA (5 blocks in green). You can add your own child's name if it has an "ah" or "ha" sound in it.


Tahlia's toy came in handy to trace around
to make the perfect block shape for me


Cut out you letters as required for the blocks above - see my Letter Cutting Hacks post (I used the Sizzix method). Sew them onto the gray alphabet blocks in the center of each block. Work out the length of each ribbon required to trim each block (13cm from memory). Cut the number of lengths needed and melt the ends to prevent fraying. Sew a border around each block using the corresponding colour 5mm ribbon, tucking the end of the ribbon under itself to finish it nicely at the ends.


Cut out the pocket from your clear plastic and trim with ribbon in a simmilar manner as above. Place scotch tape onto your sewing machine foot so the plastic will move through your machine easily. I also place paper underneath part of my sewing machine - see my set-up on my Psalm 46 - Be Still and Know that I Am God Tea Set Quiet Book Page post. Sew the plastic onto your page on three sides leaving the top open to form a pocket. Place it at the bottom leaving room to sew the pages together at the end and enough room at the top for the writing strip.

Cut the writing strip from loop tape material and sew it onto your page at the top.

Cut as many hook tape backings as you need and hot glue to the back of each alphabet block.

Finished! Store blocks back to back in the pocket to minimise dammage that can be done with the hook side of the hook and loop tape material.


Difficulty Level = Difficult

It would be easy except for sewing the ribbons around the corners is a little tricky, but you will get better with practice! Sewing the plastic is very tricky if you don't follow the suggestions of using scotch tape and paper above.

Key Learning Areas and Skills

  • Genesis 17 - God gave Abram and Sarai new names to show his covenant with them
  • Spelling - learn to spell the names Abram, Abraham, Sarai, Sarah, and maybe some others
  • Fine Motor Skills - all quiet books encourage fine motor skill development
  • Hand-eye Co-ordination - all quiet books encourage hand-eye co-ordination


Read the Chapter

Genesis 17

Devotional

I heard something about this Bible chapter once and it has stuck with me. I don't remember where I heard it so unfortunately I can't give credit where it is due. It may have been a sermon - I'm not sure. But their words definitely helped inspire this quiet book page.

Basically, they were saying that when God changed Abram's name to Abraham, and Sarai's name to Sarah, He was breathing into their names (and lives). God added the "H" sound from His name YHWH (often translated as Yahweh) to their names. The "ah" sound is the sound made when breathing, so it was as if God was speaking a miracle into their lives. And when God speaks, things happen!

God created the whole universe by speaking. He said "let there be light" and there was light. He made a man out of dust, and when He breathed into him, he became a soul. When God breathed into Abram and Sarai's lives, they had a baby in their old age, even though they both laughed at the idea.


Who But You (Abraham & Sarah)


I had heard this before Tahlia came along, and it definitely influenced how I spelled her name. It HAD to be spelled with an "ah" in it. Many Hebrew names contain an "ah" sound, and I suppose it is only natural since God interfered with the name of the first Hebrew, Abraham.

As I have discussed in more detail in my post Tahlia's Quiet Book - Front Cover and First Page, Tahlia means "dew from Heaven". If I had known that the root word for "dew" in Hebrew was "Tal" beforehand, I might have spelled her name Taliah instead. I have explained all this reasoning to her and occasionally she now likes to spell her name Tahliah! I guess the more "ah" sounds the better hahaha (pun intended)!


I hope this page will become a special one to your child as well, especially if their name is spelled with an "ah" or "ha" too. May God breathe into their life, and yours.


Follow Faith and Felt Obsession on FacebookPinterest and You Tube

Can you include your child's name on this page? 

Friday, 14 December 2018

Genesis 39 - The Temptation of Joseph Quiet Book Page

Genesis 39 demonstrates Joseph's integrity.

Memory Verse: "No one is greater in this house than I am. My master has withheld nothing from me except you, because you are his wife. How then could I do such a wicked thing and sin against God?” Genesis 39:9

Materials needed to create The Temptation of Joseph quiet book page:

  • A4 felt background sheet - I used black
  • sublimation printed Ancient Egypt dress-up dolls by Gabi's Paper Dolls (I only printed some of the female costumes and the dolls) - you can read how I had it done on my Sublimation Printing on Felt - Test post
  • Veltex material (also called loop fabric or industrial webbing) in skin colour
  • Velcro dot
  • hot glue gun and glue
  • Double sided iron-on interfacing scrap
  • gold coloured material that won't fray - I used pleather but it was difficult to sew due to it's stretchiness (made easier by gluing first)
  • clear craft glue if using pleather to make sewing easier - I used polyacetic acid & ethylene resin based glue
  • decorative material
  • two decorative buttons
  • jump ring tassel
  • gold ribbon
  • gold elastic
  • felt in gold/straw colour
  • sewing thread to match
  • my free template (Egyptian wardrobe only)
First cut out your paper dolls, clothes and wigs, cutting off the tabs as you go. Then use your male paper doll to cut out a section of Veltex and double sided iron-on interfacing to the same shape as his torso/legs.


This one is Tahlia's favourite dress


Arrange your pieces onto the background and iron on the Veltex to the background in the correct position using the interfacing. Sew around the edge to hold in place.


Potiphar's wife acting like a 'cougar'... - this one is my Grandma's fav dress


Hot glue the feet of the male doll to the background in place over the Veltex. Cut out his undergarment and finish gluing down his legs. Hot glue the Velcro dot to the back of his undergarment and place in position. Then line up the head and glue the remainder of his body down. Hot glue the woman into position.


To make the wardrobe, trace the pieces using the template onto the back of your pleather using pen - this will avoid puncturing the pleather unnecessarily. Cut them out. For the decorative panel, cut the size to the back piece and then trim down slightly so it doesn't show on the edge of the wardrobe when layered. Using the clear craft glue, glue the decorative panel to the gold/straw felt and allow it to dry. Then glue the gold edging on top and allow to dry. Sew the inner section around the decorative panel.


Glue two sections of gold ribbon on the back to form hinges for the front door of the wardrobe. Then glue some pleather to the back of your felt and allow to dry. Sew around the outside edge of your wardrobe door and then cut it out, making sure not to cut off the hinges.


I found I had to shorten the bottom of the wardrobe base by around 5 mm and overlap the door over the lower section of the wardrobe front slightly to fit it on my page. I didn't change the pattern as you may be using a different size page to me.

Glue the pleather wardrobe base to the background page and insert the hinges from the door underneath on one side and insert a short loop of gold elastic with a jump ring tassel threaded onto it on the other side where you want the latch to be. Allow to dry and sew in place, reinforcing the stitching over the hinges and elastic loop.


Glue the remaining pleather pieces to the gold/straw felt and sew along the top edge of the draw and lower section of wardrobe front. Cut the draw out and sew the lower edge in place over the lower section of the wardrobe front. Then sew the lower section of the wardrobe front down over the base on the bottom and sides to form a pocket. To complete the wardrobe, hand sew your buttons on.

Finished!


Difficulty Level = Hard

It will be easier if you use something other than pleather that stretches! If you use pleather, be sure to use the glue.


"Hey Joseph, want to see my secret garden?"


Key Learning Areas and Skills

  • Genesis 38 - This page teaches about how we need to be prepared to suffer even when we do the right thing.
  • Buttoning - Open and close the wardrobe
  • Tucking - Tuck the wigs into the wardrobe draw
  • Imaginative Play - dress up Potiphar's wife in all her outfits
  • Velcro - rip off Joseph's undergarment (and re-position them)
  • Fine Motor Skills - all quiet books encourage fine motor skill development
  • Hand-eye Co-ordination - all quiet books encourage hand-eye co-ordination


Read the Chapter

Genesis 39


Devotional

I admire the way that Jacob brought up Joseph. He was only around 17 when he was sold as a salve and yet His devotion to God is to be greatly admired. It must have been difficult to follow God in the situation he found himself in, and it would have been easy to go along with new cultures and customs and tell himself that God had forgotten him, so he may as well do likewise.


"Hey Joseph, do you want some 'trifle'..."


There are a few boundaries Joseph put in place to reduce the chances of finding himself in less than ideal circumstances. You can read about Joseph's 5 Steps to Avoid Temptation: Genesis 39:6-23 on the God Running blog. He had resolved to keep himself from "strange" women (those who did not follow God) as told in the story of Joseph and Asenath, translated by H. F. D. Sparks. He must have envisaged a celibate life, exiled in the land of Egypt. And not only exiled, but imprisoned. Nevertheless, as stated at the end of the blog post mentioned above, God preserved his life in that the punishment due Joseph was death. I noticed that Joseph was sold to Potiphar the Captain of the Guard (Genesis 37:36) - and the same titled person is in charge of the prison. It looks like Potiphar realises that Joseph is innocent because instead of putting Joseph to death, he saves face by putting him in his prison, but eventually puts him in charge of it just as he had done with his household (Genesis 40:3-4). Despite his circumstances, Joseph sticks to his values and God rewards him with freedom, power, and a beautiful convert, Asenath.

There are so many parallels between the story of Joseph and Jesus in the Bible, and I can only see more told through the love story of Joseph and Asenath.


Dreamcoat Part 8 - Potipher


Follow Faith and Felt Obsession on FacebookPinterest and You Tube

Hearing from you gives me great encouragement!

Monday, 24 September 2018

Genesis 50 - Joseph's Bones Quiet Book Page

Genesis 50 contains Joseph's dying words where he expresses his faith that God will make good on His promise to bring Israel out of Egypt. Joseph  asks his descendants to bring his bones with them when they leave.


Memory Verse: "So Joseph made the Israelites swear, saying, “When God comes to you, you shall carry up my bones from here.” Genesis 50:25.

Materials needed to create the Joseph's Bones quiet book page:

  • A4 felt background sheet - I used aqua
  • gold coloured material that won't fray - I used pleather but it was difficult to sew due to it's stretchiness (made easier by gluing first)
  • clear craft glue if using pleather to make sewing easier - I used polyacetic acid & ethylene resin based glue
  • gold trim
  • gold ribbon - melt the ends to prevent fraying
  • sewing thread to best match the colours
  • two buttons - I found some ivory ones with black etchings that somewhat resembled hieroglyphics
  • felt in gold/straw (or near enough), black, skin colour, and white/glow-in-the-dark
  • glow-in-the-dark paint if using white felt
  • decorative material or ribbons etc for the coffins
  • white ribbon for wrapping Joseph's mummy
  • my free template
Trace the sarcophagus, coffin head and death mask pieces using the template onto the back of your pleather using pen - this will avoid puncturing the pleather unnecessarily. Cut them out. Glue the front and lid of the sarcophagus to your gold/straw felt, inserting small strips of ribbon to form hinges along the top edge of the lid and loops for your buttons along the bottom edge. Make sure you make big enough loops to fit the buttons through easily. You can use pins to keep the ribbons in place if you need to but make sure it is where you will be sewing so you don't have holes where they will be visible. Leave to dry overnight.


Sew the pleather to the felt on all sides for the lid, reinforcing where the ribbons are. Only sew the top edge for the front. Cut them out ensuring you do not cut off the ribbons. Next glue the sarcophagus back to the background page, inserting the other ends of the ribbon hinges from the lid. Sew down once dried overnight. Then sew the front on the bottom and sides to form a pocket. To complete the sarcophagus, hand sew your buttons on.


Cut scraps of pleather to fit underneath the face holes of the coffin heads and death masks. Glue the death mask pieces to the gold/straw felt, layering a scrap in position under the front piece with the face hole. Leave to dry overnight, then sew down around the face hole and edges. Cut out the pieces and sew together along the top curve.


Decorate your coffin bases as desired and glue and sew on the head pieces. Sew together by the sides excluding the head or from the center of the head at the top to the center of the base at the bottom to form pockets.


I sewed the black one the first way as there was no reinforcing on the base and the other way for the blue/green coffin as it had a double layer due to the material.


I also used glue under the decorative material on this one as it is very thin material and very prone to fraying. To ensure there would be no fraying I did a tight zig zag stitch around those edges too.


For the mummy I doubled the skin coloured felt twice, inserting a wide white ribbon between the under body piece before sewing the two doubled pieces on top of each other along one straight side edge.


To make the bones I drew around the template pieces onto my white felt with a black pen and painted the glow in the dark paint on.


Glow-in-the-dark felt would make this step easier - not that it was hard, but as it is unavailable in Australia and I could not find a seller online, this was my solution. To finish, simply cut out the bones and glue them in place on the inside of the body.

Done!


Difficulty Level = Intermediate.

If you are using pleather the glue is imperative. It will be a nightmare without it as you will get bunching and/or stretching out of shape. Also, DO NOT attempt to use tape instead of glue - you will end up with the dodgy sewing featured below and have to start over.


Key Learning Areas and Skills

  • Genesis 50 - Joseph showed his faith by instructing his descendants to take his bones with them when God brought them out of Egypt!
  • Imaginative Play - wrapping and burying an Egyptian mummy is pretty fun, not to mention golw-in-the-dark bones!
  • Buttoning - open and close the sarcophagus lid
  • Wrapping - wrap the ribbon around the body
  • Sequencing & Spatial Awareness - order the pockets the wrapped body goes into - death mask, small coffin, large coffin, sarcophagus
  • Science - could incorporate a lesson about UV light and glow in the dark phenomena
  • Fine Motor Skills - all quiet books encourage fine motor skill development
  • Hand-eye Co-ordination - all quiet books encourage hand-eye co-ordination


Read the Chapter

Genesis 50


Follow Faith and Felt Obsession on FacebookPinterest and You Tube
If you know of any earlier patterns or other information, I'd love to hear from you!


Devotional

There are Jewish legends about Joseph's bones that tell stories about the Israelites forgetting to take them with them when they were about to leave Egypt. The stories were written well after the fact and there are variations in the details, but basically the story goes that the pillar of cloud/fire would not move when they were all assembled ready to leave. The great-granddaughter of Levi realised that they had forgotten Joseph's bones. She was the only person old enough to remember where his body was laid. Apparently the Egyptians had sunk his coffin into the Nile River in an attempt to bless it, so Moses had to perform a miracle to get it to float so it could be retrieved. Only then did the pillar move forward to lead them out of Egypt.

Whether the story has some truth to it I don't know, but I did find it rather interesting.


You can see the monument at Joseph's burial site in this video.


Our actions follow from what we believe to be true. Joseph gave instructions about his bones fully believing that God would bring the Israelites out of Egypt. God had told Abraham that his descendants would be enslaved in Egypt for four hundred years (Genesis 15). He also brought them to Egypt to keep them safe throughout famine. That which brought blessing also brought suffering. And you can see in what Joseph says on his deathbed that he believed both that Israel would suffer in Egypt even though throughout his lifetime it had been a blessing and that God would come to their aid and bring them out of Egypt. Indeed they did need God to come to their aid to secure release from Egyptian slavery. The story of Exodus shows what great lengths God went to keep His promise. He will surely keep the remainder of His promises and bring us out of this world of suffering and into His eternal life of blessing. May our actions demonstrate our faith to our children and peers like Joseph's did.


Follow Faith and Felt Obsession on FacebookPinterest and You Tube

Which is your favourite coffin?

Sunday, 19 November 2017

Mark 4 - This Little Light of Mine Quiet Book Page

In Mark chapter 4, Jesus tells a parable about how we need to let our light shine or it will be lost.


Memory Verse: " Then Jesus asked them, “Would anyone light a lamp and then put it under a basket or under a bed? Of course not! A lamp is placed on a stand, where its light will shine." Mark 4:21

Materials needed to create This Little Light of Mine quiet book page:

  • A4 felt background sheet. I used medium brown.
  • felt scraps in white, red, orange, yellow, and brown, and a basket colour
  • ribbon and/or rik rak scraps
  • sewing thread to best match the page
  • scissors!
  • the free template
Sew a thick ribbon along the bottom third of the page - this is to form a sort-of tablecloth. Make the ribbon longer than the page so you can fold the edges under when sewing the book together. Melt the edges of the ribbon to prevent fraying.

Cut out all your pieces from felt. Cut a length of ribbon or rik rak to fit the top of your basket edge. Melt the edges to prevent fraying, them sew it to the top of your basket. This will decorate it, but also re-enforce the felt to make it stronger on the edge that will be used as a pocket. Sew the basket in place, sitting it on top of the tablecloth ribbon on the right side of the page, leaving the top ribbon edge open to form a pocket.


Cut a length of ribbon about 19 cm long and melt the edges to prevent fraying. Sew it to the top of you candlestick bowl, starting at the left edge. This will mean that you have a length of ribbon left over at the other end. Sew down your candlestick bowl on the other side of the page, sitting on top of the tablecloth ribbon. Leave the top ribbon section open to form another pocket. Tuck the leftover ribbon at the top under the candlestick bowl when you sew it down to form a handle.


Layer the flame pieces and sandwich them between the white candle piece and another white piece of felt. Sew around the top and sides of the candle, leaving the bottom open to form a finger puppet. Cut it out and sit it in the candlestick bowl like Jesus instructed, not in the basket!! Or better yet, put it on your finger and sing the song "This little light of mine" and do the actions.

Finished!


Difficulty Level = Easy, plus No Sew version.

A very easy quiet book page!
Just use hot glue wherever sewing is recommended for a no sew version.


Another version I made on a smaller sized page (roughly 10" x 10").


Key Learning Areas and Skills

  • Mark 4 - This page tells about how we need to let our light (belief in Jesus) shine, lest it get suffocated under a basket
  • Imaginative Play - Sing the song posted from YouTube below and follow the actions with the finger puppet on your finger. This song is currently one of Tahlia's favourites, which is why I made this page now I guess!
  • Tucking - Tuck the candle into the basket (No!) and candlestick bowl!
  • Fine Motor Skills - all quiet books encourage fine motor skill development
  • Hand-eye Co-ordination - all quiet books encourage hand-eye co-ordination


Read the Chapter

Mark 4

Devotional

What a warning! If we hide our light (understanding of God's word) we will lose it. But if we expose it, it will be fed and grow!! God promises in Isaiah 42:3 that "He will not crush the weakest reed or put out a flickering candle. He will bring justice to all who have been wronged." See also Matthew 12:20. He is sensitive with us and we can trust Him with our souls no matter how fragile we feel.


This is the traditional kids song "This Little Light of Mine" which the page is designed to be sung with. The version is a little dated, but it was the best I could find. Hope your child enjoys singing it with you!


Follow Faith and Felt Obsession on FacebookPinterest and You Tube

Do you have good memories of this song?

Sunday, 13 August 2017

Luke 12 - Where is Your Treasure? Quiet Book Page

In Luke chapter 12, Jesus talks a lot about possessions, and what they say about our priorities.


Memory Verse: "For where your treasure is, there your heart will be also." Luke:12:34

Materials needed to create the Where is Your Treasure? quiet book page:

  • A4 felt background sheet. I used pink.
  • felt scraps
  • ribbon
  • large heart button
  • trinkets for the treasure inside
  • sewing threads to match ribbon
  • the treasure chest template by Stephanie from Imagine Our Life
I'm not going to give a detailed explanation here because Stephanie has already done a tutorial on how to make the chest in her post. Of course you will need to make the loop of ribbon on the lid large enough to fit over your heart button, and sew the heart button in place on the bottom piece.

It is important to sew the chest pieces using a colour thread that matches the ribbon rather than the felt so that when you sew the pieces onto the page and you go over the ribbon it doesn't look funny. That's my opinion anyway.

Finished!

Difficulty Level = Intermediate

Getting the loop right is probably the most difficult section.

Key Learning Areas and Skills

  • Luke 12 - This page tells the story of how it is better to store our treasure in Heaven, because on Earth our treasure can easily get stolen or ruined
  • Imaginative Play - who doesn't like to find treasure!
  • Buttoning - Opening and closing the treasure chest
  • Fine Motor Skills - all quiet books encourage fine motor skill development
  • Hand-eye Co-ordination - all quiet books encourage hand-eye co-ordination

Read the Chapter

Luke 12

Devotional

As I was reading this chapter and wondering what to write the devotional on, one thing stuck out to me.  A man asked Jesus to tell his brother to share the inheritance with him. Jesus doesn't. Actually, he reproves both men with one story. A man had a bountiful crop and no-where to store it, so he decided to build new barns so he could store it all up for himself and sit back and relax and not work anymore. Instead he dies that night and who knows who got to enjoy his bountiful crop. Jesus' point was that it is better to share what extra we have rather than trusting in our possessions to look after us. We can't look after ourselves by having lots of possessions anyway. For all we know, we will die tomorrow, and no amount of goods can change that.

The inheritance cannot save either of them, but God is the one who will meet their needs. And we can trust Him to because he values us much more than the sparrows, whom he never forgets. Life is about more than food and clothes, and God will ensure he looks after the basics if we stop chasing after them like madmen and take time to focus on the important things, like seeking the Kingdom of God and looking after others.

I used to be enthralled with the idea of self sufficiency. As I have grown older, I have begun to realize that self sufficiency is impossible. No one can grow and make everything they need. It takes too much effort and too much skill. Some climates are not suitable to grow certain things. We can do without a lot, but even so, I get exhausted thinking about everything I would have to do if I wanted to be self sufficient.

God created family and community so that we could support each other. We are supposed to need each other because that teaches us that we can't supply everything we need, and that we need to rely on God. The village baker and the village candlestick maker had very different jobs, but if you had a village full of butchers/bakers/candlestick makers (and every other job-ers), there would be a village full of hungry people with no working tools.

If we all focused on what God has given us that we could share with others and we would all benefit from the best of everything.


That man had a chance to ask the Lord of the Universe a question, and he blew it on "tell my brother to share the inheritance". I hope I would ask a more meaningful question than that, and receive an answer I could treasure.


Follow Faith and Felt Obsession on FacebookPinterest and You Tube

Where is your treasure?

Thursday, 30 June 2016

Tahlia's Quiet Book - Ice-cream Page

What little girl (or boy) doesn't like Ice-cream? This page encourages imaginative play, and imaginative ice-cream flavour naming!!! I can't wait to hear what Tahlia comes up with.

The pocket flap is designed to extend the page so it is tall enough to stack up lots of flavours. The bubble gum flavour on the top of the right cone is one of my favourites, and it was made by collecting a heap of coloured cotton scraps and sewing them down by machine.


I wanted this page to be it's own pocket. It was a challenge for myself as I already had the idea of one page per chapter of the Bible, which doesn't allow for extra pocket pages. Plus why not make each page as exciting as possible, rather than just being a filler in a book?


To reinforce the bottom pocket section, I just folded it in on itself and sewed the edge down. To do the top part of the pocket where the ice-cream hangs down past the pocket flap, I sewed two green spotted felt pieces together where I wanted the flap to end, but left both edges with a large length of hem below where the ice-cream edge now is. Then I sewed down the ice-cream tops on the top of the flap and over the seam extending into the length of hem. Then I trimmed the hem around the ice-cream tops and along the flap edge.


It took forever to create this page - around three weeks of evenings, and I did double of nearly everything so I could include this page in my niece Vashti's book as well. The bead work really slowed it down.

My mum made the pattern for this, which is a great personal touch for Tahlia, and something I really appreciate. However, I did have a problem on my machine with the wavy edge being a little tight to allow me to turn easily. Since then, I found a free pattern available from Wee Folk Art which will probably work better, so I will refer you to it instead of uploading my mum's template.


🍦🍦🍦🍦🍦🍦🍦🍦🍦🍦🍦🍦🍦🍦🍦🍦🍦🍦🍦🍦🍦🍦🍦🍦🍦🍦🍦🍦🍦🍦🍦🍦🍦🍦🍦🍦🍦🍦🍦🍦


Follow Faith and Felt Obsession on FacebookPinterest and You Tube

What is your favourite flavour of ice-cream and how could you make it in felt? Comment below!

Thursday, 17 March 2016

Puzzle Quiet Book Page Swap

I recently went in a quiet book swap with a group on Facebook.


We each made seven copies of our own page and sent them to the host. She sent us back one of our own pages, and six different pages made by the other participants. It is a great way to build a quiet book. You only have to think about one page layout so it saves on supplies and effort.

With not a lot of time before Christmas, this was meant to be a quick and easy basic swap.  The theme was puzzles, and the size of the pages was reduced to 8"x8", which makes it an ideal book for occupying the little ones while travelling.

This is the page I contributed:


It is a themed button maze - there are a couple of mobs of sheep in a bunch of paddocks. The gates can be opened and shut, and the sheep can be fed on a lush pasture of clover or a pile of hay, and you can bark at them while you do it all - whatever your imagination can muster.

I drew out where I wanted fences on a piece of paper so I could organize the paddock layout in my head. After sewing the buttons under a piece of tulle, I laid strips of rik rak down for the fences and sewed them down, leaving it open where the gates were to go. Cut the rik rak where the gates go and melt the ends with a match to stop it unraveling.

Done!


One of the other pages contributed was an entirely hand sewn Little Bo Peep - now that is dedication! One sheep is detatchable with velcro, and you can trace over the different paths to find which one leads home.


Our swap host made a cupcake puzzle and pocket. The pocket was made by laying two pieces of fabric over each other, turning the top edge of the top one down and adding a piece of velco to each respective side, then stitching around the three edges of the top layer of fabric - I loved the idea because it was really easy!


There were three tangram pages done in this swap. They were all made with an embroidery machine. This first one is of a rabbit. The theme went great with this bunny material I had, so I made a pocket for the pieces like the one made for the cupcake. Unfortunately I forgot to get a photo of this page with the pieces laid on it before it got given to it's new owner...


The next tangram puzzle was of a cute little house.


And the last tangram puzzle was of a horse. I love the colours chosen for this page. It came with it's own pocket built into the page by sewing down three edges of the horse tangram outline which had been embroidered onto felt.


My sister, whose Fairy Tale Quiet Book you have already seen, contributed this I-Spy page:


Again, layer two squares of fabric over the top of each other, right sides facing up. She cut an 'x' shaped opening in the middle of the top square of fabric and folded back the edges on them. Folding them back on themselves several times is a good idea to avoid them getting in the way when trying to find items. Then she inserted a smaller square of clear vinyl underneath, sewing around the inside edge, and zig zaging around the outer edges. She used her machine to do the 'Find 10 Things' lettering at the top. Next, she sewed the two squares of fabric together leaving a 1" gap around the edges to allow for binding, as well as a small opening so she could fill the space between them with ten small items and bean bag beans. She was going to use rice, but since we had to post the pages to the host and back, she decided bean bag beans would be a lighter and therefore cheaper option.

The ten items in our I-Spy page are a small plastic baby, a flower button, a Lego block, a wooden leaf picture, a wooden drum picture, a small wooden painted peg, a small glitter button, a wooden cat head picture, a wooden number '2', and a large google eye. In other versions, she has included small plastic bugs and animals. Small shells, gum-nuts, beads, paper clips, and any small, non-sharp household items would also work well.


Here's another of my 8"x8" material pages - the Easy Peasy Lei Flower Quiet Book Page.


Before the pages were made into a book, they made awesome quilts for Elsa.


Find a tutorial link and YouTube clips of how to bind the pages and book together on my page of Quiet Book Making Tips.

How I made a closure after binding my book! Post Binding Quiet Book Closure.


Follow Faith and Felt Obsession on FacebookPinterest and You Tube

Does joining a page swap tempt you? Comment below!