Do you sometimes wonder why you went to so much effort making a quiet book page when your little one prefers the simplest page in the book?
I think this page is suited to a child around the age of four, but older children will still have tonnes of fun with it too. They do need to be old enough for you not to worry about them wrapping the cord around their neck and choking on it if you are going to let them play with it unsupervised, however.
How to make my To The Moon and Back quiet book page:
I used a pen to copy the template onto the back of my velour fabric and sewed zig zag off the edge of the holes after they were cut out, but you could definitely do it before and then cut out the holes too.
I sewed the cord onto the rocket button and then hot glued the loose sections at the back of the button as well, just to make sure it would stay attached and not get in the way when threading. Sew the moon onto your background fabric using zig zag stitch along the outside edge, tucking the other end of the cord under one section. Leave the craters open to allow the rocket to thread it's way in and out through there as well.
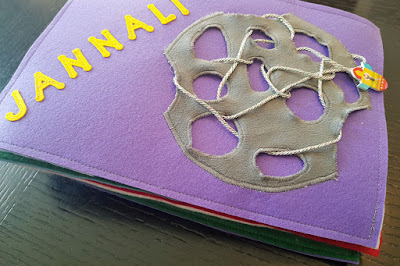
I made this version for a cheeky little girl. Her name is Jannali, which is an Australian Indigenous name meaning "the Place of the Moon". I hope she gets a lot of fun out of it and it keeps her quiet when her Mama needs a break.
I think it made a good front cover.
Join a sew along!
This page is so easy and it comes together very quickly, especially if you use a button for the rocket. We did this page one month in my Facebook Group Quiet Book Sew Along. If you want to join in the fun, join the group, go to the events tab and mark yourself as attending, print the pattern and post your progress photos in event thread. It is a great way to keep yourself motivated, and you can ask all the questions you need and get advice from other quiet book makers.
In Genesis 17, God establishes a covenant with Abram and changes his name to Abraham, and Sarai becomes Sarah.
Memory Verse: “No longer shall your name be called Abram, but your name shall be Abraham; for I have made you a father of many nations.” Genesis 17:5 NKJV.
Materials needed to create the Abram becomes Abraham quiet book page:
5mm ribbon in matching colours to your white and coloured felt
sewing threads to best match the page
diaper hook and loop tape material (like velcro but doesn't wreck felt so much and is wider and can be cut to the size needed) - I bought this (not an afiliate link)
clear plastic - you can use tablecloth plastic or sheet set packaging
scotch tape and paper
hot glue and glue gun
scissors!
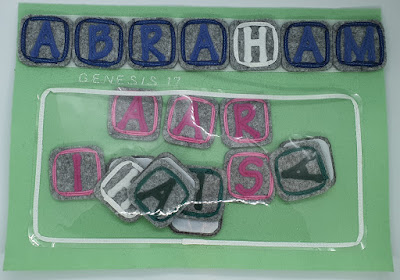
Firstly, cut out as many alphabet blocks as you need for the names you are making from the gray hard felt. I used: YHWH (4 blocks in white), ABRAAM (6 blocks in blue), SARAI (5 blocks in pink), and TALIA (5 blocks in green). You can add your own child's name if it has an "ah" or "ha" sound in it.
Tahlia's toy came in handy to trace around to make the perfect block shape for me
Cut out you letters as required for the blocks above - see my Letter Cutting Hacks post (I used the Sizzix method). Sew them onto the gray alphabet blocks in the center of each block. Work out the length of each ribbon required to trim each block (13cm from memory). Cut the number of lengths needed and melt the ends to prevent fraying. Sew a border around each block using the corresponding colour 5mm ribbon, tucking the end of the ribbon under itself to finish it nicely at the ends.
Cut out the pocket from your clear plastic and trim with ribbon in a simmilar manner as above. Place scotch tape onto your sewing machine foot so the plastic will move through your machine easily. I also place paper underneath part of my sewing machine - see my set-up on my Psalm 46 - Be Still and Know that I Am God Tea Set Quiet Book Page post. Sew the plastic onto your page on three sides leaving the top open to form a pocket. Place it at the bottom leaving room to sew the pages together at the end and enough room at the top for the writing strip.
Cut the writing strip from loop tape material and sew it onto your page at the top.
Cut as many hook tape backings as you need and hot glue to the back of each alphabet block.
Finished! Store blocks back to back in the pocket to minimise dammage that can be done with the hook side of the hook and loop tape material.
Difficulty Level = Difficult
It would be easy except for sewing the ribbons around the corners is a little tricky, but you will get better with practice! Sewing the plastic is very tricky if you don't follow the suggestions of using scotch tape and paper above.
Key Learning Areas and Skills
Genesis 17 - God gave Abram and Sarai new names to show his covenant with them
Spelling - learn to spell the names Abram, Abraham, Sarai, Sarah, and maybe some others
Fine Motor Skills - all quiet books encourage fine motor skill development
Hand-eye Co-ordination - all quiet books encourage hand-eye co-ordination
I heard something about this Bible chapter once and it has stuck with me. I don't remember where I heard it so unfortunately I can't give credit where it is due. It may have been a sermon - I'm not sure. But their words definitely helped inspire this quiet book page.
Basically, they were saying that when God changed Abram's name to Abraham, and Sarai's name to Sarah, He was breathing into their names (and lives). God added the "H" sound from His name YHWH (often translated as Yahweh) to their names. The "ah" sound is the sound made when breathing, so it was as if God was speaking a miracle into their lives. And when God speaks, things happen!
God created the whole universe by speaking. He said "let there be light" and there was light. He made a man out of dust, and when He breathed into him, he became a soul. When God breathed into Abram and Sarai's lives, they had a baby in their old age, even though they both laughed at the idea.
Who But You (Abraham & Sarah)
I had heard this before Tahlia came along, and it definitely influenced how I spelled her name. It HAD to be spelled with an "ah" in it. Many Hebrew names contain an "ah" sound, and I suppose it is only natural since God interfered with the name of the first Hebrew, Abraham.
As I have discussed in more detail in my post Tahlia's Quiet Book - Front Cover and First Page, Tahlia means "dew from Heaven". If I had known that the root word for "dew" in Hebrew was "Tal" beforehand, I might have spelled her name Taliah instead. I have explained all this reasoning to her and occasionally she now likes to spell her name Tahliah! I guess the more "ah" sounds the better hahaha (pun intended)!
I hope this page will become a special one to your child as well, especially if their name is spelled with an "ah" or "ha" too. May God breathe into their life, and yours.