Thursday 30 December 2021

The Quiet Book Bible Project Progress Chart

Here at Faith and Felt Obsession, Tahlia and I have been working on The Bible Quiet Book Project for a little over six years now, so I thought it might be a good idea to give a progress report.

It is a bit of a celebration of achievement for me, and also I hope it will be a bit of motivation too. I am no-where near where I would like to be with the progress, but it is still worth celebrating.


I feel like I have done so much more (and I have), but when I review what has been posted, I realise that it looks pretty puny. I have made many more pages than you can see from what I have published.

I have been keeping a document with each Bible Book and Chapter listed in a table, with idea notes and links to websites and things. But it is quite a large document to scroll through, and I was thinking that it would be awesome to view a summary of progress on one page.

I found a Bible Reading Record which is provided in a PDF form for printing, or as an Excel spreadsheet. The spreadsheet is adaptable to fit your needs, so I have modified it a little. 


Summary:

  • Red squares indicate the Bible Quiet Book page has been made and published for that chapter
  • Yellow squares indicate the Bible Quiet Book page has been made but is yet to be published for that chapter
  • Uncoloured squares indicate the Bible Quiet Book page has not been completed yet for that chapter


There are 1189 chapters in the Bible - and I have a long way to go. These screenshots were taken in October so by the time this post goes live, it will be a little out of date... but you can view the live document here anytime.


You can get your own Bible Reading Record by Matthew Weathers to print and use freely.


Follow Faith and Felt Obsession on FacebookPinterest and You Tube

Comment below on which chapters would you like to see posted or made next!

Thursday 16 December 2021

Matthew 2 - The Wise Men Quiet Book Page

Matthew chapter 2 recounts the story of the Wise Men following the star to find Jesus, King of the Jews.


Memory Verse: “Now after Jesus was born in Bethlehem of Judea in the days of Herod the king, behold, wise men from the East came to Jerusalem, saying, “Where is He who has been born King of the Jews? For we have seen His star in the East and have come to worship Him.” ” Matthew 2:1-2.

Materials needed to create The Wise Men quiet book page:

Cut out all the pieces for this page and the page itself from the Betty Lukens set. The Betty Lukens FAQ section has posted a cutting tips PDF.

Sew the Betty Lukens page onto the background felt along three sides, leaving the top edge open to form a pocket. Pop the pieces inside the pocket (or better yet - play with them)!

Finished!


Difficulty Level = Easy, plus No Sew version.

A very easy quiet book page!
Just use hot glue wherever sewing is recommended for a no sew version.


Key Learning Areas and Skills

  • Matthew 2 - Learn the story of the Wise Men who came to worship Jesus
  • Imaginative Play - re-enact the Wise Men following  the star
  • Fine Motor Skills - all quiet books encourage fine motor skill development
  • Hand-eye Co-ordination - all quiet books encourage hand-eye co-ordination


Sew the Betty Lukens scene onto your page along three sides
to form a pocket for piece storage


Read the Chapter

Matthew 2

Devotional

Magi... it seems strange that priests from a different religion came to worship Jesus, doesn't it? To find out how the Babylonians came to know prophecies about Jesus, read The Connection Between Daniel and the Christmas Story.


Follow Faith and Felt Obsession on FacebookPinterest and You Tube

What are your biggest questions about the Wise men? Comment below!

Thursday 2 December 2021

Vintage Counting Book

I spied this book from a few pews back in a little church I visited while on holidays a couple of years ago. After the service finished I went and spoke to the lady who owned it, who graciously allowed me to photograph it to share with you all. As you can see, I took the photos right there on the pew.


I was informed that this busy book was around 30 years old. I find it fascinating how quiet books have developed through time, and love to see the classic pages show up so often in the past, and then see the myriad of pages around today.


The page for number 1 is a bird in a birdhouse which is attached to a string to stop it from being lost.


I took a close-up of the inside cover. It looks like the book may have been made from a kit of some kind, titled "Counting Book" by WV Designs. I looked them up but didn't find anything relevant. If know any information, please let me know if the comments.


For a little history on quiet books and the classic pages, you can read my post The Evolution of Quiet Books.


Page 2 is a clown face with what I think is two ears to button on, as well as a bell and ribbon to tie.

Page 3 is ice-cream scoops, although one has been lost over the years.


Page 4 is a turtle with a zipper back for baby turtles to be stored. It looks like a few of them are missing too.

Page 5 is an elephant holding five balloons.


Page 6 has six button-up flowers.

Page 7 is a Noah's ark with seven animals inside.


Page 8 is a fishing net with eight fish inside.

Page 9 has nine shapes to match.


I imagine Page 10 originally had ten kids praying. I have been wondering what the heck the other page was, but I actually think I worked it out...

I think it is a bed and a mat that the kids can kneel on so they can say their prayers before bed.


Finally, I thought I would show you how the book has been bound. It has a strip of ribbon sewn down the spine with gaps to allow split rings to rest in place to house the back-to-back sewn pages with inserted grommets.


Tahlia - Telling It on The Mountain


I hope you enjoyed this trip down memory lane.


Follow Faith and Felt Obsession on FacebookPinterest and You Tube

Which is your favourite page in this vintage counting book? Comment below!

Thursday 18 November 2021

Genesis 26 - The Kiss (She is my Sister III) Quiet Book Page

Another lie, another blessing. What a theme for Genesis chapter 26 - but the ultimate theme is that nothing will stop Messiah from arriving as God planned.


Memory Verse: “Now it came to pass, when he had been there a long time, that Abimelech king of the Philistines looked through a window, and saw, and there was Isaac, showing endearment to Rebekah his wife. Then Abimelech called Isaac and said, “Quite obviously she is your wife; so how could you say, ‘She is my sister’?”” Genesis 26:8-9 NKJV.

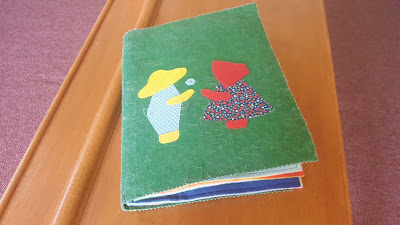
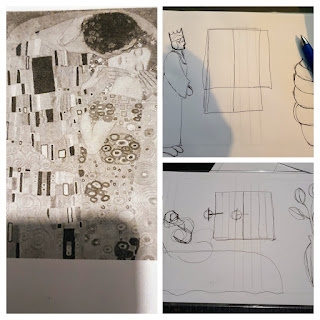
Materials needed to create the The Kiss (She is my Sister III) quiet book page:

  • A4 felt background sheet - I used light blue
  • sewing thread to best match the page
  • my free Genesis 26 - The Kiss (She is my Sister III) Bible Quiet Book Template Pattern 
  • felt in motley grey, white, green, purple, yellow, orange, dark brown, and two skin colours
  • three gold decorative materials to fit in with The Kiss painting by Gustav Klimt (go for circular pattern for the dress, and angular pattern for the tunic)
  • small green trim
  • tiny blue embroidered flowers (or cut some like I did) or you could actually embroider them
  • small scrap of narrow brown rik rak
  • clear craft glue if using decorative material which is likely to fray - I used polyacetic acid & ethylene resin based glue
  • hot glue gun and glue
  • one jewellery toggle clasp set in gold - I bought this (not an affiliate link)
  • white 4mm satin ribbon
Firstly, cut out the square background for "The Kiss" out of grey marle felt. Cut out your blanket out of the decorative gold fabric chosen and glue it in place on the grey marle square. You can use the template to ensure it is glued in the correct position. Once dry, sew along the edge of the gold fabric with a super-fine zig-zag stitch to ensure it doesn't fray.


Repeat this process for Issac's tunic. Then sew down a piece of orange felt for Rebecca's hair. I cut out a section where her face was to go, but I recommend not doing that and just sewing her face over the top of her hair. Again, use the template to position everything. 


Next, cut out the rest of the pieces for "The Kiss" and position them on your canvas to make sure they fit together well. Sew down Rebecca's face and Issac's head. I also tried to line up the circles on Rebecca's dress with the circular patterns on the dress of "The Kiss".


Because my circular gold pattern fabric was quite translucent, I layered it over the top of yellow felt. I glued two layers to the felt, then trimmed and cut the slit through the two top layers again to allow the arm to pass through.


Sew the pieces down in the following order: Issac's hands, Rebecca's hand around Issac's neck, Rebecca's arm - ensure that her dress is in position and sew her arm over the top of the dress, folding the sleeve back as in the picture below.


Then continue and sew down Issac's hair and Rebecca's dress. For Rebecca's dress, start at the sleeve and finish at the arm. Glue Issac's sleeve and once dry, follow with another zig-zag edge to prevent fraying. You may notice it was difficult for me to see where the edge was and I got it a little wrong and had to do it again. Happily, I was able to cover the mistake with a blue embroidered flower.


I cut up the blue embroidered flowers to make them smaller to resemble the ones in "The Kiss" and then hot glued them in place. You can also hot glue the small green trim onto Issac's hair at this stage (but I hadn't found something to use at this stage so I actually did it last). I wanted to match the green trim with a green felt for the topiary bush to tie them in together. And then if I used a pale green, I wanted to use a pale purple for King Abimelek and vice versa.


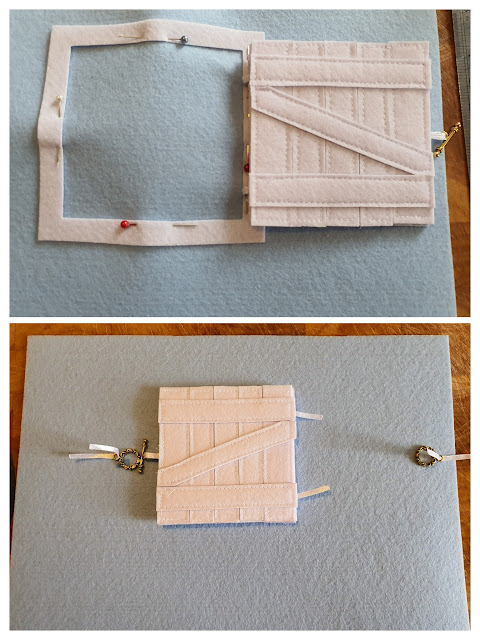
Initially I was going to make the window out of brown felt to resemble wood, but I realised that the painting would look much better with a white border. Also, I figured that if King Abimelek was looking out a Palace window, why wouldn't it have been white-washed. Surely a palace back then would have been decorated nicely. But now I am wondering if he looked through a window into their house instead of looking out a palace window. But then again, it may have been similar to the David and Bathsheba incident, where the king's palace was taller than surrounding houses, and thus when he looked out his window, he could see straight onto the roof of nearby houses. 


Arrange the window pieces onto a square of felt and sew down each plank in order. Make two window pieces (one a mirror image of the other).


Cut four little lengths of ribbon to form hinges and a latch, and melt the edges - see my post on How to Stop Ribbons Fraying. Thread the toggle onto one and fold and secure it to the back edge of the door that you want to open. Sew the hinges to the back edge of the opposite side. 


Then hot glue the other side of the door to this one. Thread the round section of the toggle clasp onto the remaining ribbon and fold it as well. 

Position the window in the middle upper portion of the page and make sure there is enough room for the window to open. I wanted to have a clasp on either side so the window could be latched open or closed, but there just wasn't enough room.


Cut out the window frame and pin it in position over the top of the hinges (but not the toggle ribbon). Pin and sew the inside edge of the frame only. Ensure there is enough ribbon length on the hinges to open and close the window freely.


Now cut out the blue page background from the inside of the window frame. Position "The Kiss" behind it before sewing down the outer edge of the window frame, tucking in the ends of the ribbon hinges and securing the ribbon with the round part of the clasp in place as you go.


Insert the toggle into the clasp to secure the window while sewing the rest of the page.


Cut out your remaining template or pieces and arrange them on your page to get the right position. Sew down the white pot while you have white thread on your machine.


Now you can sew down the pieces of your topiary bush - I couldn't get it to look right and asked Faith and Felt Obsession's Facebook followers to help me. 


Thankfully someone noticed that I had two of the pieces upside down. When that was fixed, it fit together perfectly!


Complete the page by sewing down the pieces for King Abimelek in the following order: neck, head, hand, foot, brown rik rak as a shoe, tunic sleeve, hair, crown. Use your template too line everything up correctly.


Finished!


Difficulty Level = Intermediate

The main difficulty I had was sewing a super-fine zig-zag edge around the paper thin decorative fabric, especially where there was a second layer of the same fabric on top of itself (such as Issac's arm) which made it difficult to see.


Key Learning Areas and Skills

  • Genesis 26 - Lying will get found out!
  • Art Education - learn about the famous painting "The Kiss" by Gustav Klimt - see the article Art Analysis: The Kiss by Klimt by Artsper Magazine
  • Jewellery clasps - open and close the window using the toggle clasps
  • Peek-a-boo - open the window to find out what is behind
  • Fine Motor Skills - all quiet books encourage fine motor skill development
  • Hand-eye Co-ordination - all quiet books encourage hand-eye co-ordination


Read the Chapter

Genesis 26

Devotional

Yet another example of God blessing us despite ourselves. All three instances where a patriarch tells a foreign king that his wife is his sister, in addition to many of the matriarchs being barren for a long time before conception, are meant to portray that God's will WILL succeed despite the enemies best efforts. Jesus was born through a line of lying, wife-sacrificing and barren ancestors. God's strength is made perfect in weakness.


Follow Faith and Felt Obsession on FacebookPinterest and You Tube

How did my re-imagined "The Kiss" by Gustav Klimt go? 

Thursday 4 November 2021

Time to Celebrate: Jubilee Bead Cycle tutorial (plus bracelet craft) for the High Holidays

Often I have ideas brewing in my head for a long time. I've been thinking about the Jubilee Cycle for quite a while now, but when I saw this How the Church tells time post pinned on Pinterest, it immediately sparked the idea to make a floor or coffee-table sized Jubilee Bead Cycle.


In Bible terms, years are measured in seven year blocks called weeks. The seventh year in each block was to be a Sabbath for the land - it was not to be ploughed or planted. Seven lots of seven year blocks (49 years) was followed by a 50th year known as the Jubilee (Yovel in Hebrew). This was a complete cycle. The Jubilee was supposed to see any slaves go free and land sold during the 49 years return to the rightful owners as it was granted to by God after the conquest of Canaan. It is also a picture of what will happen on the New Earth.

I think this could be an appropriate craft for either Rosh Hashanah / Feast of Trumpets or Yom Kippur / Day of Atonement. The civil New Year starts on Rosh Hashanah, but a Jubilee Year is not formally announced until ten days later on Yom Kippur. And whilst Yom Kippur is generally not a fun holiday but rather a solemn fast, when a Jubilee is announced, it cannot help but be celebrated - slaves were to go free, land and property returned to the original owners as given by God, and families were reunited. I believe Jesus is coming again to announce the ultimate Jubilee.

How to make a Jubilee / Yovel Bead Cycle

I bought a large pack of 25mm round wooden beads - you will need 50.

Paint seven beads in one colour to represent the Sabbath years and paint one bead in another colour to represent the Jubilee year. I threaded them onto skewers and cut a 'v' shape into cardboard boxes to lay them in whilst painting and drying them. Round things can be tricky to paint and dry without getting them stuck or the paint uneven.


You can use polish or varnish to seal your beads if you like. I chose to leave mine so I can write Bible references on them if I want to later (which I have talked about at the end of this post).

Once dry, thread them on to a long piece of 2mm elastic in the following order:
  • 6 plain wooden beads, 1 painted Sabbath bead
  • 6 plain wooden beads, 1 painted Sabbath bead
  • 6 plain wooden beads, 1 painted Sabbath bead
  • 6 plain wooden beads, 1 painted Sabbath bead
  • 6 plain wooden beads, 1 painted Sabbath bead
  • 6 plain wooden beads, 1 painted Sabbath bead
  • 6 plain wooden beads, 1 painted Sabbath bead
  • 1 painted Jubilee bead
Tie the ends of the elastic together and trim.

Finished!


Of course, we are also planning to make a quiet book page out of this idea too... 
So we have made a practice one already.


Some people believe that the Jubilee year was actually the same year as the last year of the 49th year, or it overlaps the last half of the 49th year and the first half or the 1st year. They think the Jubilee disrupts the seven year Sabbath cycle and interpret Jesus' parable of the fig tree to relate to Israel in the last days and the dating of the last seven years of Daniel's prophecy which they believe have been cut of and delayed until just prior to Jesus' second coming.

I disagree because:
  1. The Bible specifically says "the fiftieth year"
  2. Pentecost follows a similar pattern, with the celebration occurring on the fiftieth day following a period of seven weeks
  3. The meaning of the word Jubilee relates to a period of 50 years. The Queen Elizabeth's Golden Jubilee did not mean she had been ruling for 49 years!
  4. Jesus' parable of the fig tree related to the dating of the destruction of the Temple in 70 AD, which I hope to discuss in further detail in a future post
  5. The last week of Daniel's prophecy was not cut off, it was an accurate prophecy of the Death of Jesus our Messiah (who was the one cut off - not the week). This is the historical view of this prophecy if you want to look it up in the mean time, but it should also be the topic of a future post.
  6. Including a fiftieth year into a cycle also rounds the seven year cycles up so that they continue to fit nicely into thousand year blocks, ensuring that sets of years remain fitting within a millennium. It is also consistent with the Millennial Day Theory where each day of creation represents a millennium of Earth's history. As Peter says - one day is like a thousand years to the LORD. It allows even measurements of years throughout the ages (an age is 2000 years). There are three ages, then the Sabbath millennium. 
  7. I believe the Jubilee follows the Sabbath and interrupts the Sabbath Year Cycle in order to represent Eternity


We also made a Jubilee Bead Cycle bracelet, which could be used as a follow-up craft for a Bible Class after the kids see the larger version for the story. I panicked a little when I took this photo because I thought for a moment that I had put the beads on in the wrong order. I didn't, it just needs to be flipped over! And the elastic to be trimmed...


I am thinking of writing Bible verses on each wooden bead which can be talked about in order when showing the kids (and adults). I think us adults learn through visual stimuli just as much as the kids...

There are so many examples of seven year periods in the Bible:
  • Jacob working for Rachel, Leah, and his flocks
  • Pharaoh's dreams of the seven years of plenty and the seven years of famine
  • Solomon's Temple took seven years to build
  • The wicked queen Athaliah reigned six years and they were set free from her on the Sabbath
  • Daniel's seventy weeks (works out to 10 Jubilee cycles)
  • Hezekiah records a harvest lasting three years (probably over a Jubilee)... 
  • and I haven't looked into events that might have lasted 14, 21, 28, 35, 42, 49 or 50 years yet!


Follow Faith and Felt Obsession on FacebookPinterest and You Tube

Have you made any other Rosh Hashanah / Feast of Trumpets or Yom Kippur / Day of Atonement crafts? Let me know below!

Thursday 21 October 2021

Genesis 41- Pharaoh's Dreams Quiet Book Page

  In Genesis 41, Pharaoh is sent two dreams and Joseph is pulled from prison to interpret them.


Memory Verse: "Then Joseph said to Pharaoh, “Pharaoh’s dreams are one and the same; God has revealed to Pharaoh what he is about to do." Genesis 41:25 (NKJV).


Materials needed to create the Pharaoh's Dreams quiet book page:

Cut out all the pieces for this page and the page itself from the Betty Lukens set. The Betty Lukens FAQ section has posted a cutting tips PDF.

Sew the Betty Lukens page onto the background felt along three sides, leaving the top edge open to form a pocket. Pop the pieces inside the pocket (or better yet - play with them)!

Finished!


Difficulty Level = Easy, plus No Sew version.

A very easy quiet book page!
Just use hot glue wherever sewing is recommended for a no sew version.


I am afraid this kit pictures corn in Pharoh's dream
rather than grain as is much more likely intended.
A corn can also refer to a kernel of wheat or other grains
and is confused in modern day language.


Key Learning Areas and Skills

  • Genesis 41 - God is in control
  • Imaginative Play - was Joseph scared or confident when he appeared before Pharaoh? How would you feel?
  • Fine Motor Skills - all quiet books encourage fine motor skill development
  • Hand-eye Co-ordination - all quiet books encourage hand-eye co-ordination

Read the Chapter

Genesis 41

Devotional

The chief butler finally "remembers his faults" (not Joseph as requested), but he does get spoken of to Pharaoh. He doesn't include Joseph's innocence in his story as asked (I probably wouldn't either). Nor is the point of his story to help Joseph at all. I mean, I wouldn't be wanting to remind Pharaoh of my previous mis-favour either.

I wonder how much encouragement Joseph's dreams gave him when he was sold into slavery in a foreign land - the very land God had foretold Abraham his descendants would be enslaved in. His condition gets worse before it gets better and Joseph finds himself, not only a slave but a prisoner. Did his dreams still give him any comfort? I guess Joseph may have seen a chance to get out of goal when he was able to speak to the Chief Butler - someone with influence at court. And yet Joseph remains confident in interpreting the dreams of others, even though his own dreams are yet to be fulfilled and appear rather unlikely to come about. 

I enjoy hearing how Joseph structured his speech with Pharaoh. 

Of course, he cleaned up before coming into his presence. But after observing Joseph's favour with God, Pharaoh elevates him even further - even second in command! I can't help but feel that Pharaoh is continuing to represent God here in this chapter, and Joseph, Jesus. 

He clearly delivers the good news first, and promises a favourable outcome before he begins. I wonder at this, because there is clearly not-so-good news to come. But it looks like Joseph is employing the old feedback sandwich technique here. He puts the bad news in between two pieces of good news, and Pharaoh seems humble enough to receive it.

Joseph is only asked to interpret, but he also proposes a solution - a bold move, no? It seems rather rash to suppose that Pharaoh would listen to a suggestion from someone straight out of gaol, but Joseph has obvious confidence. And it may be that his proposal is the exact thing which convinces Pharaoh that his interpretation is true - see the following short post Why did Pharaoh accept Joseph's dream interpretations and not the others'? by Shmuel Kogan.

Another reason Joseph may have been believed revolves around the text of verses 1 and 17. In verse one, the banks of the Nile are not mentioned, but they are mentioned by Pharaoh in verse 17. It is theorised that Pharaoh actually dreamed he was standing on the Nile (a god in ancient Egypt), and in an attempt to hide this embarrassing and sacrilegious fact, Pharaoh says he was standing on the Nile bank. It is suggested that Joseph corrected this (another bold move if true), thus Pharaoh could see that Joseph had knowledge from God - see Why did Pharaoh believe Joseph's dream interpretation?

Whatever the reason/s Pharaoh believed Joseph, we can have confidence that God is in control, able to influence world leaders, and churn out miracles in the face of dire circumstances. We also can have the confidence of Joseph when we are putting our trust in the LORD.


Follow Faith and Felt Obsession on FacebookPinterest and You Tube

Has a dream from God changed your life? Comment below!

Thursday 7 October 2021

5 Ways to Measure and Cut Quiet Book Pages

Which is the best way to measure and cut fabric for quiet books is a common question people ask when they are thinking of starting to sew a quiet book for the first time. I have compiled a few examples below so you can choose the method that suits you best.


Of course, for all the methods, it is best to wash and iron the fabric before cutting to ensure it doesn't shrink afterwards.


1 - Fold and Cut

Simply fold your material into squares (or rectangles depending on the size book you want to create) and cut along all folds. This works well for when you want to use the same fabric for all the pages of your busy book. If you want different fabric for each page, another method will suit you better.


2 - Template Drawing

This is the method I use. I have decided on the sizes I want to use a lot and have made templates out of some cardboard I had laying around. Then depending on how precise I want to be, or how slippery the fabric is, I simply place it on my fabric and either cut around it, or draw on the fabric and then cut using plain old scissors.

You can just use a kid's picture book to get the sizing right too. If you look at the age recommendation on the book, it will give you an idea of what a good page size for that age looks like. Just remember to cut extra for the hem.


3 - Quilting Ruler and Rotary Cutter

If you want to do a lot of fabric cutting, you may want to invest in some tools. This method is easier on the hands if you are finding you get strains, or you have arthritis or such.


4 - Clip and Rip

This method ensures that your fabric is cut straight along the grain, and is rather quick. You may not get as many squares out of your fabric as you thought though. The video demonstrates how to make strips, but you can definitely cut the other sides of the squares in the same way.


5 - Laser Cutting Machine

This last method is of course very expensive and is therefore suited to large scale production, which I am guessing most of my readers are not going to be into. But I know you are all going to be drooling in wishful thinking like I am! Of course, this is an example of the detailed cuts which can be done, but you can also cut plain boring background pages this way too.


Which method suits your needs best? Have I missed a method? I'd love to hear about it.


Follow Faith and Felt Obsession on FacebookPinterest and You Tube

How do you cut your pages? Comment below!

Thursday 23 September 2021

Revelation 14 - The Three Angel's Messages Quiet Book Page

The Three Angel's Messages of Revelation 14 are a reminder that God is our creator who alone deserves our worship, and that judgement is coming for those who don't.


Memory Verse: “Then I saw another angel flying in the midst of heaven, having the everlasting gospel to preach to those who dwell on the earth—to every nation, tribe, tongue, and people— ” Revelation 14:6 NKJV.


Materials needed to create the The Three Angel's Messages quiet book page:

  • A4 felt background sheet - I used purple
  • this image to use as a template/pattern
  • felt in dark blue and white
  • white 9mm ribbon
  • gold 9mm ribbon
  • three gilded pearl shank buttons - I bought this (not an affiliate link)
  • black iron-on Velcro material (or use with double-sided interfacing)
  • The hook side of some Velcro or diaper hook and loop tape material (like Velcro but doesn't wreck felt so much and is wider and can be cut to the size needed) - I bought this (not an affiliate link)
  • Hot glue gun and glue
  • sewing threads to best match the page
  • marker and scissors!
Firstly, cut out an angel (you can sharpen the shape between the back of the head and the first wing a little) and the sections of the Earth to use as a template or pattern. 

Also cut out the entire Earth on the outside line. Use this to cut a circle out of your black iron-on velcro material. 

Cut about three 25-30cm lengths from the gold ribbon and melt the edges to prevent fraying - see my post on How to Stop Ribbons Fraying. Sew a buttonhole at one end of each (do a few practice ones first - you may find it easier to make the buttonhole and then cut the ribbon shorter). Alternatively, you could make ribbon loops at the end instead of a buttonhole. I make a larger buttonhole than I would for clothes to make sure it is easy to do and undo. I also marked where I wanted the buttonhole to start with a pen so I could line it up easily.


Place the opposite ends of the ribbon underneath the Velcro earth in the bottom left area with the backing paper removed. Make sure the buttonhole ends of the ribbon line up with where you want to place the buttons at the top right of the earth. 


Ensure the earth is in the centre of your page before ironing it down. Use the lowest iron setting that you can to iron it on to your background page. Mine melted slightly in one spot, but it still works and you can't notice it under the puzzle. Use a tight zig zag stitch to finish around the edge. 


Sew your buttons to the top right of the earth - you can use pins to position them correctly.

Trace three angel shapes onto your felt and cut them out. Sew some white ribbon onto the right side just below their wings along the sides of the angel (not through their middles) to form a slot to thread them onto the gold ribbon later. Place the angels onto white felt wrong side down, tucking the ribbon ends between the two layers of felt and sew them down. Cut them out and thread each of them onto a length of gold ribbon so that the angels can be lined up across the Earth.


Cut out the Earth sections from your dark blue felt. Place the wrong sides onto some more dark blue felt, sew them down and cut them out. Cut some diaper hook fabric in sections slightly smaller than these and hot glue them to the back sides. I actually sewed them on first and then had trouble sewing the blue sections to each other, so I don't recommend that. Arrange them like puzzle pieces onto the black Velcro material.

Finished! 

Difficulty Level = Intermediate

The hardest part of this page is cutting out the little holes in the angels - use some sharp cuticle scissors to help with these sections.

Key Learning Areas and Skills

  • Revelation 14 - It is wise to listen to the Three Angel's Messages:
    1. everlasting gospel preached to the whole world, for the hour of God's judgement has come
    2. Babylon the great has fallen because she caused all nations to drink the wrath of her fornication
    3. If anyone worships the beast, and receives it's mark, they will drink the cup of the wrath of God
  • Imaginative play - slide the angels up and down the ribbon as they fly around the Earth giving their messages
  • Puzzle - sort out the arrangement of the Earth sections
  • Fine Motor Skills - all quiet books encourage fine motor skill development
  • Hand-eye Co-ordination - all quiet books encourage hand-eye co-ordination


Read the Chapter

Revelation 14

Devotional

The three angel's messages remind me a lot of Noah's preaching. Or at least how I imagine the years leading up to The Flood. Noah had an urgent message to share. If everyone would only listen and believe. It was also a message from the God who made the Heavens and the Earth. And at least the animals took notice. I find it difficult to believe that anyone could have been an atheist or agnostic at that stage in Earth's history. But I think what they didn't believe was that God was going to actually punish them. Rather, they felt like "everything was going to continue" as it had since the beginning. 

In the same way, the three angels make reference to God's creative power. Creative power is much more complex than destructive power. Is it easier to paint a masterpiece or burn it? Is it easier to build a house, or blow it up? It takes far greater skill to fashion something, so why would you question God's ability to destroy it? 

Maybe they thought God was too soft, but let me assure you, Jesus had a tradie's beard, not a Soy Boy one. 


Rev 14:6-12 in song - 3 Angels Messages


Today, people believe that everything will continue until either we destroy ourselves, or we evolve enough or develop better technology to survive under harsher conditions. Not many are expecting the soon return of Jesus. But, in the same way that the World was destroyed the first time, the end of the second is decreed. Better to listen to the Good News of the three angels - for indeed it is good news if you are saved from the destruction due Babylon (who has already fallen). We know the outcome, Jesus already scored the winning goal and demonstrated His ability to raise from the dead. If you know which is the winning side, why not join it?!!


Follow Faith and Felt Obsession on FacebookPinterest and You Tube

What do you like about this page or what might you do differently? Comment below!