Do you sometimes wonder why you went to so much effort making a quiet book page when your little one prefers the simplest page in the book?
I think this page is suited to a child around the age of four, but older children will still have tonnes of fun with it too. They do need to be old enough for you not to worry about them wrapping the cord around their neck and choking on it if you are going to let them play with it unsupervised, however.
How to make my To The Moon and Back quiet book page:
I used a pen to copy the template onto the back of my velour fabric and sewed zig zag off the edge of the holes after they were cut out, but you could definitely do it before and then cut out the holes too.
I sewed the cord onto the rocket button and then hot glued the loose sections at the back of the button as well, just to make sure it would stay attached and not get in the way when threading. Sew the moon onto your background fabric using zig zag stitch along the outside edge, tucking the other end of the cord under one section. Leave the craters open to allow the rocket to thread it's way in and out through there as well.
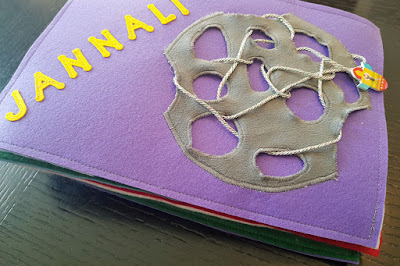
I made this version for a cheeky little girl. Her name is Jannali, which is an Australian Indigenous name meaning "the Place of the Moon". I hope she gets a lot of fun out of it and it keeps her quiet when her Mama needs a break.
I think it made a good front cover.
Join a sew along!
This page is so easy and it comes together very quickly, especially if you use a button for the rocket. We did this page one month in my Facebook Group Quiet Book Sew Along. If you want to join in the fun, join the group, go to the events tab and mark yourself as attending, print the pattern and post your progress photos in event thread. It is a great way to keep yourself motivated, and you can ask all the questions you need and get advice from other quiet book makers.
In Genesis 17, God establishes a covenant with Abram and changes his name to Abraham, and Sarai becomes Sarah.
Memory Verse: “No longer shall your name be called Abram, but your name shall be Abraham; for I have made you a father of many nations.” Genesis 17:5 NKJV.
Materials needed to create the Abram becomes Abraham quiet book page:
5mm ribbon in matching colours to your white and coloured felt
sewing threads to best match the page
diaper hook and loop tape material (like velcro but doesn't wreck felt so much and is wider and can be cut to the size needed) - I bought this (not an afiliate link)
clear plastic - you can use tablecloth plastic or sheet set packaging
scotch tape and paper
hot glue and glue gun
scissors!
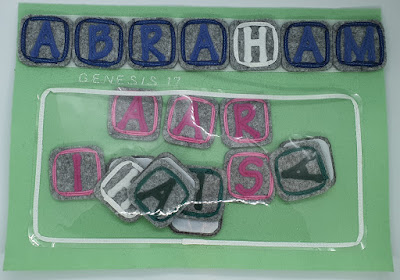
Firstly, cut out as many alphabet blocks as you need for the names you are making from the gray hard felt. I used: YHWH (4 blocks in white), ABRAAM (6 blocks in blue), SARAI (5 blocks in pink), and TALIA (5 blocks in green). You can add your own child's name if it has an "ah" or "ha" sound in it.
Tahlia's toy came in handy to trace around to make the perfect block shape for me
Cut out you letters as required for the blocks above - see my Letter Cutting Hacks post (I used the Sizzix method). Sew them onto the gray alphabet blocks in the center of each block. Work out the length of each ribbon required to trim each block (13cm from memory). Cut the number of lengths needed and melt the ends to prevent fraying. Sew a border around each block using the corresponding colour 5mm ribbon, tucking the end of the ribbon under itself to finish it nicely at the ends.
Cut out the pocket from your clear plastic and trim with ribbon in a simmilar manner as above. Place scotch tape onto your sewing machine foot so the plastic will move through your machine easily. I also place paper underneath part of my sewing machine - see my set-up on my Psalm 46 - Be Still and Know that I Am God Tea Set Quiet Book Page post. Sew the plastic onto your page on three sides leaving the top open to form a pocket. Place it at the bottom leaving room to sew the pages together at the end and enough room at the top for the writing strip.
Cut the writing strip from loop tape material and sew it onto your page at the top.
Cut as many hook tape backings as you need and hot glue to the back of each alphabet block.
Finished! Store blocks back to back in the pocket to minimise dammage that can be done with the hook side of the hook and loop tape material.
Difficulty Level = Difficult
It would be easy except for sewing the ribbons around the corners is a little tricky, but you will get better with practice! Sewing the plastic is very tricky if you don't follow the suggestions of using scotch tape and paper above.
Key Learning Areas and Skills
Genesis 17 - God gave Abram and Sarai new names to show his covenant with them
Spelling - learn to spell the names Abram, Abraham, Sarai, Sarah, and maybe some others
Fine Motor Skills - all quiet books encourage fine motor skill development
Hand-eye Co-ordination - all quiet books encourage hand-eye co-ordination
I heard something about this Bible chapter once and it has stuck with me. I don't remember where I heard it so unfortunately I can't give credit where it is due. It may have been a sermon - I'm not sure. But their words definitely helped inspire this quiet book page.
Basically, they were saying that when God changed Abram's name to Abraham, and Sarai's name to Sarah, He was breathing into their names (and lives). God added the "H" sound from His name YHWH (often translated as Yahweh) to their names. The "ah" sound is the sound made when breathing, so it was as if God was speaking a miracle into their lives. And when God speaks, things happen!
God created the whole universe by speaking. He said "let there be light" and there was light. He made a man out of dust, and when He breathed into him, he became a soul. When God breathed into Abram and Sarai's lives, they had a baby in their old age, even though they both laughed at the idea.
Who But You (Abraham & Sarah)
I had heard this before Tahlia came along, and it definitely influenced how I spelled her name. It HAD to be spelled with an "ah" in it. Many Hebrew names contain an "ah" sound, and I suppose it is only natural since God interfered with the name of the first Hebrew, Abraham.
As I have discussed in more detail in my post Tahlia's Quiet Book - Front Cover and First Page, Tahlia means "dew from Heaven". If I had known that the root word for "dew" in Hebrew was "Tal" beforehand, I might have spelled her name Taliah instead. I have explained all this reasoning to her and occasionally she now likes to spell her name Tahliah! I guess the more "ah" sounds the better hahaha (pun intended)!
I hope this page will become a special one to your child as well, especially if their name is spelled with an "ah" or "ha" too. May God breathe into their life, and yours.
In Genesis 19, Sodom and Gomorrah are destroyed and Lot's wife turns into a pillar of salt, but Lot and his two daughters escape.
Memory Verse: “At dawn the next morning the angels became insistent. “Hurry,” they said to Lot. “Take your wife and your two daughters who are here. Get out right now, or you will be swept away in the destruction of the city!”” Genesis 19:15
Materials needed to create the Sodom and Gomorrah quiet book page:
A4 felt background sheet - I used cream
felt scraps in brown, orange, yellow, gray, light blue, sparkly white (or white plus glitter glue), and various other colours
This quiet book page was inspired by a page from Glued To Glory's Quiet Book #16: Old Testament Bible. If you want to simplify this page - head over to her site and take a look. Heck, just take a look anyway! The more inspiration the better.
Cut out a section of brown felt to cover the bottom half of your page and sew a horizontal buttonhole in matching thread towards the top of the brown and just to the left of the middle of the page. (You can use the template to line up where other things may be positioned to work out where a good spot is. This will form the pop stick slot for Lot's wife to be inserted in and out of so it should be wide enough for that but not much wider to stop her from moving around too much.) Then sew the brown felt to the bottom of the page around all edges.
Sew down your sun, the buildings, three little people and the right mountain. Double the felt for the left mountain and sew it down leaving the cave mouth open.
Cut out Lot's wife out of yellow felt and sew her down around all edges except the bottom to a piece of sparkly white felt (or add sparkles with glitter glue later), making sure she is facing the right direction for each colour. Cut her out and insert a pop stick, securing it and the bottom edge of lot's wife with hot glue.
Sew down the city in rows, adding your fire and brimstone furry yarn over the top of the two rows of city using zig zag stich before finishing with the city wall.
Finished!
Difficulty Level = Intermediate.
You will need to do a fair amount of hand turning of the wheel on your sewing machine as there are lots of small fiddly pieces.
Key Learning Areas and Skills
Genesis 19 - Learn about where our focus should be - on where we are going (Heaven) rather than love of our current situations. Also, there is a Tale of two cities going on here - repentance is the difference between the different treatment of Sodom and Gomorrah and Nineveh.
Inserting - insert Lot's wife into the buttonhole, then pull her out, flip her over and insert again! Explore the cave with your finger.
Imaginative play - Lot's wife runs away but looks back and becomes a pillar of salt
Fine Motor Skills - all quiet books encourage fine motor skill development
Hand-eye Co-ordination - all quiet books encourage hand-eye co-ordination
Verse 13 talks about the outcry that has reached the ears of the LORD against Sodom. The things reported to have been done there are recorded in Ezekiel 16:49-50. "Now this was the sin of your sister Sodom: She and her daughters were arrogant, overfed and unconcerned; they did not help the poor and needy. They were haughty and did detestable things before me. Therefore I did away with them as you have seen." Whilst God longs to forgive and have all come to repentance, Sodom and Gomorrah were destroyed as a warning that sin results in death. You can read a thorough explanation of the text at What was the sin of Sodom and Gomorrah? by Greg Koukl.
Had Lot taken the warning more seriously, would his wife have looked back? Yes, she was sorrowing for her other children who had not left with them, but should we also loose our salvation because someone else chooses not to accept it? Did she end up any happier? She showed that she cared more for her treasures that she left behind than for the favour God had showed her.
Jesus said that the people of his day were worse than those of Sodom - it is because they claimed to follow God, yet their lives did not reflect that. It seems to me that the Third Commandment applies to Christians more than anyone else. I know that mis-using the Holy names of God as swear words is not good, but it seems worse to me to claim that you are a Christian and then not live up to that claim as of course I frequently don't. People who use God's name as a cuss word probably don't even believe in God and therefore it is not such bad intent. But to actively say "I follow Christ" and then live life like there are no consequences to sin is to malign His name so much worse. We are giving Christ a bad name. People think that if that's what Christianity is like then I want no part of it, and we can hardly blame them.
Rather than miss out because others we care about are missing out, we should use our witness to encourage others to take the warning seriously. This world is destined for destruction, and we should make every effort to influence those we care about to accept God's love and provision of salvation. As the song Freely, Freely by Carol Owens says "Go in My Name and because YOU believe, others will know that I live."
This DIY felt board set has been a real hit! I think for the lower primary aged kids numbers and letters become pretty fun.
My sister says her kids wouldn't even know what a Hymn Board is. Even though they attend church every week, they go to a church where hymns are seldom played, contemporary Christian music dominates, and the words are projected onto a screen.
Fortunately for us, we often visit smaller country churches where a hymn board is still mounted on the wall and a Hymnal can be found tucked into the back of a pew.
I have been singing Tahlia to sleep with hymns since she was born so she knows a few and it melts your heart to hear her randomly singing them.
Because we believe in keeping the fourth commandment, our church also has a sunset times board on the opposite side of the pulpit to the hymn board. In Genesis God says there was evening and there was morning, the first day and so on. Like the Jewish people, we know that the day begins and ends at sunset. So it is handy to know what time sunset is so we know when Sabbath is coming.
I had intended that these would be part of a church (as opposed to Bible) themed quiet book, where Tahlia could copy the numbers from the board at church and kind of follow along with church each week. And they will probably make it there eventually, but for now we are having lots of fun with them mounted on our felt board like you would find them on a wall at church.
Tahlia has been learning to follow along with the words in a hymnal of late, and I have been encouraging her to flip through and find the right one that is coming up next based on what the hymn board tells us. Apparently that's not so fun... too much like school work I think. But for some reason the Hymn Board and Sunset Times Felt Board Play Set rates high on the fun scale.
How We Made the Hymn Board and Sunset Times Felt Board Play Set
A Sizzix Original and capitals lollipop alphabet/numeral die set or another method of cutting numbers about 2.5 x 3 cm in size - see my post on Letter cutting hacks. (Or you could just print them onto the felt using the sublimation/heat press method and save yourself a lot of sewing - see my post Sublimation Printing on Felt - Test).
1. Use the template to cut out your pieces (for the number cards it would be easier to rule up a piece of white felt and cut them out that way but I included the piece for size reference). I made 63 number cards (six of each number 0-9) and 3 colon cards for displaying the time. That way there is an extra in case one gets lost. My white felt sheet divided into 63, so that is how I decided how many to make. Plus 60 number cards is a common amount if you were to buy a set for an actual hymn board, so I figured there would generally be enough of each number required.
2. Double the thickness of your black runners by sewing them to another piece of black felt and cutting them out.
3. Position your black runners in the positions shown on the next two pages of the template. You can cut out the black runners places on the positioning templates and lay the runners in the position and pin, then remove the template. It doesn't matter if it rips when you take it off.
You could use this pattern to make a sports score board too!
4. Sew the runners down the center for the ticker ones and either the upper or lower edge of the thinner ones to allow the number cards to slide into the track formed.
5. Use an original sizzix to cut out the required letters and numbers and sew in place on the backboard and number cards. I used the centers of the zeros to make the colons for the sunset times.
6. Play with your DIY Hymn Board & Sunset Times Felt Board Play Set!
Baby likes to play too!
If you make one of these please tell us about it below or send us an email with a picture. It would make our day. It actually took me at least 1.5 hours drawing up the template on this one so you guys could download it (not including the design time so I could make it initially) so it would really make it feel worthwhile to see some pictures if you do make one 😍
Rebecca at the Well in Genesis 24 is a beautiful story and every girl's matchmaking dream come true.
Memory Verse: “And when she had finished giving him a drink, she said, “I will draw water for your camels also, until they have finished drinking.”” Genesis 24:19 NKJV.
Materials needed to create the Rebecca at the Well quiet book page:
Firstly, get the printable transferred onto white felt by the sublimation printing and heat press method - see my post on Sublimation Printing on Felt - Test. Print the Rebecca and bucket section in reverse as well so you can glue her back to back.
Cut out the printable picture and both buckets and Rebecca's.
Attach your wool or string to the background felt underneath where your picture will be sewn using zig zag stitch. Go back and forth a few times to reinforce the hold.
Sew down the picture along three sides to form a pocket at the top.
Use the split pins to join each Rebecca to her bucket. Hot glue the buckets together and enclose the other end of the wool or string inside, leaving space for the split pins to remain free to turn. Hot glue Rebecca together, again leaving space for the bucket to swivel between her arms and the bottom edge open to form a finger puppet.
Finished!
Difficulty Level = Easy, plus No Sew version.
A very easy quiet book page! The hardest part is lining up both side of Rebecca when hot gluing (but that's not that hard)!
Just use hot glue wherever sewing is recommended for a no sew version.
Key Learning Areas and Skills
Genesis 24 - God is a good matchmaker!
Imaginative Play - draw water from the well to give the camels a drink
Finger Puppet - Rebecca
Fine Motor Skills - all quiet books encourage fine motor skill development
Hand-eye Co-ordination - all quiet books encourage hand-eye co-ordination
How great are the rewards for being faithful in little.
All Rebecca was asked for was a simple drink of water - something which would have taken one minute max. But she offered to water the camels too. Surely Abraham sent more than his "oldest servant who ruled over his house" with the caravan to Nahor! They could have easily drawn the water for the camels. And in fact there were more servants, although they are not mentioned until after Rebecca is found and secured.
I was wondering how many camels there were - can you guess? I was guessing at least five, probably more - but I read it again and it says there were ten. There was all the presents for Rebecca and her mother and brother to carry, plus a bride price, food for the camels and servants to last a good portion of the journey, and possibly camels to ride for the servants. It seems to me that this trip was an urgent one. Everything happens in a rush!
Abraham asks and in the next sentence, Eliezer has left and arrived. Before he finishes praying, Rebecca has appeared. He "runs" to her and she "quickly" lets down her pitcher. She "runs" home to make arrangements for him to stay and her brother "runs" out to invite him in. Then he refuses to eat before he tells them his mission, and after being asked to stay ten nights he will only agree to stay one before returning home.
Giving Eliezer a drink would have fulfilled his request, and is more than Rebecca was obligated to do. But to offer to water ten camels must have taken quite a while even though she did it "quickly".
The below podcast by experienced people says that a thirsty camel can drink between 100-150 liters of water in around 15 minutes. So to water 10 camels, Rebecca might have had to draw 1000-1500 liters of water. I imagine that Rebecca could lift no more than 20 liters at once, so she would have to draw water at least 50-75 times in order to draw that much water which must have taken a couple of hours. It was no casual offer that she made.
How Much Water Does a Camel Drink?
by Camel Connection
Rebecca is not the only virtuous person we can learn from in this chapter. Eliezer is pretty impressive too. Although he is not named in this chapter, Abraham thinks in chapter 15 that Eliezer his servant will be his heir. Eliezer must have known this at the time too. Not only does he not become hurt or offended when he is no longer heir, but he is the one trusted to secure a Godly wife for his replacement Issac. What faithfulness! We can learn so much about how to behave when we are disappointed by not receiving what we thought we were going to. Like when we don't get the promotion we thought we deserved. God has a plan, and often it is not our business!
Although PanPanic ensured there was no Easter Hat Parade at school this year, they still held an Easter Hat Slideshow.
And we did our own parade at home.
Why we made the Butterfly Resurrection Easter Hat
As always we take the opportunity to both learn about Jesus' sacrifice and develop faith-sharing skills. I think it is important to practice sharing your faith from a young age. There are too many who shy away from proclamations - but I want to make sure Tahlia grows up to be bold and unashamed of the Gospel.
This year our Easter bonnet featured an empty tomb with a myriad of butterflies. Butterflies have long been a symbol of the resurrection because caterpillars seem to die in their cocoons and emerge shortly thereafter possessing a far superior body. We included so many butterflies as Jesus' resurrection gives us the reassurance that He is able to do the same for anyone who places their hope and trust in him.
Inside the tomb we see what Mary saw described in John chapter 20. I have heard that the angels sitting at either end of the stone where Jesus had been laid are supposed to remind you of the Ark of the Covenant which had two angels on top with their wings touching each other. On top of the ark between the angels was called the Mercy Seat and this was where the Shekinah Glory of God's presence shone. We tried to emulate this in a way, but the light was also supposed to give the impression of angels rejoicing and reflecting the angel-party mood I imagine was going on in Heaven despite the disbelief and grief on Earth.
How we made the Butterfly Resurrection Easter Hat
Two of my favourite butterflies
This video gives the basic gist of how we made the base of our butterflies from pipe-cleaners, although we did make a few changes. Next we wrapped the wings in lace and secured it with hot glue. We also added beads to the ends of their feelers. I knew we would need a lot, so we started making these well before Christmas, but even so we did get a bit of help from some friends to make so many. Tahlia hot glued all bar one of the little ones in place and did an excellent job don't you think?
We had one little one left over so she did wear it as a ring.
The large butterfly on top was also made from pipe-cleaners and wrapped in lace.
We started the layers from the outside edges first so that each layer overlapped the next without getting in the way.
This hat is the third in a series where we have re-used the same paper mache hat we made in Kindergarten. After removing last years beautiful felt flowers we gave it a quick vacuum to remove the dust and debris.
This year we enclosed the arch/doorway from the last two years to form the empty tomb. We marked where we wanted the tomb to go to and used plastic shopping bags to pack the space to be filled. Then we covered that section with three or so more layers of paper mache before removing the shopping bags and covering from the inside as well.
We also marked the edge of the entrance to the tomb on paper and formed a base for the stone out of cardboard cereal box. This got covered with layers of paper mache too.
The tomb and stone were painted inside and out in white by Tahlia, and I touched up the sky and grass after the damage done by removing the felt flowers from last year.
I had been hoping to find a frosted plastic box in a jewelry store but had no luck. Happily, and perhaps Providentially, we attended a wedding a few weeks before the hat had to be finished. The wedding favours came in a perfectly sized white box with a transparent lid. I managed to take a photo for you with one chocolate left in there before they all got demolished. Each box had two chocolates inside originally!
After removing the divider, three LED rings fit exactly inside the box - we bought this 6 pcs LED Rubber Rings from AliExpress (not an afiliate link). I bought extra in case some did not work and I'm glad I did as all the rest broke very quickly. The box is fixed in place with blu-tak so it can be removed to allow the rings to be turned on and off.
The angels were bought from a craft store but I have seen similar in dollar stores too - they were hot glued in place.
Psalm 28 was written by David and praises God who rescues him when he puts his trust in the LORD.
Memory Verse: “Save Your people,
And bless Your inheritance;
Shepherd them also,
And bear them up forever.” Psalm 28:9 NKJV.
Materials needed to create the Shepherd Them quiet book page:
A4 felt background sheet - I used tan
Betty Lukens Felt book 01 Bible Stories available at Koorong
sewing thread to best match the page
scissors!
Cut out all the pieces for this page and the page itself from the Betty Lukens set. The Betty Lukens FAQ section has posted a cutting tips PDF.
Sew the Betty Lukens page onto the background felt along three sides, leaving the top edge open to form a pocket. Pop the pieces inside the pocket (or better yet - play with them)!
Finished!
Difficulty Level = Easy, plus No Sew version.
A very easy quiet book page!
Just use hot glue wherever sewing is recommended for a no sew version.
Key Learning Areas and Skills
Psalm 28 - Praise God that He is willing and able to hear our prayers, save and shepherd us
Imaginative Play - make the lambs play and eat the grass, play the harp with David
Fine Motor Skills - all quiet books encourage fine motor skill development
Hand-eye Co-ordination - all quiet books encourage hand-eye co-ordination
We all know that we don't deserve to have the Master of the universe listen to our beck and call. And yet this Psalm is all about praising Him because He hears us.
The sole reason given in this Psalm that God answers our prayers is that we trust Him. He loves to come through for us because of that.
It's been a while since I did an Easy Peasy page - but who doesn't like it when a quiet book page comes together quickly?
Don't get confused with an octopus quiet book page where there should only be eight tentacles - jellyfish can have lots! I must have a little obsessive compulsive disorder because it really grates on me when a counting page only goes up to eight. Admittedly I did make one that only goes up to eight, but in my defense that wasn't the primary purpose of the page - see Genesis 28 - Jacob's Ladder Quiet Book Page.
My jellyfish is a simple semi-circle. I used one of the rows from my Malachi 4 - Sun of Righteousness Quiet Book Page template and lined it up along a straight edge of felt and only cut around the outside edge.
Then I cut lengths from a 3mm white ribbon and threaded beads on (1-10). I made a card to stick the lengths of ribbon to so they would be evenly spaced when I went to sew them.
Then I pinned and sewed down the ends of the ribbons using zig zag stitch and angling in the two at either end so they would fit under the head of the jellyfish.
Finally, I sewed down the head of the jellyfish covering the ribbon ends and trimmed it with double gathered lace. This adds a touch and feel element to the page.
I am not sure I am a fan of the look with the looped tentacles... what do you all think? Although I don't think the ribbon would be thick enough when knotted to keep the beads on if they weren't.
Some variation ideas include:
Touch and feel tentacles made from various ribbons and trims - these can be curled using a hair iron or wet and let to dry around a pencil etc
Beads inside mesh tubing - If you look closely at this pinterest pin, Elena Rihsi has threaded the beads onto a thin cord before inserting them through the mesh cord. That way if the mesh breaks, the beads don't go anywhere! Genius.