Thursday, 6 June 2019

How to re-size printable quiet book templates to fit your page size

Do you need to re-size a template to fit your quiet book page size? There are so many ways you can adjust a printable download to fit.


1. Adjust the printing options from your computer.

Keep in mind that there are different ways to print from your computer -
  • Often you can print directly from internet file storage such as Google drive
  • You may choose to download an image or PDF and print directly from your computer image storage
  • After downloading, you can also choose to open your file in Adobe or your Word processor and print from there
  • Again, you can download your image and open it in Paint, Photoshop or another editing program where you can edit and then print


In the above example from Google Drive, by clicking on the more settings section, there are four ways to adjust the size of your file:

a) You can adjust the paper size by choosing another option - A5 will print on A4 paper at half the size, etc.

b) You can adjust the pages per sheet. If you choose 4 pages per sheet and also choose to print four copies, you will get four copies of your file - one printed in each quarter of your page.

c) You can adjust the scale using the fit to page box - this adjusts the size slightly and may prevent some edges getting cut off.

d) You can adjust the scale using the number box with arrows. This adjusts as a percentage of the original image and will allow you to reduce and enlarge the image (by going above 100). It is easy to adjust an image to the exact size you wish using this method.


2. Photocopiers often have a reduce and enlarge button which you can adjust using a percentage value.


3. Of course if you only have an A4 printer or photocopier and need to print in A3 or another larger size, you could take the image into a printing service shop and ask them to enlarge it for you.

The Print & Copy Shop, Lower Main Street, Ballybofey
© Copyright Kenneth Allen and licensed for

reuse under this Creative Commons Licence.


I was inspired to write this post because someone in a quiet book sew-along I am running is making A5 sized pages. That is half the size of my normal templates, so I thought I might be able to make it easier with some instructions on how to change the size of your printables. I often use these methods when I use a colouring page as a quiet book pattern, such as when I made my Psalm 46 - Be Still and Know that I Am God Tea Set Quiet Book Page. I printed multiple tea cups at a reduced size on one sheet of paper adjusting the printing options on my computer using option b) above.


Follow Faith and Felt Obsession on FacebookPinterest and You Tube

Let me know if this has helped you out with re-sizing your printable templates!

Thursday, 23 May 2019

Hand Stitched Quiet Book Cover

I recently saw a hand-stitched quiet book cover which someone had made their grand-daughter. It was so lovely, I had to share it with you all.


I think you will agree, the design is very simple, but it looks stunning.

The pages are made from one or two of the Betty Lukens quiet book kits (not an affiliate link) which I have featured before in several posts:


This time however, the instructions for gluing pockets on the reverse of the pages has been followed.

When the book is put together this means that all pages are stacked on top of each other facing up and then bound. The original instructions ask you to hole punch the felt and run string through the stack, but this book has been bound very wisely ignoring that portion of the instructions!


Instead, it looks like the stack has been hand stitched together first and then the tightly fitting hand stitched cover has been attached to the stack. This allows decorative stitching to be used on the outside and solid-hold stitching to be used on the spine underneath.

My other posts on how to bind quiet books include:


Follow Faith and Felt Obsession on FacebookPinterest and You Tube

Which binding method appeals to you most?

Thursday, 9 May 2019

Malachi 4 - Sun of Righteousness Quiet Book Page

Malachi 4 is the last chapter of the last book of the Old Testament and it looks forward to the dawning of the Sun of Righteousness - Jesus.


Memory Verse: “But for you who fear my name, 
the Sun of Righteousness will rise with healing in his wings." Malachi 4:2a


Materials needed to create the Sun of Righteousness quiet book page:

  • A4 felt background sheet - I used royal blue
  • felt scraps in sun colours, I used yellow, orange, red and maroon
  • lots of ribbon scraps in gold, yellow, orange, red, maroon, brown, pink or whatever colours go with your chosen felt colours
  • a pair of white shoelaces with blue flecks - I bought mine here in white blue (not an affiliate link)
  • my free Sun of Righteousness template download
Use the template to cut out four pieces of felt in coordinating sun colours. If your page size is smaller than mine, you can cut the template in half and make a quarter sun or use the smaller four layers and leave out the largest one. To make this page for the sun of righteousness, you need four layers only. If you are making a sun page in general, feel free to use all five layers.


If you are making the Bible version, you need all four ends of the shoelaces but one long length will suffice for a general sun page.


Cut up enough coordinating ribbons to fill the top edges of each layer, leaving room for a shoelace at one end of each. Melt the edges of your ribbons to prevent fraying.


Pin the ribbons leaving room for the shoelace under the yellow layer first. Before sewing them down, thread the shoelace through the ribbons to ensure you cut it at the correct length. Melt the end of the shoelace to prevent fraying.  Sew down the shoelace end underneath the layer before sewing down the felt on top of the ribbons which will secure them at the same time. Go backwards and forwards a couple of times in places where you are using thin ribbons to ensure they get caught in the stitching. Repeat this process for each layer, finishing with the smallest - alternate ends that the shoelace is located. Some ribbons thread easier from one direction than the other so ensure they are facing the right side for the shoelace location on that layer.


The first half explains how to sew this page and
the second half explains the spiritual significance.


Finished!

Difficulty Level = Easy.

Cutting the semi-circles straight across the bottom edge will enable you to line them up easier, however, it may add too much bulk to the lower edge of the sun where they are all piled up.

You may be able to use the sections cut out of the centers of the semi-circles if you want to swap the order of colours around and make a second page at the same time.


Using a lunch box with dividers can help you get organised for a TV pinning session on the couch.

Key Learning Areas and Skills

  • Malachi 4 - Jesus is the Sun of Righteousness with healing in His wings, the tassels remind us of the commandments
  • Threading - thread the shoelaces through the sun's rays
  • Counting - count the number of rays on each layer
  • Fine Motor Skills - all quiet books encourage fine motor skill development
  • Hand-eye Co-ordination - all quiet books encourage hand-eye co-ordination


Read the Chapter

Malachi 4


Devotional

In Numbers 15, God told Israel to make fringes on their garments and to put tassels on the four corners. The tassels had to have a blue thread running through them - so the shoelaces are meant to represent the tassels and the sun's ribbon rays are indicative of the fringes. The blue thread was to remind them to keep the commandments - something which seems a little odd don't you think? How does a blue thread remind you of the commandments??

The rounded shape depicting the tablets of the 10 commandments was probably introduced in about the middle ages by Christian artists.


Aron de Chaves \ de Chavez. Painter at Amsterdam in 1700.


However, both the Babylonian and Jerusalem Talmuds (Jewish commentaries on scripture) report that the shape was square. It was half as thick as it was wide and high so when both tablets were placed together they formed a cube. They were made from sapphire stone, which is why a blue thread is supposed to remind you of the blue stone of the commandments.


Image Source: A Layman Looks at the Word

Jesus would have worn a prayer shawl similar to the one below. The word for the tassels in Hebrew is the same word used in Malachi for "wings". The woman who had an issue of blood in Matthew, Mark, and Luke must have known this prophecy and believed Jesus to be the Sun of Righteousness therein. So she figured if she could just touch His tassels she would be healed. She was!


A tallit, or prayer shawl with fringes and
tassels - like Jesus would have worn


There were many people in the crowd no doubt jostling Jesus, but her touch drew power. Faith made the difference. It wasn't fancy - I doubt she even told anyone her plans. Her faith was silent until she had a story to tell.


Follow Faith and Felt Obsession on FacebookPinterest and You Tube

Have you heard about the "wings" on a prayer shawl before?

Saturday, 27 April 2019

Remy's Quiet Book - My First One

Not long after I had Tahlia, my good friend was having a baby shower. Mum had recently reminded me about the felt quiet books we had when we were kids - bought ones, but I remember them being lots of fun.

I decided to ask everyone at the baby shower to make a quiet book page which Mum and I would sew together at the end.  We ended up doing a lot more work than that, but it turned out so well that I became a little obsessed with them... and that's how all this started!


HAPPY BIRTHDAY REMY - YOU HAVE TURNED 5!! 
You are such a sweet, lovely girl and Tahlia loves having you in her life.
Thanks so much for inspiring Faith and Felt Obsession and The Bible Quiet Book Project. 
Over 5 Years in the making...


The templates:


Follow Faith and Felt Obsession on FacebookPinterest and You Tube

Which pages would you HAVE to include in your first quiet book?

Tuesday, 16 April 2019

Spectacular Spring Lamb Easter Bonnet

Last Year we set the bar for the remaining years of Tahlia's primary school Easter Hat Parades. I set myself the challenge of making an admirable Christian hat (no eggs or bunnies) that would be far from embarrassing and that would get people talking about the Good News of Easter, um, I mean Passover.


This year I hope we have again risen to the challenge with our Spring Lamb Easter Bonnet.

This idea came with one week to go before the event. Thankfully. I had planned something else, but it just didn't have the pizzazz I was looking for and I never ended up buying all the needed items.

My first job was to secure a stuffed toy lamb - and not a Shaun the Sheep look-alike. It had to be without blemish like all Passover lambs. Happily my workmates were in the know about an awesome nearby op shop and enthusiastically took me on a lunch-time shopping adventure. Praise God this little cutie was waiting for me!


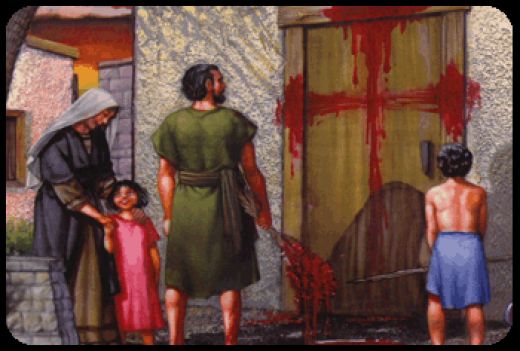
The inspiration for the Spring Lamb Easter Bonnet came from the 10th Plague from the First Passover.

You realise a lot of things when you try to convert Bible text into images. Obviously others have realised it before me because I found some awesome pictures online that demonstrate what happened to the Israelite's doors when they followed God's instructions to kill a lamb and use hyssop to paint blood on the lintel and both doorposts as protection against the death of their first born sons (Exodus 12:22).


Image Source


Who knew there was so much imagery in the old testament around the cross?


Tahlia did get to show her hat to her class and talk about it. I'm not sure that what she said would have made a whole lot of sense to them, but it was good witnessing practice. And it was a wonderful learning experience for us to share together.

You might think that I made the hat, but let me reassure you, Tahlia helped a lot.

Most importantly, she proudly wore it on the day!


Together we stripped back the Palm Sunday Easter Bonnet from last year.

She stirred the paper mache glue mixture and applied another coat.


She re-painted the hat.


Tahlia insisted we iron the felt before making the flowers. A step I was thinking we might be able to skip.


She cut the pipe cleaners.

She cut the red, white and orange flower pieces out and even helped with hot gluing them all together.

I made the bunch of hyssop.


I rolled strips of red felt for the blood to fill the bowl and glued one end of the ribbon for the cross to it. I glued everything down - the ribbon to the screws and itself, the felt to the bowl and the bowl to the hat.


I used a small screw driver to make holes to insert the screws. I had planned on using nails but I couldn't find them. I think screws worked well anyway because they had a lip which stopped the ribbon slipping off.

Tahlia wanted to make a door for the archway but we ran out of time. I thought it would be better without, but I think Tahlia was right to want a door. It might have helped the ribbon cross stand out more.

She helped glue everything onto the hat.


So that the lamb was not ruined by hot glue I employed more felt and my secret weapon safety pins!


We watched quite a few YouTube videos on how to make felt flowers. These were our favourites:


If you can't work out how I made the pink carnations you will have to beg me to do a tutorial. I'm not planning to do it unless someone asks though!


EDIT:

See the other Easter Hats in this Trilogy

  1. Hosanna! Palm Sunday Easter Bonnet - focuses on Praising Jesus' ability to save
  2. Spectacular Spring Lamb Easter Bonnet - this one!
  3. Magnificent Butterfly Resurrection Easter Bonnet - focuses on the joy and hope of the Resurrection


Follow Faith and Felt Obsession on FacebookPinterest and You Tube
I would love to see and share your Christian themed Easter Hats!