Showing posts with label Beads. Show all posts

Thursday 12 March 2020

Easy Peasy Jellyfish Counting Quiet Book Page

It's been a while since I did an Easy Peasy page - but who doesn't like it when a quiet book page comes together quickly?


Don't get confused with an octopus quiet book page where there should only be eight tentacles - jellyfish can have lots! I must have a little obsessive compulsive disorder because it really grates on me when a counting page only goes up to eight. Admittedly I did make one that only goes up to eight, but in my defense that wasn't the primary purpose of the page - see Genesis 28 - Jacob's Ladder Quiet Book Page.

My jellyfish is a simple semi-circle. I used one of the rows from my Malachi 4 - Sun of Righteousness Quiet Book Page template and lined it up along a straight edge of felt and only cut around the outside edge.


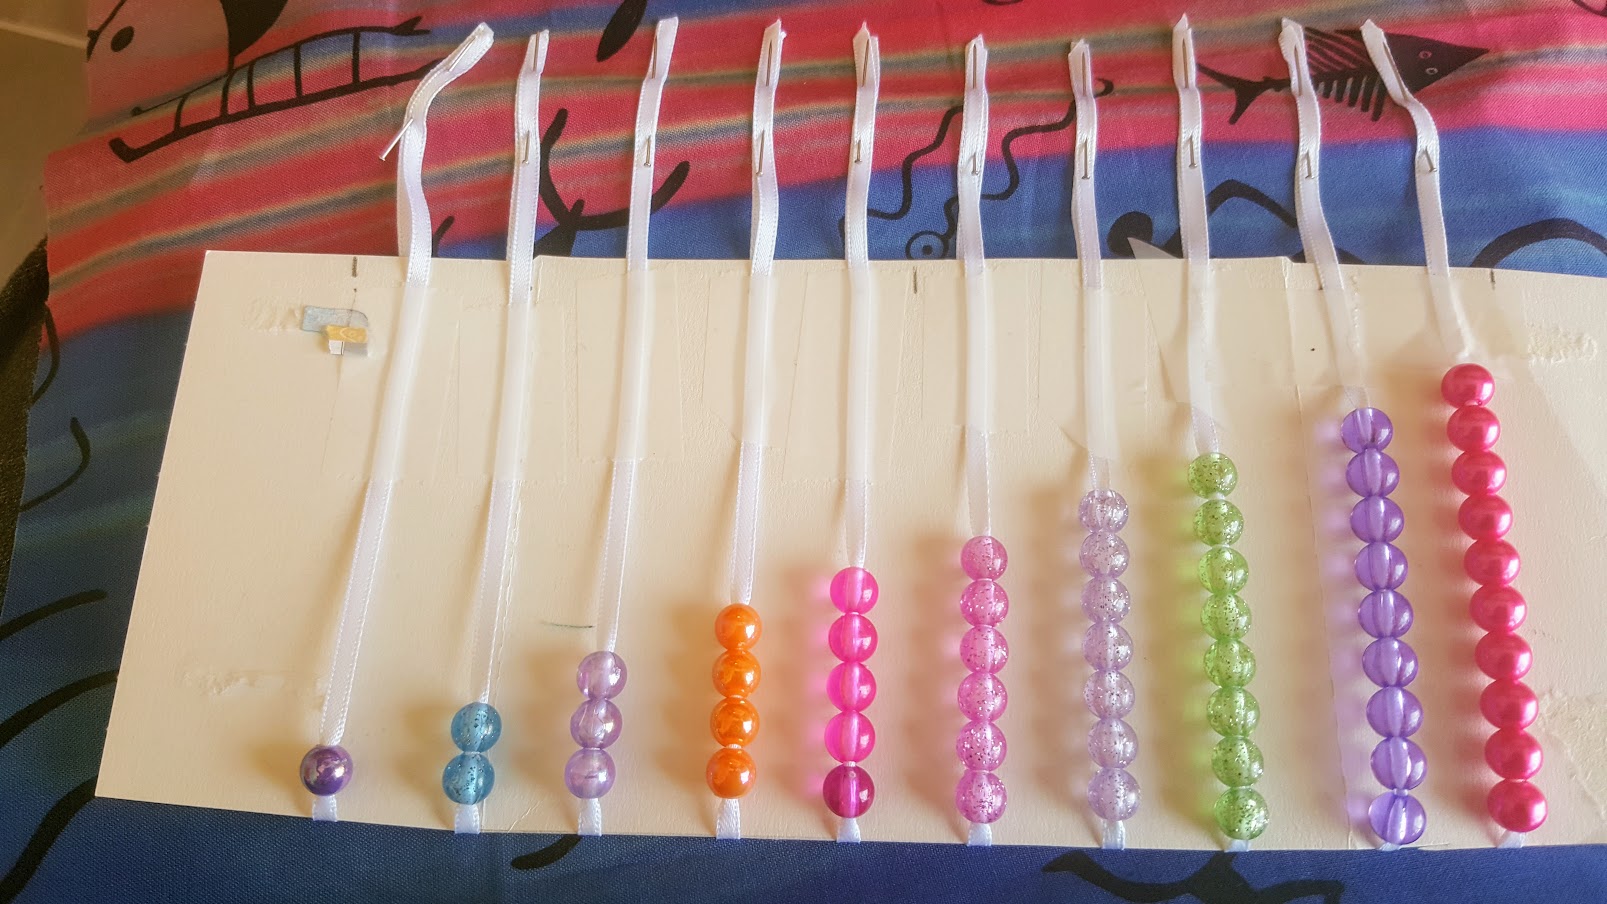
Then I cut lengths from a 3mm white ribbon and threaded beads on (1-10). I made a card to stick the lengths of ribbon to so they would be evenly spaced when I went to sew them.


Then I pinned and sewed down the ends of the ribbons using zig zag stitch and angling in the two at either end so they would fit under the head of the jellyfish.


Finally, I sewed down the head of the jellyfish covering the ribbon ends and trimmed it with double gathered lace. This adds a touch and feel element to the page.

I am not sure I am a fan of the look with the looped tentacles... what do you all think? Although I don't think the ribbon would be thick enough when knotted to keep the beads on if they weren't.

Some variation ideas include:
  • Touch and feel tentacles made from various ribbons and trims - these can be curled using a hair iron or wet and let to dry around a pencil etc
  • Beads inside mesh tubing - If you look closely at this pinterest pin, Elena Rihsi has threaded the beads onto a thin cord before inserting them through the mesh cord. That way if the mesh breaks, the beads don't go anywhere! Genius.
  • Inserting a squeaker under the jellyfish head
  • Making a button/bead maze in the jellyfish head
  • Jellyfish swimming in reversible sequin fabric - comes with a beautiful free template from teenytinymom


Follow Faith and Felt Obsession on FacebookPinterest and You Tube

Have you made a jellyfish quiet book page? I'd love to hear about it in the comments!

Thursday 27 February 2020

Psalm 29 - Enthroned Above The Flood Quiet Book Page

Psalm 29 reassures us the God is both powerful and in control. He sits enthroned above the flood.


Memory Verse: “The Lord sits enthroned over the flood; the Lord is enthroned as King forever." Psalm 29:10 NIV


Materials needed to create the Enthroned Above The Flood quiet book page:

  • A4 felt background sheet - I used blue
  • a Noah's ark and animals image - I used this printable from the article Sharing Time: The Prophet Will Tell Us in the LDS kids magazine Friend
  • felt in white, green, red and as close as you can get to gold
  • Kam snaps
  • ric rak
  • 30cm of 2mm round elastic
  • wooden cloud buttons - I bought these from AliExpress (not an affiliate link)
  • dotted mesh material
  • 40mm wide rainbow ribbon - I bought this from AliExpress (not an affiliate link)
  • gold pleather
  • clear craft glue if using pleather to make sewing easier - I used polyacetic acid & ethylene resin based glue
  • decorative beads
  • a throne template - I modified this Colouring page Saint Nicholas' throne from edupics.com
  • hot glue gun and glue

Firstly, get the Noah's Ark and animals transferred onto white felt by the sublimation printing and heat press method - see my post on Sublimation Printing on Felt - Test. Cut out the ark and animals and sew the ark onto the background page along three sides leaving the top open to form a pocket for the animals.

Prepare two wooden cloud buttons by threading 15cm of the elastic onto each and tying a knot to create a loop of elastic. Slide the knot to the back of the button and hot glue in place. Cut the ends short.


Cut your mesh material to size to fit inside your page with extra length (and width if you want to finish the edges first - I didn't but I wish I had). Fold the top over itself a couple of times and pin and sew along the top edge as shown above, placing the elastic of the buttons underneath at either end. Make sure the end is poking out the bottom so you can pull it up and over the buttons to hold the rolled up mesh in place later.


Measure your ground and make a few layers of grass for the animals to sit in. I used ric rak to edge the top of the grass as there would be too many layers of felt along the bottom if I doubled the felt as I usually do. Use kam snaps to attach the grass to the page. At the back, use small squares of spare felt to strengthen them and prevent them ripping a hole when being pulled.


Cut a length of rainbow ribbon to fit your page and melt the edges - see my post on How to Stop Ribbons Fraying. I rounded the edges, but you don't have to. Mark where the button holes should be on the ribbon, then sew and cut.


Use the a colouring page as a throne template to make your throne. Simplify the lines by joining some together and rounding off the top.


Before sewing the pleather, I used the glue to attach the pleather to a sheet of felt. My pleather was stretchy which makes it very difficult to sew. Allow the glue to dry before sewing in place. Then sew the red felt on top and cut out the front section of the throne. Decorate with beads at the top.


Make a slot for threading the throne onto the rainbow ribbon by doubling a piece of felt and sewing onto the other half of your sheet of felt. Make sure it is slightly wider than your rainbow ribbon to allow it to pass through easily. Hot glue the throne to the sheet of felt with the slot facing out and centered at the back. Cut out the throne once again.

Thread the throne onto the ribbon and button it on, or store in the ark pocket.

Complete!


Difficulty Level = Intermediate.

Pleather can be difficult to work with.


Key Learning Areas and Skills

  • Psalm 29 - God is in control even when it might seem like He is not
  • Rolling - roll up the rain, and roll it down again
  • Buttoning - secure the rain when it is rolled up with the elastic and cloud buttons, button on the rainbow ribbon
  • Threading - thread the throne onto the rainbow ribbon
  • Colours - learn the colours of the rainbow
  • Tucking - tuck the animals into the ark
  • Using snaps - snap on and off the ground to make it appear to flood
  • Fine Motor Skills - all quiet books encourage fine motor skill development
  • Hand-eye Co-ordination - all quiet books encourage hand-eye co-ordination


Read the Chapter

Psalm 29.


Devotional

Maybe you feel like everything is out of control, but God assures us that He's got it. Sometimes trouble is what we need to wake us up and turn our course. When trial comes are we willing to listen to instructions and build an ark? Or do we insist on our own way?

This Psalm speaks about God twisting the oaks and breaking the cedars. Trees are often used as a symbol of men and strength. So the strength of men is nothing to God. Therefore, why worry about what man can do to you? Rather worry about pleasing God.

Not only does God rule over the kaos of The Flood, but He caused it.


Psalm 29 - HeartSong


Follow Faith and Felt Obsession on FacebookPinterest and You Tube
Have you made a Noah's Ark quiet book page? I'd love to hear about it in the comments!

Thursday 15 August 2019

Genesis 13 - Abram and Lot Separate Quiet Book Page

In Genesis 13, Abram allows Lot to choose which part of the Land to use because their families and herds have grown too large for them to stay together.


Memory Verse: “Is not the whole land before you? Please separate from me. If you take the left, then I will go to the right; or, if you go to the right, then I will go to the left.”” Genesis 13:9

Materials needed to create the Abram and Lot Separate quiet book page:

  • A4 felt background sheet - I used light blue
  • felt scraps
  • shiny blue material scrap for the lake
  • clear craft glue (optional) - I used polyacetic acid & ethylene resin based glue
  • ribbon scraps in vegetation motifs and colours
  • thin grey ribbon
  • letter beads
  • my free Abram and Lot Separate template download
Cut out a section of shiny blue material to fit where the lake goes. My material was very prone to fraying, so I folded it over the edge and glued it down and then zig zagged around the sides at the back once it was dry. The front was covered by the mountains and foreground so I don't think I worried about zig zagging around that, but I did glue it down.


Next I sewed down the mountains followed by the foreground and a series of decorative ribbons to look like rows of fields and vegetation on the same side as the lake.

To make Abram and Lot, first sew the hands to a piece of the same coloured felt and cut them out. Wedge these under the sleeves of their coats when sewing the coats to a piece of the same coloured felt to double it up and cut then cut them out. Sew a small button hole in the center of their coats to thread them onto ribbon with for sliding across the page.

Cut two heads for each person - you can't sew one to a larger background and then cut it out for this one as it will be difficult to cut out afterwards because the coat is in the way. But it doesn't really matter if the sewing is messy here anyway. It will be covered up by a beard and turban.


The beards have a slit up the middle to allow them to sit correctly over the coat. I only cut one side of the beard and left a large piece of felt on the other side so it could be sewn neatly from one side and cut away on the other later.


Sew the turbans in a similar way, cutting the back felt piece away after sewing.


Thread Abram and Lot onto a piece of grey ribbon each and cut it to the length of your page. Melt the edges of your ribbon - see my post on How to Stop Ribbons Fraying.

Cover the bottom section with grey felt and then cover the line where the grey and foreground meet with grey stones. Thread the word 'left' using alphabet beads onto Abram's ribbon on the left side and the word 'right' onto Lot's ribbon on the right side. Sew down both ends of the grey ribbons using zig zag stitch so that  Abram and Lot can slide along the bottom of the page. Cover the ends with more rocks so you can't see the ugly stitching.

Finished!

Difficulty Level = Intermediate.

Getting the beards and turbans right is the most difficult part of this page, but I have shared my tips on how to do this in the tutorial.


Key Learning Areas and Skills

  • Genesis 13 - selfishness often harms us without us even realising it.
  • Directions - this page teaches about right and left. There are very few quiet book pages that teach this.
  • Imaginative Play - would you choose the left or the right side?
  • Fine Motor Skills - all quiet books encourage fine motor skill development
  • Hand-eye Co-ordination - all quiet books encourage hand-eye co-ordination

I did consider putting Abraham's tent on the left side, but I decided against it -
the starkness of the landscape contrasts better with the lushness of the right.

Read the Chapter

Genesis 13


Devotional

Lot leaves Abram as a very rich man, having so many herds and servants that they cannot continue to live together. He chooses the best part of the land for himself however, and it is not long until we find that Lot has not benefited from his decision.

It is only the next chapter in which he is taken captive when an army attacks the cities of the plain. Following his rescue by Abraham, he remains living there. Why?

When we find Lot in Sodom, there is no longer any mention of his flocks and herds and servants - the very reason he left Abraham in the first place. I often wonder what happened to them. They must have been sold before the visit from the angels, else surely Lot would have been given a chance to save them as he was with his other daughters and sons-in-law.

I always wonder how different things might have turned out had Lot chosen the other side. I don't imagine that Abraham would have lost nearly everything if he had lived near Sodom. Perhaps that is where Lot went wrong. He moved to a wicked city. Abraham stayed in his tent. And I imagine if he had been given the other side, he would have still lived in his tent. Don't let the priorities of the world sway you. Romans 12:2 NKJV says "And do not be conformed to this world, but be transformed by the renewing of your mind, that you may prove what is that good and acceptable and perfect will of God."


Follow Faith and Felt Obsession on FacebookPinterest and You Tube

Which side would you choose?

Thursday 14 February 2019

Re-labelled Baby Slogan Slippers

Pre-made baby slogans are often almost perfect, but they use the wrong names of endearment for your family.

For that reason, you can often pick things like this up quite cheaply at the end of the season because they don't suit anyone.


I have re-labelled these slippers so they fit my family. It was easy - you can do it too.


First I cut lengths of ribbon to cover the original names and melted the ends to prevent fraying. Then I hand sewed the letter beads onto the ribbon, securing each one individually. Next I attached the ribbon to the shoes with a little bit of hand sewing and a whole lot of hot glue. Sewing them in place is important if the gift is for a baby. A present that a baby ends up choking on is not a good gift.

Enjoy!


Follow Faith and Felt Obsession on FacebookPinterest and You Tube

How would you label your slippers?

Sunday 27 January 2019

DIY Beaded Yad (Torah Pointer)

I am in need of a toy yad for an upcoming quiet book page, but was unable to find one for sale. Real yads are very expensive, so I decided I would have to find a way to make one. I did consider using polymer clay, but when I thought of this beaded idea it stuck. These are so easy to make that your kids can do it!


A yad is a Torah pointer used to read scripture scrolls without damaging the parchment. The Hebrew word 'yad' literally means 'hand'.


carloriccardi, Parashat NoahCC BY 2.0


Materials Needed to Make a DIY Beaded Yad:
Long silver pipe cleaner
Pointing hand silver bead - available from here (not an affiliate link)
Decorative beads - with about a 2mm hole
Bend your pipe cleaner in half and thread on your pointing hand bead. Twist the pipe cleaner together to hold the bead tightly in place. Thread decorative beads over both ends of the pipe cleaner until you get close to the end. 
To finish:
1.  Use jewelry pliers to roll up the ends of the pipe cleaner to secure... or
2.  You could try placing a bead sideways at the end and thread the ends of the pipe cleaner through from either side. Twist to hold in place under the last bead. You can thread a ribbon through the last bead hole if you want a way to secure it to a book or scroll.


DIY Beaded Yad / Torah Pointer - Short Version


DIY Beaded Yad / Torah Pointer - Detailed Version


Done!
Now you can enjoy reading Torah!


Follow Faith and Felt Obsession on FacebookPinterest and You Tube
Hearing from you gives me great encouragement!


Comment below - which number yad is your favourite?


Follow Faith and Felt Obsession on FacebookPinterest and You Tube

Which number Yad (Torah Pointer) is your favourite?