Sunday 11 December 2016

Vashti's Quiet Book - Front Cover and Crown Pages

This is a quiet book I made for my niece Vashti.  My sister has added her own pages too.  Like most of my quiet books, I designed it to be added to and swapped around.


I used a pattern I found here for the front cover flowers, and embellished the flower centers with beadwork. The leaves from this pattern did not look like hydrangea leaves to me, so I used a leaf pattern I found here instead.  For the lettering, I printed a nice font from the computer to use as a pattern. The beads really made it come alive, hey!

I didn't sew the flowers back to back for stability like I do with most things.  It would take away from the effect, and it's not really meant to be played with anyway.


Since Vashti was named after a queen in the Bible, Mum, my sister and I made a crown with interchangeable jewels to stick on. I plan to do a tutorial in a separate post, as I made a similar page for one of the Bible chapters. Its pretty easy to see what we did anyway.


As a template for the crown, I used this colouring page from masivy.com. We used sticky velcro dots on the jewels, and sewed normal velcro onto the crown. I was a little worried that the sticky dots would come off easily but them seem to be fairly solid so far, and they have had a fair bit of use so I hear. This was Vashti's favourite page for a long time.

I also made a treasure chest to keep the extra jewels in. I used Stephanie's Treasure Quiet Book Page pattern from Imagine Our Life.


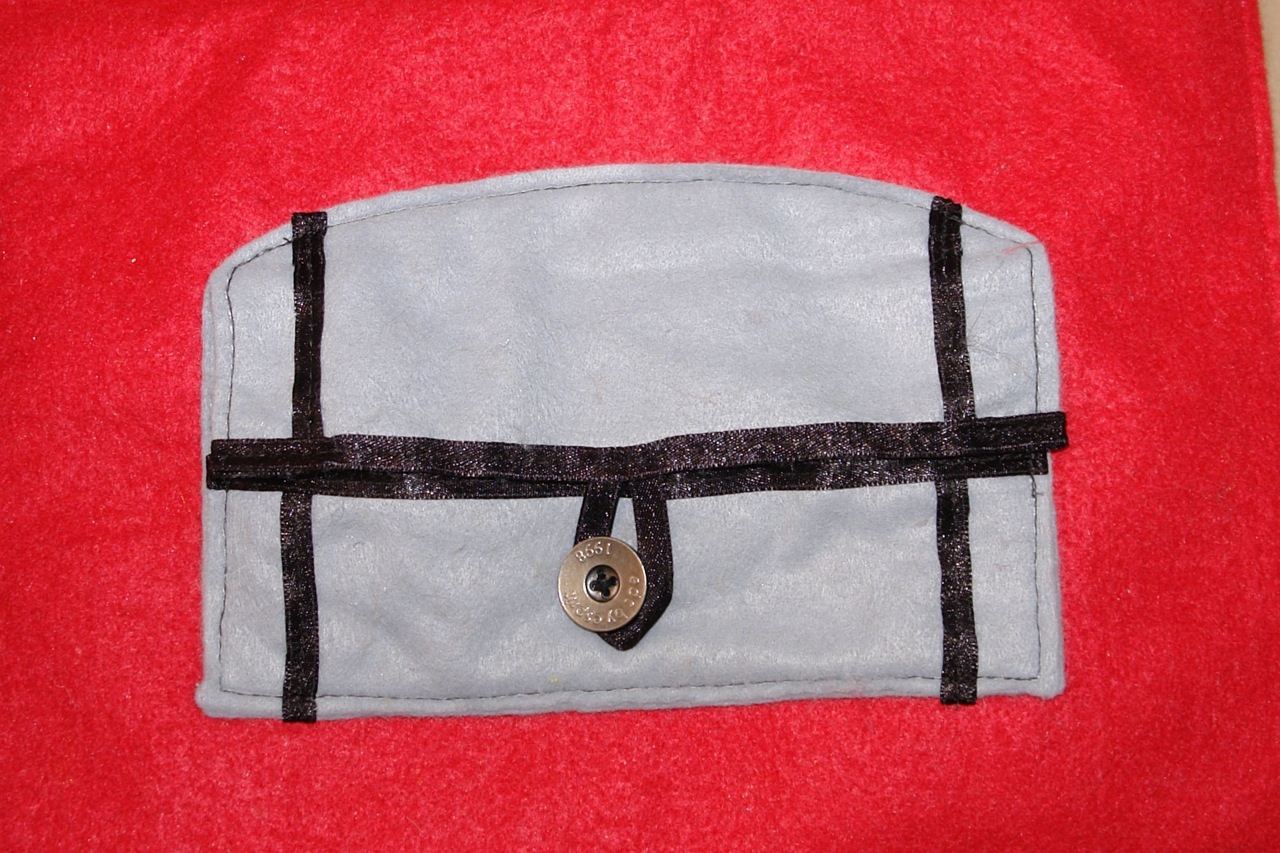
The jewels are actually kept in a zip lock bag inside the treasure chest because otherwise they would fall out the sides, but who wants to spoil a picture with that!


Follow Faith and Felt Obsession on FacebookPinterest and You Tube

Which page do you like the best?

Wednesday 26 October 2016

Tahlia's Quiet Book - Indigenous Page

I want Tahlia to connect with and learn about her culture, so here is the Indigenous Australian quiet book page I made her:


I modified the Australian Aboriginal Flag by turning the yellow circle into a yellow glove to make the page interactive and resemble cave handprints. The High-5 logo I used as a template was widened at the bottom to allow easier access, but it is still too small and no longer fits her hand inside. She is only three and a bit. Oh well. I will just have to make something to go inside so we can use it as a pocket instead.

The Australian Aboriginal Flag was created by Harold Thomas, and his explanation of the meaning of the colours is as follows (Reference):

  • Black – represents the Aboriginal people of Australia
  • Yellow circle – represents the Sun, the giver of life and protector
  • Red – represents the red earth, the red ochre used in ceremonies and Aboriginal peoples’ spiritual relation to the land


To read about how Indigenous Australian cave handprints were made and the history and significance, please visit Aboriginal Art Online.


Why Tahlia didn't get a Gamilaraay name:

Gamilaraay is an Indigenous language from north-west NSW. I had wanted to give Tahlia a Gamilaraay middle name, so I used the online Gamilaraay dictionary to look up some words. I was thinking something like 'rainbow' because when God shines through the dew drops (i.e. Tahlia - see my Tahlia's Quiet Book - Front Cover and First Page post) you get a rainbow. However, when I looked into the word for rainbow, I wondered if it would also be the name for the rainbow serpent. I checked with relatives, and they confirmed that it was. I decided against that name very quickly, but I did notice something very interesting about the rainbow serpent's name...

It is made up of two word parts, yulu and wiri...

The words listed below, along with their meanings found on the online  Gamilaraay dictionary helped me come to the following conclusion:

yuluwirri = rainbow

yulu = claw of animal

wirringan = Aboriginal doctor, clever man, Ethn. has magical powers to cure illness or perform malevolent magic, eg. Wirringan nhama marumali 'The clever man will fix him'

wirriil = feather

yulu-gi to play, to dance, to gamble


It seems to me that "yuluwirri", meaning rainbow, and also the name of the rainbow serpent, when translated literally means "clever/feather claw". An odd name, don't you think, when snakes don't actually have feathers or claws.


Although, if you read Genesis 3, where God curses the serpent for tricking Eve, the curse is specifically that from then on, the snake would have to crawl on it's belly (verse 14). It implies that before the curse, besides being known as cunning/crafty, the serpent had legs and/or wings so it did not have to move on it's belly. Maybe that's why it is found in a tree, being somewhat like a reptilian bird. These qualities are also associated with the rainbow serpent's name "yuluwirri"; claws, feathers and cleaverness/malevolence. Perhaps the serpent became known as a snake after losing it's legs and wings.

So I find it fascinating that linguistic evidence exists in the Gamilaraay language for the truth of the story found in Genesis 3. "Yulu-gi", to dance, brings to mind the phrase in English "dance with the devil".


If you are interested in learning Indigenous languages, I discovered this awesome blog 'GAMILARAAY' about the Gamilaraay language, aimed at getting people learning and sharing it!


Follow Faith and Felt Obsession on FacebookPinterest and You Tube

Do you have some more Indigenous quiet book ideas for me?

Monday 24 October 2016

Genesis 9 - Rainbow After The Flood Quiet Book Page

In Genesis chapter 9, God made a covenant with Noah and all the living creatures of the earth that He would never destroy everything with a flood again.


Memory Verse: "I have set my rainbow in the clouds, and it will be the sign of the covenant between me and the earth." Genesis 9:13

Materials needed to create the Rainbow After The Flood quiet book page:

  • A4 felt background sheet, I used red
  • Betty Lukens Felt book 07 Noah's Ark available at Koorong.
  • sewing thread to best match the page
  • scissors!
Cut out all the pieces for this page, and the page itself from the set. Cut it out as it is, not in the shape of an ark as suggested in the instructions. I hate to waste the space on the background picture. The Betty Lukens FAQ section has posted a cutting tips PDF.


Sew the page onto the background felt along three sides, leaving the top edge open to form a pocket. Pop the pieces inside the pocket (or better yet, play with them)!

Finished!

Difficulty Level = Easy, plus No Sew version.

One of the easiest quiet book pages ever!
Just use hot glue wherever sewing is recommended for a no sew version.

Key Learning Areas and Skills

  • Genesis 9 - This page tells the story of how God reassured Noah after the flood and promised not to destroy the earth again with a flood
  • Imaginative Play - Rearrange the pieces on the background
  • Fine Motor Skills - all quiet books encourage fine motor skill development
  • Hand-eye Co-ordination - all quiet books encourage hand-eye co-ordination

Alternative Ideas

Tell the whole flood story with this Noah's Ark felt board set available from Story Time Felts.

Read the Chapter

Genesis 9

Devotional

Before the flood, the earth was watered via a mist which came out of the ground (Genesis 2:6). Many Christians believe that The flood was the first time it had ever rained, so I guess it's rather understandable that no-one believed Noah when he warned them that a flood was coming. It was a foreign concept to them. It's a bit like today really. No-one thinks that Jesus is about to come back and put an end to the current cycle of life. They have never seen anything like that before, but since God has told us, we better believe it whether we have seen it before or not. Otherwise we might find ourselves outside the boat so to speak.

Anyway, if you had never seen rain before and the first time you did it resulted in a global flood that destroyed everything except what survived in the ark (and the ocean), I imagine it would be rather scary next time it rained. I guess God had thought about that already, and wanted to reassure them that it wouldn't happen again. No more global flood that destroys everything. And He gave them something tangible to remind them of His promise - a rainbow.


Follow Faith and Felt Obsession on FacebookPinterest and You Tube

How does God reassure you when you are scared?

Wednesday 19 October 2016

Tahlia's Quiet Book - Brush Your Teeth Pages

A Brush Your Teeth quiet book page is a tonne of fun! A toothbrush was one of Tahlia's first Christmas presents, and she absolutely loved it. This page has also been a hit. It used to be her favourite page when she was about two and a half. It stayed her favourite for a long time.


I made the toothbrush, toothpaste and cup using part of Stephanie's Brush Your Teeth quiet book template from Imagine Our Life. At the time I was just getting into quiet book making and sewed a plastic piece from a folder cover in between the two felt layers for the toothbrush and toothpaste in an attempt to strengthen them. It worked OK, but I have since discovered thick stiffened felt from Spotlight. I would definitely use that instead if I ever make it again. I would also use that for the white brush bristles as our toothbrush has unfortunately fulfilled it's purpose in Tahlia's own mouth quite a bit and become a bit sad and soggy. A small price to pay for the amount of fun she was rewarded with!

Mum and I made the mouth together. I did the teeth freehand on the machine, but I gave an example to give you an idea of what I did (or what I would try to do if I did it again and wanted a new improved version) plus my Mum's template for the mouth. As you can see in the picture, my teeth are very uniform unlike the example I gave in the template. Once you have followed the instructions on the template, cut down between the teeth and turn them inside out before pinning them on the page and placing the mouth over the top to get the positioning right. Sew them down and then sew the mouth on top to cover the gummy sections. Thanks heaps once again Mum!!


Follow Faith and Felt Obsession on FacebookPinterest and You Tube

Who is glad you don't have teeth like this mouth?!!

Saturday 15 October 2016

Tahlia's Quiet Book - Pony Page

This pony quiet book page is super cute and interactive. It promotes imaginative play through the feed bowl, bridle and lead, and the removable blanket.


The pony quiet book page was made by my friend at her baby shower, and she kindly made extras for her sister and myself too. I knew she was horse-mad so I had made her a horse template by doing a rubbing of my Mum's coffee table, which has embossed horses and chariots running around the edge of it. She took one look at it and said "No" and announced she would draw her own pony. It's something I have watched her do a thousand times, so I'm not sure what I was thinking doing that either! By the look on her face I could see her completely re-designing the page in that instant.

To make the mane, she wound wool around a ruler, carefully slid it off, and pinned it under the pony. My Mum sewed down the pony for her because I asked her to man the sewing machine during the party. Once it was sewed down, my friend cut the mane where it had been folded over the ruler.


We didn't finish the quiet book pages at the party. She finished her pages at home for me later, and I'm so glad she did. Not just because it took a lot of work off Mum and I, but because there is no way it would have turned out so good if I was in charge. The bridle, lead and blanket edging are made from a thin ribbon, and you will have to copy as best you can from the picture. The ribbon was left over from her wedding, so that's pretty special. She did a great job, don't you think!

She designed the page herself, and has allowed me to share the template with you - Thanks heaps!!


Follow Faith and Felt Obsession on FacebookPinterest and You Tube

Do you know a little friend who LOVES ponies?

Friday 14 October 2016

Wall Christmas Tree

As we didn't have a Christmas tree and I didn't want a heap of things to move each time we have to get a new rental, I decided to make a felt wall Christmas tree. I already had all the supplies needed, so that made it handy and cost effective!


Whilst I am aware that Christmas is not Christian in origin, it is a wonderfully fun time of year when people are willing to listen to stories about Jesus.  So why not take advantage of this, and "make the most of every opportunity" (Colossians 4:5).

I forgot to take a photo of how to draw and cut out the tree, but you can see how on Cheryl's blog That's What Che Said.  Just fold a piece of green felt in half and draw a zig zag tree pattern on and cut whilst folded.  If you don't have confidence, you could opt for a simple triangle tree.

We used a metallic cardboard star I kept from my husband's yr 12 formal.  It is stuck to the wall with double sided tape, as is the felt tree.


Baby is admiring the Christmas tree.

Normally I always double my felt so it is strong and looks more professional, but for this project, I wanted it to be fun, quick, and easy.  Also, I was a bit concerned if I doubled the felt that it would be too heavy and not stick to the tree.  No-one would find that very fun...


We have:

One star topper - the star of Bethlehem is fascinating - read about the astronomical phenomenon here. Use a large star colouring sheet from here. There is both a five pointed star or a star of David, which may be more appropriate since Jesus was the son of David.

Two doves - like the two doves mary and Joseph took to the temple on the eighth day for Jesus' circumcision.  They were so poor that's all they could afford.  God did not favour His son when He sent Him into the world.  He was born in a manger, not a palace.  The template I used was found at Simply Creative Ways.

Three angels - has already inspired a conversation about our guardian angels; use this tutorial and pattern by Laura from the blog Bugs and Fishes.

Four trumpets - used to announce Jesus' birth.  He was actually born around the feast of trumpets in September/October; use the trumpet image available here as a template.

Five bells - the poem "The Bells of London" posted below is by Marjorie Anisborough Decker, the author of The Christian Mother Goose Book Trilogy. You might want to visit her blog and browse her awesome book collection; I used a colouring sheet and cut them out of sparkly felt.

Six gingerbread men - just for fun, but mankind is after-all the reason Jesus came into the world; I drew around a cookie cutter, but you could use a colouring sheet from from mrprintables.com as a template. Decorate with puffy paint and jewels for the icing and lollies. I have fond memories of making gingerbread at Christmas with my Mum and sister. Mum always used to make such lovely decorations that I wanted her to do these ones for me too. She did a terrific job once again!


Seven snowflake ornaments - to remind us Jesus' sacrifice makes us whiter than snow; use the tutorial by Laura from the blog Bugs and Fishes.

Eight candy canes - click here for a poem to remember the reason Jesus came into the world; use a colouring sheet from mrprintables.com as a template and glue on ribbon for stripes.

Nine pointy baubles - just for fun; I used a colouring sheet available here and hot glued rik rak on to decorate.

Ten presents - Jesus was God's presence pun intended to us, the wise men gave presents to Jesus, we need to be generous to others; use another colouring sheet from mrprintables.com. Cut out the square from one colour of felt and the ribbon in one piece from another colour. Hot glue the ribbon onto the present.

Eleven star lights - the wise will shine like the stars, see Daniel 12:3; once again I used a colouring sheet available from mrprintables.com.

Twelve round baubles - just for fun; I traced around an upturned glass and sewed a layer of metallic spotted mesh on top of the orange felt.

Image Source
Image Source
Free Printable available here!

If you don't want to spend a lot of time making ornaments, you could always try backing ornaments printed on material with felt. Or just cut out a heap of circles in lots of different colours. Tahlia discovered that crocheted hexagons will also stick to the felt tree, so that might be another easy option if you know how!


If you are looking for hours of fun without a lot of cost, I found a printable wall Christmas tree for coloring in.  As you need to assemble it from various printed pages, it doubles as a jigsaw puzzle.  It looks amazing!!  Might be our Christmas project for next year.


Thursday 13 October 2016

Tahlia's Quiet Book - Grapes, Butterfles, Bee and Potato Head Pages

These next quiet book pages form the major part of Tahlia's quiet book. Most of them were gifts made by other people to contribute to Tahlia's book.


The grapes and butterfly pages were made for Tahlia by my sister. At the time, grapes were one of her favourite foods. The string is meant to be a caterpillar and it can be threaded through the hole it has eaten in the leaf. The leaf pattern came from Purl Soho, and the grapes were drawn by my Mum. The butterfly was made using a colouring in sheet printed from the internet, and the cocoon and tree were drawn by my brother-in-law.


The butterfly racing page was made by my awesome friend!  The butterfly buttons on the ribbons came from an op shop.  There is no pattern for this one, but you could probably use something like this flower printed out in a few different sizes.


This page was made as an extra for Tahlia while we were making my friend a book at her baby shower.  It was made by my friend's mum.  Thanks heaps!  The bee came from a $2 shop.  The hive pattern was made by Stephanie from Imagine Our Life, and the flowers are from Purl Soho.


My Mum put in an amazing effort into helping me finish these pages.  We did Mr Potato Head about three times over for two friends books as well.  Thanks so much Mum!! The template was made by Jocelyn from Sunshine, Lollipops and Rainbows. The hats are reversible, some with a button on one side and not the other, and some with a patterned felt on the reverse. We also made two sets of eyes each, so there would be green, blue, brown and googly options.


I know the walking stick is meant to be a moustache, but this is for kids, right?


Follow Faith and Felt Obsession on FacebookPinterest and You Tube

Which page do you like the most out of these ones?

Monday 3 October 2016

Happy New Year!

It is now the Biblical (and Jewish) New Year, so I want to wish you a Happy New Year. May you be inscribed in the Book of Life!

Image Source

Actually, the Bible has two new years six months apart, much like we do today with the financial new year. This is the actual new year, not the one installed after the Exodus, which I have a feeling was done so that the month numbers would correspond with the new year and autumn festivals falling in a month numbered seven. Hopefully you will see the significance unfold in some future posts.

I began working on this blog at the Biblical New Year last year, so it is now the one year anniversary of Faith and Felt Obsession. I have had a great time learning and I hope to continue improving my sewing, crafting and blogging skills.

I find it fascinating that the Biblical New Year begins in Autumn (well in Jerusalem it is Autumn at this time of year). Spring is the logical time for the beginning of the year, or so I thought until I realised it wasn't in God's books. He created everything mature. Adam was fully grown, trees were fully grown, even fruiting so it seems. So I guess it follows that God created the world beginning in the mature season of Autumn.


Follow Faith and Felt Obsession on FacebookPinterest and You Tube

Do you celebrate the Biblical New Year?

Tuesday 6 September 2016

Genesis 5 - Lineage Birthday Cake Quiet Book Page

In Genesis chapter 5, we are given the lineage of Adam to Noah, along with their ages at death, and a secret message hidden in what many would consider a rather boring Bible passage.


Memory Verse: Now he called his name Noah, saying, “This one will give us rest from our work and from the toil of our hands arising from the ground which the Lord has cursed.” Genesis 5:29 NASB

Materials needed to create the Lineage Birthday Cake quiet book page:

  • A4 felt background sheet. I used mid blue.
  • felt scraps
  • sparkly felt for icing (optional)
  • sewing thread to match each colour of felt
  • magnets - I used 5mm craft neodymium magnets, but you need to be careful with these... they are very strong magnets so they are dangerous if swallowed
  • four small buttons
  • round black elastic
  • sewing machine with font function (or alternate method e.g. hand embroidery, fabric marker or transfer paper)
  • things to decorate the cake e.g. strawberries (optional).
  • the free template
Use the complete cake guide to work out where to position your cake on the page. There are two options, one with candles and one without. Since the candles sit higher than the cake, I thought I better include them so you can see how high they would sit. But since they are very close to the edge of the pattern paper, I thought it might not print properly, so I did one without as well.

Place pins as markers through each 'X'. This is where your magnets will be sewn down under the small squares of felt. Sew your magnets in position, ensuring that they are sewn down with the same side (north or south pole) facing up so that the candles all face the same way when put on the cake.


Write out your lettering using your chosen method (ensuring it will fit into that amount of space) and cut out one side of your candle set.

The name and age at death/translation side (and corresponding meaning side) should say:
  • Adam 930 (Man)
  • Seth 912 (Appointed)
  • Enosh 905 (Mortal)
  • Keenan 910 (Sorrow)
  • Mahalalel 895 (The Blessed God)
  • Jared 962 (Shall Come Down)
  • Enoch 365 (Teaching)
  • Methuselah 969 (His Death Shall Bring)
  • Lamech 777 (Despairing)
  • Noah (Comfort and Rest)
Next, cut out ten flames (not twenty) as it is easier to sew small sections onto a larger sheet of felt than sewing two small sections to each other. It makes it easier to keep things straight and lined up in the sewing machine, especially when you are also going to be inserting flames and magnets between the two parts. I found the idea for this method on the blog Laura Thoughts, so for a better explanation on how to do it, please visit here.


Sew the flames down first and cut them out. Insert them under the top ends of the candles when you pin them on to the corresponding candle side. Make sure you line up the lettering properly on the opposite side.

Start sewing the candles from the bottom end, and when you get back around (but before you get right to the end), insert a magnet into the candle and then sew it closed. You can use a wooden skewer to help push the magnet in. Again, make sure you put the magnet in with the correct pole facing down so that the name side of the candle will face outwards when placed into the cake.


Check that the lettering has been lined up and sewn correctly, then cut out your candles.

Cut out your cake sections. I doubled each of my chocolate cake sections, but the felt I was using was rather thin. if you use thicker felt you will not have to.

Cut out and sew the icing sections to the top of each cake section. Use the complete cake guide to position them on your page in line with the magnet squares and sew them onto the page by the sides and bottom, leaving the section that has the icing sewn on it free to make a pocket for the candles. Do not sew down over the icing.

Cut out your bunting from the corresponding colours as indicated on page for of the template. I wrote the English words grammar words 'IS', 'BUT' & 'AND' on the back of the blue bunting, so it can be folded over when you line up the candles and help reveal the message - although I have just discovered I placed the words in the wrong order on the bunting... oh dear! At least we can still use it on the side without the writing and insert the words in our heads.

Fold your length of elastic in half, and starting at the folded end, wrap your bunting around both strings and pin. Leave a small loop of elastic at each end and spaces where indicated so you can button it onto the page. When everything is lined up and you have worked out how much length you will need, tie the ends of the elastic together and hide the knot inside the last piece of bunting.


The bunting colours have been co-ordinated so that there is blue bunting the same colour as the candles in all the spots where an English word needs to be inserted for the grammar to make sense. There is no magnet inside the blue bunting, but sew all the rest with a magnet inside for the candle to attach to so you can reveal the hidden message by lining them up. Again, ensure that the magnet's pole is positioned so that the meaning side of the candle faces outwards when attached to the bunting. Just sew in a V shape, going over the top of the elastic so it stops the bunting moving around and the magnet can't fall out.


"but" and "the" are the wrong way around :(

Lay out the bunting on the page above the cake and mark and sew the buttons in place.

I couldn't decide if I wanted to include the strawberries, and how to attach them. I was considering hot glue or press studs, but I ended up just putting them in a small zip lock bag in the middle pocket. That way they can be played with but are not permanently attached.


Finished!

Difficulty Level = Hard

Probably the most difficult aspects of creating this page is getting the magnets into the candles and bunting while sewing. You could make them slightly wider or hand sew those sections. Also, lining up the wording is a little confusing. If you don't have a machine with an alphabet, you could use a fabric marker, iron on transfer paper, or hand embroidery instead. Using a fabric marker or transfer paper might make it less confusing as you could do the writing after the candle and bunting are sewn together.

Key Learning Areas and Skills

  • Genesis 5 - This page tells the story of the secret message hidden in the lineage of Adam to Noah
  • Imaginative Play - mmm, cake!
  • Ordering - place the name candles in the correct order of creation/birth
  • Magnets - the candles can be transferred from the cake to the bunting to reveal the hidden message
  • Tucking - the candles have to be tucked under the flap of cake to magnet on properly
  • Buttoning - the bunting elastic onto the page
  • Reading - the names, meanings, and ages
  • Decoding - find the hidden message
  • Fine Motor Skills - all quiet books encourage fine motor skill development
  • Hand-eye Co-ordination - all quiet books encourage hand-eye co-ordination

 Read the Chapter

Genesis 5

Devotional

The idea for this page came from a combination of things... and very importantly, from a poem by Emily Hunter from The Bible-Time Nursery Rhyme Book. It was a very treasured book in my childhood - a gift from my parents for my third birthday. Now that Tahlia is three, I am greatly enjoying sharing it with her too. It comes VERY HIGHLY recommended from me!

Image Source
The poem that inspired me is about Methuselah, and how he would need sooooo many candles on his birthday cake. It has a picture of a massive tiered cake with a tonne of candles on it, and I always loved that page as a child.

The other thing that inspired this page was hearing about the hidden message in the meaning of the names in this lineage. I heard it first in a sermon I think. You can find a detailed explanation here.

Basically, when you read the meaning of each name in the lineage as a list, a secret message is revealed.

Adam = Man
Seth = Appointed
Enosh = Mortal
Kenan = Sorrow
Mahalalel = The Blessed God
Jared = Shall come down
Enoch = Teaching
Methuselah = His death shall bring
Lamech = The Despairing
Noah = Comfort (or Rest)

Man (is) appointed mortal sorrow; (but) the Blessed God shall come down teaching (that) His death shall bring (the) despairing comfort/rest."


Hidden messages like this are evidence of God's design and inspiration in the Bible writings.

Methuselah has a double hidden meaning, because when he died, the flood came. It is thought that his name was intended to be a prophecy of the flood via his father Enoch. You can read more about this topic here.

Patriarchs from Adam to Israel (Jacob)
Image Source 

The ages of the people in this chapter also holds significance, something I noticed when making this quiet book page. They all lived very long lives, but since Noah wasn't yet dead, his age at death is not mentioned until later in Genesis. I think it is rather significant that his death is not recorded in this section because through the story of the flood (the first destruction of the earth) Noah represents the faithful generation that will be living at Jesus' second coming, those who will not see death in the final destruction. They will receive comfort and rest.


Follow Faith and Felt Obsession on FacebookPinterest and You Tube

Are you excited to study the "boring" Bible passages now?

Wednesday 24 August 2016

Tahlia's Quiet Book - Teddy Page

Here is another page my Mum and I made for Tahlia's original quiet book. I am including the free template so you can make one for someone special too!


This teddy was originally a full teddy that my Mum designed and had her primary school craft class make.  We cut him off at the shoulders and put a ribbon to learn to tie around his neck. This is proving to be a challenging task, but one that has been of interest to Tahlia for quite a while now. She undoes the bow very quickly, and then pretends to do it back up. She watches carefully as someone does it up for her.


We also made his ears able to flap, which I am so happy about because Tahlia has found that she can play peek-a-boo by covering his eyes with his ears!!


Since I got the idea of making quiet books around the time of my friend's baby shower, I decided we should make her one at the party.................... Right.................... Probably not a good idea. Mum and I had to finish off a lot of pages. Actually we were making two of each page at that party since my friend's sister was also planning a baby. So, along with a few others, Mum and I made this page three times, phew!

The other teddies we made had blue and green eyes. Tahlia ended up with the pink ones because she was the only baby with a known sex at the time. They all ended up being girls though! Anyway, I'd like to teach her about having 'pink eye' and how to treat it with pretend eye drops. We could get some real imaginary play going on at the vet or doctor's clinic.


Materials needed to create the Teddy Quiet Book Page:

  • A4 felt background sheet in cream
  • felt scraps in tan
  • ribbon
  • black wool
  • black thread
  • two large buttons
  • my Mum's teddy template... Thanks Mum!


How to create the Teddy Quiet Book Page:

  • Cut out each ear twice and sew together to strengthen.
  • Cut a length of ribbon and burn the ends to stop it fraying.
  • Cut out the head and body section and pin in place with the ribbon and ears positioned underneath. Sew down.
  • Mum embroidered his mouth and nose for me with some black wool.
  • Attach the eyes with black thread.

All Done!


Follow Faith and Felt Obsession on FacebookPinterest and You Tube

Do you like Teddy pages?