Thursday, 22 May 2025

Vintage Felt - Creation Circles Day 4

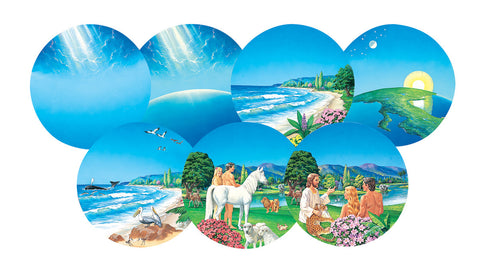
This is Creation Day 4 of a vintage Creation Circles felt board set.


This set is to be used as a way to keep kids engaged while you tell the story of creation on a felt board.

The greater light, lesser light and the stars feature on Day 4 of creation, and these pieces should all be glued in place during the lesson, as well as matching the correct number to the creation circle for placement only so it can be used for revision.


The space created on Day 1 has now been filled.

I have two copies of Day 4 Creation Circles from two different sources. You can see the differences in how people put them together. It's great how sets like this that you put together yourself will always be personalised.


Betty Lukens sells a modernised version of this set in small and large Creation Circles options.
You can get a cartoon type version, Beginner Bible Creation from Little Folk Visuals as well. Or why not try making your own set?

The song "This is My Father's World" is suggested to be sung together in class to accompany the lesson.


Image Source


Once published, I will link the other Creation Circle posts below:


Follow Faith and Felt Obsession on FacebookPinterest and You Tube

Thursday, 8 May 2025

Genesis 23 - Sarah Dies and is Buried Quiet Book Page

In Genesis 23, Sarah dies and is buried in a cave - the only property Abraham ever owns in the Promised Land during his lifetime.


Memory Verse: Then Abraham rose from beside his dead wife and spoke to the Hittites. He said, “I am a foreigner and stranger among you. Sell me some property for a burial site here so I can bury my dead.” Genesis 23:3-4 (NIV).


Materials needed to create the Sarah Dies and is Buried quiet book page:

  • A4 felt background sheet - I used pale blue
  • my free template
  • double sided fusible interfacing and/or fabric glue
  • fabric scrap for the field - I used a shaggy green
  • fabric scrap for the inside of the cave - I used a patterned cotton that somewhat resembled cave paintings
  • felt scraps in pink, dark brown, light blue, light purple, and light tan
  • light tan small wooden button
  • light tan round elastic
  • light tan ribbon scrap - I used a jute/hessian/sting type ribbon
  • sewing thread to best match the page
Cut out the inside of both sides of the cave and the field from your fabric scraps. I trimmed a lot of the shag from my fabric to reveal short rows of shag to represent my field. Use the double sided fusible interfacing or the fabric glue to attach the fabric scraps to dark brown felt for the cave, and the page background for the field. Cut out the cave pieces from the felt and sew around all the pieces using matching thread in a tight zig zag stitch to prevent fraying.


If you want to add trees as I wish I did (see the devotional section), this might be a good point to do that.

Use the template pieces to line up where the back cave piece should be sewn onto the page and sew it down as close to the zig zag stitch as possible. Then sew the top cave piece over the top along the bottom, left side and top edge, leaving the right side open to form a pocket.

Cut out Sarah and sew onto the same colour felt, then cut her out. You can put her in the cave pocket.

If you are using actual ribbon, see my post on How to Stop Ribbons Fraying.

Cut out your left and right city gates from the light tan felt. Line up your city gates and measure the amount of elastic you will need to fit over your button on the opposite side (with a bit extra to sew into the left gate). Sew down the left gate with the elastic tucked between it and more light tan felt on the inside edge of the gate, and the light tan ribbon on the outside edge to use as a hinge. Cut it out, being careful to fold back the elastic and ribbon so you don't cut them off as you do this. Sew down your right gate with ribbon on the outside edge and cut it out, folding back the ribbon as you go around. Hand sew your button onto the right city gate. Button the elastic from the left city gate over the button on the right city gate.


Use your template pieces to line up where to position Abraham and Ephron on the back of the city. They should hover a little above the bottom edge so that you can sew the back city piece onto the page background. Use your front city template piece to position the back city behind where the gate will be and sew it down. Place the city gate over the back city and place the front city piece over the ribbon hinges. Trim and prevent the ribbons from fraying if needed to fit underneath the front city piece without sticking out the outer wall of the city. Ensure there is enough ribbon so the gate can be swung open. Sew the front city into position catching the ribbon as you go.


My photos reveal that I sewed the purple hill down before the city, but I think it is better to sew it after so you can be sure to align the edgeof the  city with the edge of the field. If you cut the purple hill a bit wider/longer than necessary, you can cut it down to fit exactly in the space between the cave and the city. Sew the purple hill in place. 

Finished!


Difficulty Level = Easy, plus no-sew version.

A very easy quiet book page!
Just use hot glue wherever sewing is recommended for a no sew version.


Key Learning Areas and Skills

  • Genesis 23 - God promised the whole land to Abraham and his descendants - but this promise was not realised in Abraham's lifetime, yet he believed it would happen (and one day he will live to see it)
  • Buttoning - open and close the city gate using a button
  • Pocket Play - young children love pulling things out and placing items and putting them back (not always lol) into pockets - Sarah is all wrapped up ready to be buried in the cave
  • Peek-a-boo - Abraham and Ephron are hiding behind the city gate
  • Imaginative Play - sometimes kids need to be allowed to play with topics like death and burial, especially if they have recently lost a loved one - play is how they work through issues
  • Fine Motor Skills - all quiet books encourage fine motor skill development
  • Hand-eye Co-ordination - all quiet books encourage hand-eye co-ordination


Read the Chapter

Genesis 23

Devotional

While Abraham didn't own the whole Promised Land, God did allow him one little slice where he could confidently bury his dead without fear of disruption.


This song made me realise I had left an important part of this page out. It made me realise that this scene and the location of the cave and field at Machpelah near Mamre including all the trees in the field is probably the same place that Abraham camped near the trees at Mamre in Genesis chapter 18 when God visits him and talks to him about a promised son, and about Sodom and Gomorrah. 

It must have been a very significant and special place for Abraham and the family. I think maybe this place holds his hopeful expectation of the resurrection and the ultimate fulfilment of God's promises. If I made this page again, I'd want to include the great trees at Mamre.


Follow Faith and Felt Obsession on FacebookPinterest and You Tube

What has God asked you to believe in faith? Comment below!

Thursday, 24 April 2025

The Double Crown - Easter Hat Parade

The challenge continued for us to create yet another fun faith-filled Easter Hat for the parade at school.


This hat was probably the easiest we have made and it was a bit of a relief, actually, that I didn't have to spend so much time on this one. I think it was finished within one evening (if I remember correctly). It has been a few years since I posted about our Easter Hats so it was a few years ago now.

All we did was print off a crown template we found on the internet (there are lots available) and keep repeating the pattern across a length of felt, long enough to wrap around Tahlia's head and leave some for doubling over to attach with hook and loop tape (we only used the hook part).


Tahlia then helped sew the crown to another piece of felt and I cut it out.

I only ended up putting the hook side of some tape on one end of the crown so that it wouldn't show on the outside of the crown. It held well without the loop side since felt is full of fibres anyway.


Then Tahlia had lots of fun hot gluing on gems and some thorny looking decorative trim, which she embellished with felt thorns (small brown triangles).

The hat shows the Crown of Thorns Jesus wore to the cross, and looks forward to the crown He will wear when He returns as King Messiah.

Tahlia doesn't remember if she was able to talk with her friends about the meaning of the hat, but she does remember that it was fun to wear a crown. And she wasn't embarrassed to wear a crown with a Christian message. Even if she didn't talk to her friends about Jesus and His love for us, and how He was willing even to take the punishment that we deserve so we don't have to, it is important to keep offering her those opportunities. I know I don't take every opportunity presented to me either, but practice does make it easier next time. So keep giving your kids opportunity to practice sharing their faith!


After the parade, we used it for our holiday décor, along with some other story-telling items. 

This Easter Hat is probably more boy-friendly than some of our previous Easter Bonnets which are much more girly (although you could modify a couple of them):


Follow Faith and Felt Obsession on FacebookPinterest and You Tube

Thursday, 10 April 2025

Exodus 14 - Crossing the Red Sea Quiet Book page

In Exodus 14, God provides a way of escape from Egypt by crossing the Red Sea.


Memory Verse: Then the waters returned and covered the chariots, the horsemen, and all the army of Pharaoh that came into the sea after them. Not so much as one of them remained. But the children of Israel had walked on dry land in the midst of the sea, and the waters were a wall to them on their right hand and on their left. Exodus 14:28-29 (NKJV).

Materials needed to create the Crossing the Red Sea quiet book page:

Cut out all the pieces for this page, and along the dotted lines where indicated to form two flaps that will open to reveal the Israelites underneath crossing the Red Sea. The Betty Lukens FAQ section has posted a cutting tips PDF.

Hot glue (or sew) the picture of the Israelites crossing in place behind the flaps, being careful not to get any glue on the flaps (or they might get glued shut).


Sew the page onto the background felt along three sides, leaving the top edge open to form a pocket. Pop the Egyptian army piece inside (or better yet, play with the page)!

Difficulty Level = Easy, Plus no-sew version!

One of the easiest pages to make! Just use hot glue wherever sewing is recommended for a no sew version.

Key Learning Areas and Skills

  • Exodus 14 - God made a way to escape the Egyptian army even though it seemed like there was no hope - He wants to set us free
  • Imaginative Play - action the story of the Israelites crossing the Red Sea to escape from the Egyptian army
  • Ordered Storytelling - remember and tell the story in order using the scene changes
  • Pocket Play - young children love pulling things out and placing items and putting them back (not always lol) into pockets
  • Fine Motor Skills - all quiet books encourage fine motor skill development
  • Hand-eye Co-ordination - all quiet books encourage hand-eye co-ordination


Read the Chapter

Exodus 14


Devotional

God can make a way where there seems to be no way. He enjoys displaying His strength and Wisdom against dire circumstances. The more dire your circumstances, the more His miraculous workings out are shown to be. So don't despair when things seem impossible, rejoice that God is preparing a miracle for you to bear witness of!


Additionally, I think it is important to tell the full story, including the death of the Egyptian army. Sometimes people leave these kinds of things out, but without this part of the story, it is incomplete. It is a warning to those who defy God, and who think they can get away with treating others as slaves without consequences - there are always consequences! And can there be a true hero without setting people free properly? How can you triumph if your enemies are still casting their shadow over you? Kids are more resilient than you think. They rejoice when the dragon is slain.


Follow Faith and Felt Obsession on FacebookPinterest and You Tube

Do your little ones enjoy learning to plait? Comment below!

Thursday, 27 March 2025

Vintage Felts - Creation Circles Day 3

This is Creation Day 3 of a vintage Creation Circles felt board set.

You can build this set together in class by gluing on felt pieces to form a layered picture.


On Day 3 of Creation, God made dry ground to appear and vegetation covered the land. The following needs to be glued down during this lesson:
  • grass and tree
  • apples
  • pumpkin vine
  • red and yellow flowers


You can also place the correct number on or near the circle, but I don't think it is meant to be glued down, just matched for re-use.

A space for the beasts and mankind to inhabit has been made ready for Day 6.

I believe this set is a vintage version of these Creation Circles by Betty Lukens. You can get the new ones in a larger option with one circle and 17 pieces to form various overlays, or a smaller version with seven separate circles like this set.


You can get a cartoon type version, Beginner Bible Creation from Little Folk Visuals as well.

Once published, I will link the other Creation Circle posts below (you may find something different in each post):


Follow Faith and Felt Obsession on FacebookPinterest and You Tube