Friday, 16 November 2018

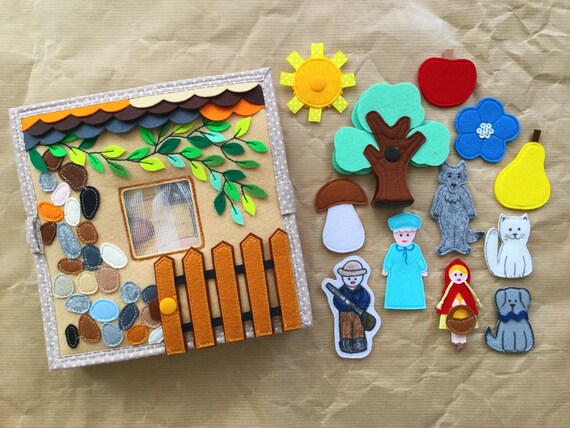
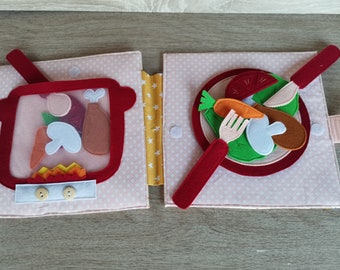
The Best Things About Quiet Books

I asked the creators - here are the reasons why quiet books are experiencing revival...


"What I like best about my story quiet books is that you can tell stories, make up stories together and play (in whatever language you are most comfortable)."

Teenytinymom - How to Make Quiet Books


"What I love most about my quiet books is that quite literally sky is the limit with respect to what you can create! Anything can be done ๐Ÿ˜Š"

Busywings on Facebook
Busywings on YouTube


"I love quiet books, because they can be used by children of all ages and by people with Alzheimers to give both mind and body stimulation."

In the Hoop with Lee on Facebook


"Busy books are the best screen free travel toy, glad they are making a comeback."

Winter and Willow Felts on Facebook
Winter and Willow Felts on Etsy


"What I like about the quiet books is that they help children to develop their fine motor skills and imagination... and of course to keep the kids away from gadgets for some time ..."

My Craft / Quiet books on YouTube
My Craft / Quiet books on Facebook


The best things about quiet books are "Colorful pages with lively activities helping little fingers to weave; button; zip; buckle; lace and learn too!! And yes all these with loads & loads of fun ๐Ÿ˜Š๐Ÿ˜Š
Crafters love to get back to childhood get into little one’s shoes to see their world !!"

Creative Puppetz on Facebook
#creativepuppetz on Instagram
Creative Puppetz on YouTube


"Books are great for children’s development and learning, perfect toy for home and places when child has to be quiet, like in an airplane, traveling by car, at the doctor’s office."

Sviatlana Balybina on YouTube


"Hi! The thing I love 'bout quiet books is that it's so interactive that it creates a natural interest in little ones towards getting started with books"

Nest Crafted on Facebook
Nest Crafted on YouTube


"I’m in love with quiet books about 3 years already. I like to create pages, making patterns, sewing. It is perfect developing toy which helps kid to know new things. And the main reason I love them, fabric book is not electronic device and can not be connected to internet. For now it is very important for kids to be busy without involvement web information."

Felt Cookie on Facebook


"Really, I think I love all material, activity, play and learn...my son loves books made by Mum ...and it is an evolving toy, I make new books as he develops ๐Ÿ˜‰"

Feutrine et Activitรฉs pour les petits on Facebook


"I love that quiet books enable learning through play - the best way to learn anything!"

Carissa D on YouTube

Sunday, 4 November 2018

Genesis 12 - Abram's Journey Quiet Book Page

In Genesis chapter 12, God tells Abram to go to a place He would show him. I have included a few verses from chapters 11 and 13 here for convenience.


Memory Verse: "The Lord had said to Abram, “Go from your country, your people and your father’s household to the land I will show you." Genesis 12:1

Materials needed to create Abram's Journey quiet book page:

  • A4 felt background sheet. I used deep blue.
  • brown felt, plus tan scraps
  • sewing thread to match, plus blue for the rivers
  • a shoelace
  • crotchet rings
  • my free template


First place your map UPSIDE DOWN on your brown felt and trace around it with a pen.  This way the pen side will be face down...


...and the map will be the right way when placed on the background felt. Sew it down.

Next mark each point at which you will turn when sewing the rivers. I placed my template on top of my felt version and pushed in a pin at each turning point. I started at the branched ends and aimed for the entrance point of each pin when I got to each subsequent pin.


Sew down your pyramids and crotchet rings where indicated. For the crotchet rings I set my machine to zero length on zig zag stitch and secured them with about 20 stitches.

Measure the length of shoelace needed by threading it as shown in the first picture and  leaving enough of an end to stitch it down underneath the zigurat. Melt the ends of the shoelace to prevent fraying before using zig zag stitch to secure it to your page . Place the ziggurat over the end of the shoelace and sew down.

Finished!


Difficulty Level = Intermediate

This is a very easy quiet book page to sew, except for sewing the rivers. You might find this part easier if you do it by hand.


Key Learning Areas and Skills

  • Genesis 12 - This page tells the story of how Abraham obeyed God and moved his family to Canaan
  • Threading - thread the shoelace through the places mentioned that Abraham stopped at on his way
  • Fine Motor Skills - all quiet books encourage fine motor skill development
  • Hand-eye Co-ordination - all quiet books encourage hand-eye co-ordination


Read the Chapter

Genesis 12


Devotional

Abraham had already moved from Ur to Haran when God called him to move again. Moving can be a hard thing, particularly when leaving family - although sometimes it is the reason for the move! Perhaps it was one reason that God wanted Abraham to move, although maybe not. Whilst it is recorded in non-Biblical sources that Abraham's father was an idol worshiper and even owned an idol shop, it does seem that God waited until his death before instructing Abraham to leave.

It is also difficult to trust God and take those first steps when you can't see the end of the road. But God asked Abraham to go to a place that He would show him. Abraham didn't know where the road ended. But He decided to trust God anyway.

It ended up being a bit like a wander in the wilderness for him, and although he eventually ended up living in the promised land, the only piece of it he owned was a burial plot. I assume he could not build a house on land that did not belong to him, and that he continued to live in a tent for the rest of his long life.

There is a lot of pressure on people these days to buy their own home and people who are not able to often feel unsuccessful and like they lack something to show for their efforts. Circumstances are far from perfect and though someone works hard, often things don't work out how we plan. God wants us to remember that this earth is not our home - we are wanderers here. And if we live in a tent for the rest of our lives here that is quite OK. One day we will possess a 'mansion'.


Abraham's Exciting Journey - Song for the Kids


Follow Faith and Felt Obsession on FacebookPinterest and You Tube

I'd love to hear from you!

Monday, 29 October 2018

Genesis 3 - The Fall of Adam and Eve Quiet Book Page

In Genesis chapter 3, Adam and Eve eat from the Tree of Knowledge of Good and Evil.


Memory Verse: Now the serpent was more crafty than any of the wild animals the Lord God had made. He said to the woman, “Did God really say, ‘You must not eat from any tree in the garden’?” Genesis 3:1

Materials needed to create The Fall of Adam and Eve quiet book page:

  • A4 felt background sheet. I used sky blue.
  • felt scraps
  • sewing thread to match
  • fabric paint (optional)
  • sew on press studs
  • a pipe cleaner
  • two black seed beads
  • thin ribbon scrap
  • a tree of the knowledge good and evil template - I used this wall hanging from Wee Folk Art
  • a tree of life template - I used the Autumn Oak Applique pattern also from Wee Folk Art
  • a printer / scanner
  • a laminator and lamination sheets or iron on transfer paper/sublimation printing and white stiffened felt

Image Source

For the Adam and Eve finger puppets, I used the workbook Bible Stories by Twin Sisters Productions, 2005. I printed and cut out around the outside of the puppets, but left the finger holes uncut, then laminated them. After laminating, I cut around each finger puppet again, and cut out the finger holes. I used a single craft hole punch to make a hole in the finger slots so I could get the scissors in. If you want them made from felt, you could use transfer paper and white stiffened felt, or have them sublimation printed onto felt and then back them with stiffened felt.

On your background sheet, arrange some green felt in the foreground to make grass and sew down.

Cut out a double layer of darker green felt in the shape of a bush. Decorate one piece with fabric paint flowers (or use flower buttons etc). Sew one side of two press studs to the back of the bush piece so they will fit between the finger holes of the finger puppets. Sew the two bush pieces together. Then sew the bush down in about the middle of the foreground along the bottom edge. Sew the other half of the two press studs to the background sheet so they line up with their respective studs on the bush. This is how you will store the finger puppets and stop them falling out of the quiet book when not in use.


Print and cut out your tree templates. You may have to reduce the size to make sure it fits to your page (sorry I can't remember whether I did or not as I made this page quite a while ago). I definitely reduced the size of the tree of life template so I could create a peek-a-boo flap. I didn't want the tree of life to seem boring compared to the tree of knowledge of good and evil! I just used one of the sections but straightened out one edge and turned it upside down. Use doubled felt for the flaps to strengthen them. Sew fruit down underneath the flaps.


For the Tree of Knowledge of Good and Evil, sew down your leaf sections first. Double the felt for the trunk and sew it down to the page along the trunk and outer tips of the branches. This way you can weave the snake in and out.

The snake was made by sewing a circle of brown felt folded back and forth between two thin strips of felt. I inserted a ribbon at the end for a tongue. Before sewing together completely at the opposite end, I inserted a pipe cleaner to allow the snake to bend and keep it's shape. It was difficult to get the pipe cleaner past the frill, but I got it eventually. Sew on two black seed beads for the eyes.

Finished!

Difficulty Level = Difficult

The snake was quite difficult as I wanted it to be thin - which made inserting the pipe cleaner hard. You could simplify it by leaving off the winged frill on the snake, using a small toy snake, or making this Pipe Cleaner Craft: Beaded Snake by Kids Activities instead. If I had found this idea before making the snake I might have saved myself a fair bit of bother.


Key Learning Areas and Skills

  • Genesis 3 - This page tells the story of how sin entered the world
  • Imaginative Play - our Adam and Eve like to play peek-a-boo
  • Press Studs - apples and Adam and Eve get held behind the bush for storage with press studs
  • Finger Puppets - your fingers are Adam and Eve's legs!
  • Peek-a-boo - lift the flap to discover fruit on the Tree of Life
  • Weaving - the snake can be woven through the branches of the tree of knowledge of good and evil
  • Fine Motor Skills - all quiet books encourage fine motor skill development
  • Hand-eye Co-ordination - all quiet books encourage hand-eye co-ordination

Eve giving Adam the apple...


Read the Chapter

Genesis 3

Devotional

The first lie is still believed today. No-one wants to think they are going to die forever. The snake said "you shall not surely die" but God said "The wages of sin is death, but the gift of God is eternal life" (Romans 6:23). The gift is only given to the righteous. The dead know not anything (Ecclesiastes 9:5).

It is a misnomer that the righteous go to Heaven when they die. The righteous go to Heaven after the resurrection, when Jesus returns with His reward (Isaiah 40:10, Revelation 22:12). Heaven is not the reward - He is not bringing Heaven with Him. Eternal life is. Until then, Jesus refers to the dead as 'sleeping'. The belief in immediate Heaven and Hell following death entered the church with the conversion of Gentile (often Greek) people who brought their ideas from Greek mythology with them.

It would be unjust for punishment to precede judgement - and God will leave no avenue open for Satan to appeal against His justice system.


Adam and Eve - Song for the Kids


Follow Faith and Felt Obsession on FacebookPinterest and You Tube

I'd love to hear from you!

Wednesday, 3 October 2018

Pre-School Bible Class Song Activity - Felt Bible

The best Bible class I have taken Tahlia to when she was little was based almost entirely on songs and activities to go with the songs. It had a theme or story for each month and a box of items to go with each song. Children need repetition, and repeating the songs all month helped them learn the song and enjoy it.


This felt Bible has been hanging around the children's room at a church I recently visited for at least 20 years. No-one, not even the older ladies, could tell me where they came from - but they would be easy enough to make yourself. I think they may have been a kit purchase for people to cut out and put together themselves. If you know the company that produced them, please share your info!

They appear to be printed using the sublimation method to me, although the ink has rubbed off onto the other pages so perhaps not. But sublimation printing would definitely work if you did not want to paint/draw/sew a whole bunch by hand. Check out my post on affordable sublimation printing - Sublimation Printing on Felt - Test.


Alternatively you could use iron-on transfer paper and use images of your child's family. Putting Jesus there with all the other family members demonstrates to a child that He is an important member of their family.


This item was handed out to accompany the song Read your Bible, Pray Every Day. I'm sure you could adapt it to many other songs too, such as With Jesus in the Family, Happy Happy Home.


Children's Bible Songs has printable lyrics and guitar chords for Read Your Bible, Pray Every Day.


Follow Faith and Felt Obsession on FacebookPinterest and You Tube

If you have any other song activities or picture ideas to include in this Bible I'd love to hear from you!

Monday, 24 September 2018

Genesis 50 - Joseph's Bones Quiet Book Page

Genesis 50 contains Joseph's dying words where he expresses his faith that God will make good on His promise to bring Israel out of Egypt. Joseph  asks his descendants to bring his bones with them when they leave.


Memory Verse: "So Joseph made the Israelites swear, saying, “When God comes to you, you shall carry up my bones from here.” Genesis 50:25.

Materials needed to create the Joseph's Bones quiet book page:

  • A4 felt background sheet - I used aqua
  • gold coloured material that won't fray - I used pleather but it was difficult to sew due to it's stretchiness (made easier by gluing first)
  • clear craft glue if using pleather to make sewing easier - I used polyacetic acid & ethylene resin based glue
  • gold trim
  • gold ribbon - melt the ends to prevent fraying
  • sewing thread to best match the colours
  • two buttons - I found some ivory ones with black etchings that somewhat resembled hieroglyphics
  • felt in gold/straw (or near enough), black, skin colour, and white/glow-in-the-dark
  • glow-in-the-dark paint if using white felt
  • decorative material or ribbons etc for the coffins
  • white ribbon for wrapping Joseph's mummy
  • my free template
Trace the sarcophagus, coffin head and death mask pieces using the template onto the back of your pleather using pen - this will avoid puncturing the pleather unnecessarily. Cut them out. Glue the front and lid of the sarcophagus to your gold/straw felt, inserting small strips of ribbon to form hinges along the top edge of the lid and loops for your buttons along the bottom edge. Make sure you make big enough loops to fit the buttons through easily. You can use pins to keep the ribbons in place if you need to but make sure it is where you will be sewing so you don't have holes where they will be visible. Leave to dry overnight.


Sew the pleather to the felt on all sides for the lid, reinforcing where the ribbons are. Only sew the top edge for the front. Cut them out ensuring you do not cut off the ribbons. Next glue the sarcophagus back to the background page, inserting the other ends of the ribbon hinges from the lid. Sew down once dried overnight. Then sew the front on the bottom and sides to form a pocket. To complete the sarcophagus, hand sew your buttons on.


Cut scraps of pleather to fit underneath the face holes of the coffin heads and death masks. Glue the death mask pieces to the gold/straw felt, layering a scrap in position under the front piece with the face hole. Leave to dry overnight, then sew down around the face hole and edges. Cut out the pieces and sew together along the top curve.


Decorate your coffin bases as desired and glue and sew on the head pieces. Sew together by the sides excluding the head or from the center of the head at the top to the center of the base at the bottom to form pockets.


I sewed the black one the first way as there was no reinforcing on the base and the other way for the blue/green coffin as it had a double layer due to the material.


I also used glue under the decorative material on this one as it is very thin material and very prone to fraying. To ensure there would be no fraying I did a tight zig zag stitch around those edges too.


For the mummy I doubled the skin coloured felt twice, inserting a wide white ribbon between the under body piece before sewing the two doubled pieces on top of each other along one straight side edge.


To make the bones I drew around the template pieces onto my white felt with a black pen and painted the glow in the dark paint on.


Glow-in-the-dark felt would make this step easier - not that it was hard, but as it is unavailable in Australia and I could not find a seller online, this was my solution. To finish, simply cut out the bones and glue them in place on the inside of the body.

Done!


Difficulty Level = Intermediate.

If you are using pleather the glue is imperative. It will be a nightmare without it as you will get bunching and/or stretching out of shape. Also, DO NOT attempt to use tape instead of glue - you will end up with the dodgy sewing featured below and have to start over.


Key Learning Areas and Skills

  • Genesis 50 - Joseph showed his faith by instructing his descendants to take his bones with them when God brought them out of Egypt!
  • Imaginative Play - wrapping and burying an Egyptian mummy is pretty fun, not to mention golw-in-the-dark bones!
  • Buttoning - open and close the sarcophagus lid
  • Wrapping - wrap the ribbon around the body
  • Sequencing & Spatial Awareness - order the pockets the wrapped body goes into - death mask, small coffin, large coffin, sarcophagus
  • Science - could incorporate a lesson about UV light and glow in the dark phenomena
  • Fine Motor Skills - all quiet books encourage fine motor skill development
  • Hand-eye Co-ordination - all quiet books encourage hand-eye co-ordination


Read the Chapter

Genesis 50


Follow Faith and Felt Obsession on FacebookPinterest and You Tube
If you know of any earlier patterns or other information, I'd love to hear from you!


Devotional

There are Jewish legends about Joseph's bones that tell stories about the Israelites forgetting to take them with them when they were about to leave Egypt. The stories were written well after the fact and there are variations in the details, but basically the story goes that the pillar of cloud/fire would not move when they were all assembled ready to leave. The great-granddaughter of Levi realised that they had forgotten Joseph's bones. She was the only person old enough to remember where his body was laid. Apparently the Egyptians had sunk his coffin into the Nile River in an attempt to bless it, so Moses had to perform a miracle to get it to float so it could be retrieved. Only then did the pillar move forward to lead them out of Egypt.

Whether the story has some truth to it I don't know, but I did find it rather interesting.


You can see the monument at Joseph's burial site in this video.


Our actions follow from what we believe to be true. Joseph gave instructions about his bones fully believing that God would bring the Israelites out of Egypt. God had told Abraham that his descendants would be enslaved in Egypt for four hundred years (Genesis 15). He also brought them to Egypt to keep them safe throughout famine. That which brought blessing also brought suffering. And you can see in what Joseph says on his deathbed that he believed both that Israel would suffer in Egypt even though throughout his lifetime it had been a blessing and that God would come to their aid and bring them out of Egypt. Indeed they did need God to come to their aid to secure release from Egyptian slavery. The story of Exodus shows what great lengths God went to keep His promise. He will surely keep the remainder of His promises and bring us out of this world of suffering and into His eternal life of blessing. May our actions demonstrate our faith to our children and peers like Joseph's did.


Follow Faith and Felt Obsession on FacebookPinterest and You Tube

Which is your favourite coffin?