Showing posts with label tucking. Show all posts

Sunday 19 November 2017

Mark 4 - This Little Light of Mine Quiet Book Page

In Mark chapter 4, Jesus tells a parable about how we need to let our light shine or it will be lost.


Memory Verse: " Then Jesus asked them, “Would anyone light a lamp and then put it under a basket or under a bed? Of course not! A lamp is placed on a stand, where its light will shine." Mark 4:21

Materials needed to create This Little Light of Mine quiet book page:

  • A4 felt background sheet. I used medium brown.
  • felt scraps in white, red, orange, yellow, and brown, and a basket colour
  • ribbon and/or rik rak scraps
  • sewing thread to best match the page
  • scissors!
  • the free template
Sew a thick ribbon along the bottom third of the page - this is to form a sort-of tablecloth. Make the ribbon longer than the page so you can fold the edges under when sewing the book together. Melt the edges of the ribbon to prevent fraying.

Cut out all your pieces from felt. Cut a length of ribbon or rik rak to fit the top of your basket edge. Melt the edges to prevent fraying, them sew it to the top of your basket. This will decorate it, but also re-enforce the felt to make it stronger on the edge that will be used as a pocket. Sew the basket in place, sitting it on top of the tablecloth ribbon on the right side of the page, leaving the top ribbon edge open to form a pocket.


Cut a length of ribbon about 19 cm long and melt the edges to prevent fraying. Sew it to the top of you candlestick bowl, starting at the left edge. This will mean that you have a length of ribbon left over at the other end. Sew down your candlestick bowl on the other side of the page, sitting on top of the tablecloth ribbon. Leave the top ribbon section open to form another pocket. Tuck the leftover ribbon at the top under the candlestick bowl when you sew it down to form a handle.


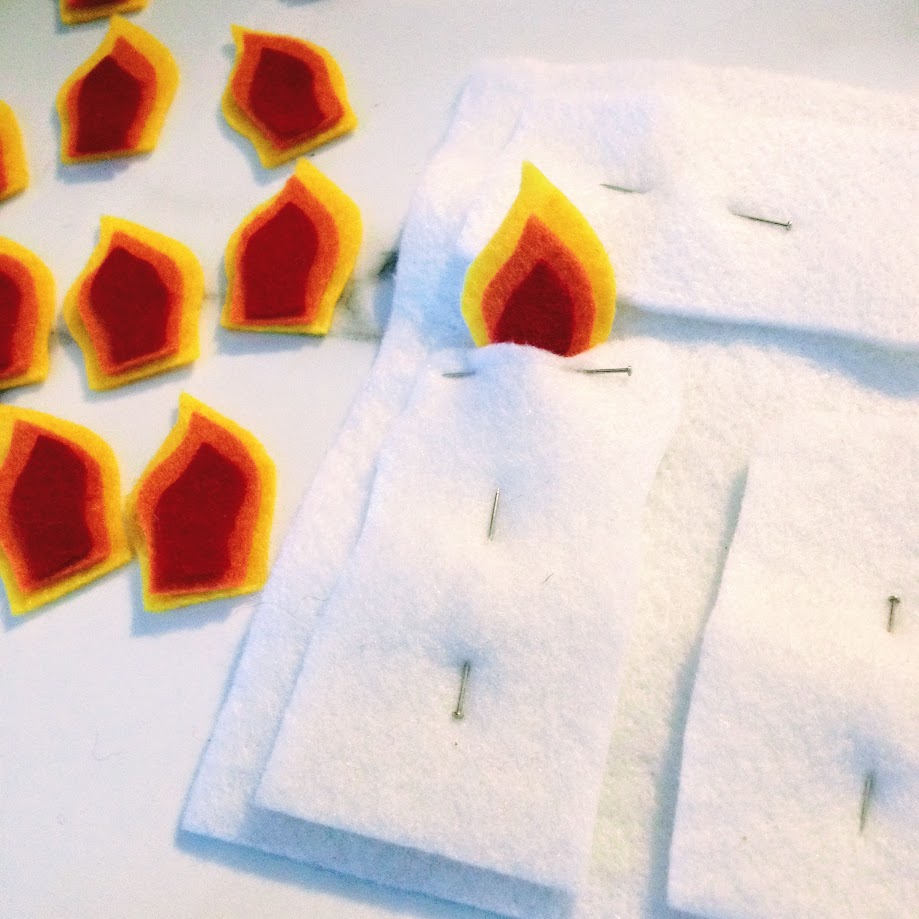
Layer the flame pieces and sandwich them between the white candle piece and another white piece of felt. Sew around the top and sides of the candle, leaving the bottom open to form a finger puppet. Cut it out and sit it in the candlestick bowl like Jesus instructed, not in the basket!! Or better yet, put it on your finger and sing the song "This little light of mine" and do the actions.

Finished!


Difficulty Level = Easy, plus No Sew version.

A very easy quiet book page!
Just use hot glue wherever sewing is recommended for a no sew version.


Another version I made on a smaller sized page (roughly 10" x 10").


Key Learning Areas and Skills

  • Mark 4 - This page tells about how we need to let our light (belief in Jesus) shine, lest it get suffocated under a basket
  • Imaginative Play - Sing the song posted from YouTube below and follow the actions with the finger puppet on your finger. This song is currently one of Tahlia's favourites, which is why I made this page now I guess!
  • Tucking - Tuck the candle into the basket (No!) and candlestick bowl!
  • Fine Motor Skills - all quiet books encourage fine motor skill development
  • Hand-eye Co-ordination - all quiet books encourage hand-eye co-ordination


Read the Chapter

Mark 4

Devotional

What a warning! If we hide our light (understanding of God's word) we will lose it. But if we expose it, it will be fed and grow!! God promises in Isaiah 42:3 that "He will not crush the weakest reed or put out a flickering candle. He will bring justice to all who have been wronged." See also Matthew 12:20. He is sensitive with us and we can trust Him with our souls no matter how fragile we feel.


This is the traditional kids song "This Little Light of Mine" which the page is designed to be sung with. The version is a little dated, but it was the best I could find. Hope your child enjoys singing it with you!


Follow Faith and Felt Obsession on FacebookPinterest and You Tube

Do you have good memories of this song?

Thursday 20 April 2017

Psalm 4 - Peaceful Sleep Quiet Book Page

In Psalms chapter 4, David acknowledges that it is God who keeps us safe.


Memory Verse: "In peace I will lie down and sleep, for you alone, Lord,
make me dwell in safety." Psalm 4:8 NIV

Materials needed to create the Peaceful Sleep quiet book page:

  • A4 felt background sheet; I used mauve
  • felt/material scraps, velour is good for the blanket
  • embroidery floss (optional)
  • small rope dolls (I bought mine from a dollar shop)
  • sewing thread to best match the page
  • a bed template - I used the Five Little Monkeys pattern by Stephanie of Imagine Our life
Sew a large scrap of felt to fill the bottom third of your felt background sheet.  I cut off the excess mauve so I could use it for something else. You could simply sew a strip over the bottom third of your sheet.

Cut out the bedhead and sew it down, followed by the pillows. Be sure to line it up properly so that the bed base does not allow wall coloured felt to show through, and that the pillows are visible above the blanket.

I used velour material for the blanket. It was from a baby suit given to Tahlia. The velour makes a lovely soft blanket for the dollies and adds a touch and feel aspect to the page.  Cut out two blanket sections so they can be sewn right sides facing out. Use the embroidery floss to add an authentic touch to the top edge of the blanket. Sew the blanket in place to the bed base.

Sew the bed base down to the floor/wall on the bottom and sides.

Put the dollies into bed.

Finished!


Difficulty Level = Easy.

Blanket stitch is easy, don't be off-put. If in doubt, You Tube it!

Key Learning Areas and Skills

  • Psalm 4 - This page tells that God keeps us safe, and we can sleep in peace
  • Imaginative Play - The dollies can play at all sorts of things. These three dollies are meant to be Tahlia and her cousin, and her friend enjoying a sleepover.
  • Touch and Feel - The velour blanket is lovely soft texture, and it runs in a grain - you can rub it with and against the grain and feel a big difference in texture
  • Fine Motor Skills - all quiet books encourage fine motor skill development
  • Hand-eye Co-ordination - all quiet books encourage hand-eye co-ordination

Read the Chapter

Psalm 4

Devotional

Financial stresses seem to be the focus of this Psalm. They can certainly keep you awake at night. The basic message is that if you resolve to do the right thing, and you decide to put your trust in God, His listening ear and attentiveness is worth more than financial security.

The Easy-to-Read Version is more of a paraphrase, but it puts this Psalm so beautifully, and brings out such meaning that it is WELL worth the read.

Despite my worried nights, He has always seen us through. I pray you have a peaceful sleep tonight.


Follow Faith and Felt Obsession on FacebookPinterest and You Tube

Does this quiet book make you feel safe enough to sleep resting in the arms of the Almighty?

Tuesday 6 September 2016

Genesis 5 - Lineage Birthday Cake Quiet Book Page

In Genesis chapter 5, we are given the lineage of Adam to Noah, along with their ages at death, and a secret message hidden in what many would consider a rather boring Bible passage.


Memory Verse: Now he called his name Noah, saying, “This one will give us rest from our work and from the toil of our hands arising from the ground which the Lord has cursed.” Genesis 5:29 NASB

Materials needed to create the Lineage Birthday Cake quiet book page:

  • A4 felt background sheet. I used mid blue.
  • felt scraps
  • sparkly felt for icing (optional)
  • sewing thread to match each colour of felt
  • magnets - I used 5mm craft neodymium magnets, but you need to be careful with these... they are very strong magnets so they are dangerous if swallowed
  • four small buttons
  • round black elastic
  • sewing machine with font function (or alternate method e.g. hand embroidery, fabric marker or transfer paper)
  • things to decorate the cake e.g. strawberries (optional).
  • the free template
Use the complete cake guide to work out where to position your cake on the page. There are two options, one with candles and one without. Since the candles sit higher than the cake, I thought I better include them so you can see how high they would sit. But since they are very close to the edge of the pattern paper, I thought it might not print properly, so I did one without as well.

Place pins as markers through each 'X'. This is where your magnets will be sewn down under the small squares of felt. Sew your magnets in position, ensuring that they are sewn down with the same side (north or south pole) facing up so that the candles all face the same way when put on the cake.


Write out your lettering using your chosen method (ensuring it will fit into that amount of space) and cut out one side of your candle set.

The name and age at death/translation side (and corresponding meaning side) should say:
  • Adam 930 (Man)
  • Seth 912 (Appointed)
  • Enosh 905 (Mortal)
  • Keenan 910 (Sorrow)
  • Mahalalel 895 (The Blessed God)
  • Jared 962 (Shall Come Down)
  • Enoch 365 (Teaching)
  • Methuselah 969 (His Death Shall Bring)
  • Lamech 777 (Despairing)
  • Noah (Comfort and Rest)
Next, cut out ten flames (not twenty) as it is easier to sew small sections onto a larger sheet of felt than sewing two small sections to each other. It makes it easier to keep things straight and lined up in the sewing machine, especially when you are also going to be inserting flames and magnets between the two parts. I found the idea for this method on the blog Laura Thoughts, so for a better explanation on how to do it, please visit here.


Sew the flames down first and cut them out. Insert them under the top ends of the candles when you pin them on to the corresponding candle side. Make sure you line up the lettering properly on the opposite side.

Start sewing the candles from the bottom end, and when you get back around (but before you get right to the end), insert a magnet into the candle and then sew it closed. You can use a wooden skewer to help push the magnet in. Again, make sure you put the magnet in with the correct pole facing down so that the name side of the candle will face outwards when placed into the cake.


Check that the lettering has been lined up and sewn correctly, then cut out your candles.

Cut out your cake sections. I doubled each of my chocolate cake sections, but the felt I was using was rather thin. if you use thicker felt you will not have to.

Cut out and sew the icing sections to the top of each cake section. Use the complete cake guide to position them on your page in line with the magnet squares and sew them onto the page by the sides and bottom, leaving the section that has the icing sewn on it free to make a pocket for the candles. Do not sew down over the icing.

Cut out your bunting from the corresponding colours as indicated on page for of the template. I wrote the English words grammar words 'IS', 'BUT' & 'AND' on the back of the blue bunting, so it can be folded over when you line up the candles and help reveal the message - although I have just discovered I placed the words in the wrong order on the bunting... oh dear! At least we can still use it on the side without the writing and insert the words in our heads.

Fold your length of elastic in half, and starting at the folded end, wrap your bunting around both strings and pin. Leave a small loop of elastic at each end and spaces where indicated so you can button it onto the page. When everything is lined up and you have worked out how much length you will need, tie the ends of the elastic together and hide the knot inside the last piece of bunting.


The bunting colours have been co-ordinated so that there is blue bunting the same colour as the candles in all the spots where an English word needs to be inserted for the grammar to make sense. There is no magnet inside the blue bunting, but sew all the rest with a magnet inside for the candle to attach to so you can reveal the hidden message by lining them up. Again, ensure that the magnet's pole is positioned so that the meaning side of the candle faces outwards when attached to the bunting. Just sew in a V shape, going over the top of the elastic so it stops the bunting moving around and the magnet can't fall out.


"but" and "the" are the wrong way around :(

Lay out the bunting on the page above the cake and mark and sew the buttons in place.

I couldn't decide if I wanted to include the strawberries, and how to attach them. I was considering hot glue or press studs, but I ended up just putting them in a small zip lock bag in the middle pocket. That way they can be played with but are not permanently attached.


Finished!

Difficulty Level = Hard

Probably the most difficult aspects of creating this page is getting the magnets into the candles and bunting while sewing. You could make them slightly wider or hand sew those sections. Also, lining up the wording is a little confusing. If you don't have a machine with an alphabet, you could use a fabric marker, iron on transfer paper, or hand embroidery instead. Using a fabric marker or transfer paper might make it less confusing as you could do the writing after the candle and bunting are sewn together.

Key Learning Areas and Skills

  • Genesis 5 - This page tells the story of the secret message hidden in the lineage of Adam to Noah
  • Imaginative Play - mmm, cake!
  • Ordering - place the name candles in the correct order of creation/birth
  • Magnets - the candles can be transferred from the cake to the bunting to reveal the hidden message
  • Tucking - the candles have to be tucked under the flap of cake to magnet on properly
  • Buttoning - the bunting elastic onto the page
  • Reading - the names, meanings, and ages
  • Decoding - find the hidden message
  • Fine Motor Skills - all quiet books encourage fine motor skill development
  • Hand-eye Co-ordination - all quiet books encourage hand-eye co-ordination

 Read the Chapter

Genesis 5

Devotional

The idea for this page came from a combination of things... and very importantly, from a poem by Emily Hunter from The Bible-Time Nursery Rhyme Book. It was a very treasured book in my childhood - a gift from my parents for my third birthday. Now that Tahlia is three, I am greatly enjoying sharing it with her too. It comes VERY HIGHLY recommended from me!

Image Source
The poem that inspired me is about Methuselah, and how he would need sooooo many candles on his birthday cake. It has a picture of a massive tiered cake with a tonne of candles on it, and I always loved that page as a child.

The other thing that inspired this page was hearing about the hidden message in the meaning of the names in this lineage. I heard it first in a sermon I think. You can find a detailed explanation here.

Basically, when you read the meaning of each name in the lineage as a list, a secret message is revealed.

Adam = Man
Seth = Appointed
Enosh = Mortal
Kenan = Sorrow
Mahalalel = The Blessed God
Jared = Shall come down
Enoch = Teaching
Methuselah = His death shall bring
Lamech = The Despairing
Noah = Comfort (or Rest)

Man (is) appointed mortal sorrow; (but) the Blessed God shall come down teaching (that) His death shall bring (the) despairing comfort/rest."


Hidden messages like this are evidence of God's design and inspiration in the Bible writings.

Methuselah has a double hidden meaning, because when he died, the flood came. It is thought that his name was intended to be a prophecy of the flood via his father Enoch. You can read more about this topic here.

Patriarchs from Adam to Israel (Jacob)
Image Source 

The ages of the people in this chapter also holds significance, something I noticed when making this quiet book page. They all lived very long lives, but since Noah wasn't yet dead, his age at death is not mentioned until later in Genesis. I think it is rather significant that his death is not recorded in this section because through the story of the flood (the first destruction of the earth) Noah represents the faithful generation that will be living at Jesus' second coming, those who will not see death in the final destruction. They will receive comfort and rest.


Follow Faith and Felt Obsession on FacebookPinterest and You Tube

Are you excited to study the "boring" Bible passages now?

Sunday 26 June 2016

Tahlia's Quiet Book - Front Cover and First Page

Here is the front cover and first page of Tahlia's first quiet book... with instructions on how to make the pages!


Tahlia is a Hebrew name, and means "dew from Heaven", and in a broader sense, "blessing" because essentially, dew is a blessing from God. So the tear shaped sparkles on the flower petals are to represent dew. She loves it!

I used the template provided by Rachel from the blog Lines Across available here for the flower, although I made a few modifications. I tacked down the petals with a sewing machine first, and sewed them onto the page rather than using glue. I want my creations to last, so machine sewing is a better option. I did glue down the flower center as it would have been difficult to sew. I did use the circle as a guide so I knew where to place the petals, although it wouldn't be necessary if felt is limited. Also, I found that the recommended number of petals was no-where near enough. I probably placed the petals nearer to the outside of the circle than Rachel did. In my creation, there are 17 of the largest petals in the outermost layer, 16 of the middle sized petal, and 14 in the inner layer of the smallest size.


The first page that you open up to is a back-to-back laminated Bible verse page. It has two verses making reference to dew from heaven, Zechariah 8:12 and Psalms 133:3. Both imply blessing, just like Tahlia is to us.

If you click on the H2919 in the above Zechariah link, it will explain the Hebrew meaning of the word translated as dew in English.
To make this page, I first printed the two verses on coloured paper, cut them out, and laminated them back to back. I trimmed the edge leaving a 5mm clear edge around it to ensure it was laminated properly, and to allow the ribbon that I sewed down on the page as a frame to show through. The corners are made from a square of felt folded and sewed down along the outer edges with a triangle of overhead plastic sandwiched in between. I have since discovered thick stiffened felt, and will probably just use a triangle of that if I do something similar again.

Tahlia was keen to get her hand in the photo!


Learning to tuck things in is an important skill for a toddler, and this page is a fun way to learn. It might seem pretty basic, but Tahlia does enjoy this page, and when the time comes to learn about the meaning of her name, I'm sure it will only gain significance.


My husband and I actually didn't know there were such verses in the Bible when we named Tahlia. We knew the meaning and that it was of Hebrew origin, but didn't know that there were verses containing the root word, albeit not the actual name. God showed me the Zechariah verse one day when Tahlia was only a few months old. After that I looked up the H2919 occurrence in the Bible and read all the other verses, of which there are thirty. My other favourite was Psalms 133:3, but there are plenty of other nice ones too. Perhaps she will prefer some of the others, and we can always laminate them and swap them over.


Follow Faith and Felt Obsession on FacebookPinterest and You Tube

Do you want to make a name page book for your little one?