In Ecclesiastes 4, Solomon praises the value of a friend.
Memory Verse: "And though one might prevail against another, two will withstand one. A threefold cord is not quickly broken." Ecclesiastes 4:12 (NRSV).
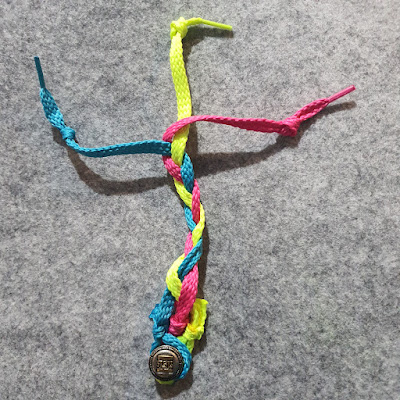
Materials needed to create the Three-Stranded cord quiet book page:
- my free Ecclesiastes 4 - Three-Stranded Cord Bible Quiet Book Page Template Pattern
- A4 felt background sheet - I used a marle grey
- three coloured shoelaces in blue, yellow and pink
- shank button
- sewing threads to best match the page
- scissors!
Firstly, measure the length of shoelace you will need to fit your page. Insert pins to mark the spot where you want to sew them to the page, and one on the page where the button at the bottom will go. Plait the strands so you can see what length you will need to reach the place where you want to put a button at the bottom and mark with a pin on each strand. Once unplaited again, I found my pins were at the length of the bottom of my page (about an inch or so below the position of the button).
Sew the top end of the shoelaces down to the page in the three positions marked on the pattern (or adjust as necessary to fit your page), using a zero stitch width zig zag stitch (so it goes back and forth over the same spot). Leave enough of a tail to tie a knot over the stitching to hide it.
Fold the other ends of the shoelaces over themselves to form loops large enough to fit comfortably over the shank button. Sew the loop closed using the same zero-length zig zag stitch.
Tie another knot over the stitching. Cut the remainder of the shoelace off with a short tail and melt the edges if made of suitable material - see my post on How to Stop Ribbons Fraying.
Hand sew down a shank button where indicated on the pattern (or adjust to your page). The shank will allow enough room for all three loops to fit under the button.
Lastly, plait the shoelaces and loop them around the shank button to keep them in place.
Difficulty Level = Easy
One of the easiest pages to make!
Key Learning Areas and Skills
- Ecclesiastes 4 - God designed us to have friends and family - we are stronger together
- Plaiting - learn how to do a three-stranded plait
- Buttoning - learn how to thread a loop over a shank button
- Fine Motor Skills - all quiet books encourage fine motor skill development
- Hand-eye Co-ordination - all quiet books encourage hand-eye co-ordination
Read the Chapter
Ecclesiastes 4Devotional
I got the idea for this page from a myriad of Christian wedding knot-tying ceremony boards I saw on Pinterest. I loved how they incorporated an Old Testament verse with the image of a cross and the Trinity, for indeed these concepts can be found throughout the Bible.I guess a wedding is a perfect example of the Trinity because marriage should be a unity of three - a man, a woman and God. The word used in the Shema to describe God being one is actually the same word used to describe Adam and Eve being one, so it in no way proves a unitarian viewpoint.
The word Elohim is very interesting. "El" is singular, but the "im" suffix is plural. Although there is a Jewish view that God was speaking to the angels when He said "Let Us make man in Our image", I can't see that we were made in the image of a mixture of God and angels.
Different versions differ in how Malachi 2:15 is translated, but the ESV is pretty awesome. "Did he not make them one, with a portion of the Spirit in their union? And what was the one God seeking? Godly offspring. So guard yourselves in your spirit, and let none of you be faithless to the wife of your youth."
We were created in God's image, and I believe this includes a tri-une relationship in marriage.


