Showing posts with label sheep. Show all posts

Thursday 26 March 2020

Psalm 28 - Shepherd Them Quiet Book Page

Psalm 28 was written by David and praises God who rescues him when he puts his trust in the LORD.


Memory Verse: “Save Your people,
And bless Your inheritance;
Shepherd them also,
And bear them up forever.” Psalm 28:9 NKJV. 

Materials needed to create the Shepherd Them quiet book page:

  • A4 felt background sheet - I used tan
  • Betty Lukens Felt book 01 Bible Stories available at Koorong
  • sewing thread to best match the page
  • scissors!
Cut out all the pieces for this page and the page itself from the Betty Lukens set. The Betty Lukens FAQ section has posted a cutting tips PDF.

Sew the Betty Lukens page onto the background felt along three sides, leaving the top edge open to form a pocket. Pop the pieces inside the pocket (or better yet - play with them)!

Finished!


Difficulty Level = Easy, plus No Sew version.

A very easy quiet book page!
Just use hot glue wherever sewing is recommended for a no sew version.

Key Learning Areas and Skills

  • Psalm 28 - Praise God that He is willing and able to hear our prayers, save and shepherd us
  • Imaginative Play - make the lambs play and eat the grass, play the harp with David
  • Fine Motor Skills - all quiet books encourage fine motor skill development
  • Hand-eye Co-ordination - all quiet books encourage hand-eye co-ordination


Read the Chapter

Psalm 28

Devotional

We all know that we don't deserve to have the Master of the universe listen to our beck and call. And yet this Psalm is all about praising Him because He hears us.

The sole reason given in this Psalm that God answers our prayers is that we trust Him. He loves to come through for us because of that.


Psalm 28:1-2,6-9 Song
"To You, I Will Cry, O LORD"
(Esther Mui) Christian Praise Worship Lyrics


Follow Faith and Felt Obsession on FacebookPinterest and You Tube

Have you asked God to be your shepherd - will you trust Him to lead you?

Tuesday 16 April 2019

Spectacular Spring Lamb Easter Bonnet

Last Year we set the bar for the remaining years of Tahlia's primary school Easter Hat Parades. I set myself the challenge of making an admirable Christian hat (no eggs or bunnies) that would be far from embarrassing and that would get people talking about the Good News of Easter, um, I mean Passover.


This year I hope we have again risen to the challenge with our Spring Lamb Easter Bonnet.

This idea came with one week to go before the event. Thankfully. I had planned something else, but it just didn't have the pizzazz I was looking for and I never ended up buying all the needed items.

My first job was to secure a stuffed toy lamb - and not a Shaun the Sheep look-alike. It had to be without blemish like all Passover lambs. Happily my workmates were in the know about an awesome nearby op shop and enthusiastically took me on a lunch-time shopping adventure. Praise God this little cutie was waiting for me!


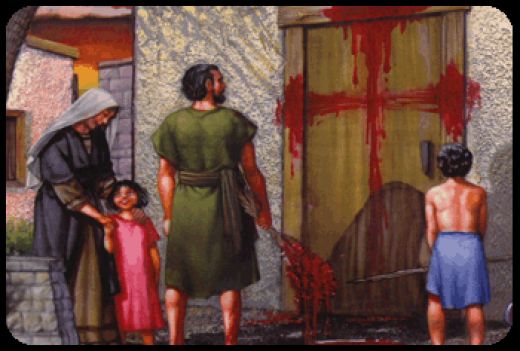
The inspiration for the Spring Lamb Easter Bonnet came from the 10th Plague from the First Passover.

You realise a lot of things when you try to convert Bible text into images. Obviously others have realised it before me because I found some awesome pictures online that demonstrate what happened to the Israelite's doors when they followed God's instructions to kill a lamb and use hyssop to paint blood on the lintel and both doorposts as protection against the death of their first born sons (Exodus 12:22).


Image Source


Who knew there was so much imagery in the old testament around the cross?


Tahlia did get to show her hat to her class and talk about it. I'm not sure that what she said would have made a whole lot of sense to them, but it was good witnessing practice. And it was a wonderful learning experience for us to share together.

You might think that I made the hat, but let me reassure you, Tahlia helped a lot.

Most importantly, she proudly wore it on the day!


Together we stripped back the Palm Sunday Easter Bonnet from last year.

She stirred the paper mache glue mixture and applied another coat.


She re-painted the hat.


Tahlia insisted we iron the felt before making the flowers. A step I was thinking we might be able to skip.


She cut the pipe cleaners.

She cut the red, white and orange flower pieces out and even helped with hot gluing them all together.

I made the bunch of hyssop.


I rolled strips of red felt for the blood to fill the bowl and glued one end of the ribbon for the cross to it. I glued everything down - the ribbon to the screws and itself, the felt to the bowl and the bowl to the hat.


I used a small screw driver to make holes to insert the screws. I had planned on using nails but I couldn't find them. I think screws worked well anyway because they had a lip which stopped the ribbon slipping off.

Tahlia wanted to make a door for the archway but we ran out of time. I thought it would be better without, but I think Tahlia was right to want a door. It might have helped the ribbon cross stand out more.

She helped glue everything onto the hat.


So that the lamb was not ruined by hot glue I employed more felt and my secret weapon safety pins!


We watched quite a few YouTube videos on how to make felt flowers. These were our favourites:


If you can't work out how I made the pink carnations you will have to beg me to do a tutorial. I'm not planning to do it unless someone asks though!


EDIT:

See the other Easter Hats in this Trilogy

  1. Hosanna! Palm Sunday Easter Bonnet - focuses on Praising Jesus' ability to save
  2. Spectacular Spring Lamb Easter Bonnet - this one!
  3. Magnificent Butterfly Resurrection Easter Bonnet - focuses on the joy and hope of the Resurrection


Follow Faith and Felt Obsession on FacebookPinterest and You Tube
I would love to see and share your Christian themed Easter Hats!

Monday 18 July 2016

Genesis 4 - Cain and Abel Quiet Book Page

In Genesis chapter 4, God accepts Abel's offering but does not accept Cain's.


Memory Verse: Then the Lord said to Cain, “Why are you angry? Why is your face downcast? If you do what is right, will you not be accepted? But if you do not do what is right, sin is crouching at your door; it desires to have you, but you must rule over it.” Genesis 4:6,7.

Materials needed to create the Cain and Abel quiet book page:

  • A4 felt background sheet. I used dark green.
  • felt scraps in thick white, thin white, stone, and wheat colours
  • sewing thread to match each colour of felt
  • hot glue gun and glue sticks
  • various blind samples in stone and stick colours and patterns
  • red and wheat coloured wool scraps
  • an altar template - I used this activity page from Calvary Kids
  • a sheep template - I used this image from Free Bible Stories For Children
  • my wheat sheaf and altar sticks template
  • instructions on how to do the wheat embroidery stitches by Mary Corbet on YouTube
Cut out the altar template as a complete altar, leaving space around the edge. Cut four of this from stone coloured felt and sew them doubled up to strengthen them. Sew them down leaving the edges that face the middle of the page open so that the altars become a pocket to store the other items in.


Cut the stones out of the template. Cut two lots of stones from blind samples, one from a light stone colour, and one from a darker stone colour. Hot glue them onto the altars using a mixture of light and dark stones on each altar.

Cut out the sticks background template and cut out doubles from dark brown felt. Sew them back to back. Cut out the sticks from a mottled brown blind sample and hot glue them onto the backgrounds.

Cut one the complete sheep template and cut one from some fairly thick white felt. Then cut off the legs and face of the sheep from the template. and cut out two lots from some thinner white felt. Sew them onto the sheep as it's wool coat, one on each side. Cut out the ears from the thinner felt and attach by hand or using a zero stitch length zig zag setting on your machine.


Tie some red wool around the legs of the sheep.

Cut out the wheat sheaf template and cut one from some fairly thick felt. Cut out two from wheat coloured felt. Hand embroider the wheat on first, then sew on either side of the thick felt with the wheat coloured wool layered in between. Tie the wool into a bow.

Finished!

Difficulty Level = Intermediate

The sheep and bundle of wheat are the slightly harder elements of this page. You could simplify it by finding images online to print onto transfer paper and then ironing them onto the felt instead. This was the first hand embroidery I have ever done (aside from a few cross stitches and things as a child).

Key Learning Areas and Skills

  • Genesis 4 - This page tells the story of Adam and Eve's sons Cain and Abel, and the devastating result of sin
  • Ordering - place the sticks and sheep/wheat in the correct order on top of the altar
  • Fine Motor Skills - all quiet books encourage fine motor skill development
  • Hand-eye Co-ordination - all quiet books encourage hand-eye co-ordination

 Read the Chapter

Genesis 4

Devotional

There is debate regarding why God was displeased with Cain's offering due to the fact that there are no recorded instructions given by God prior to this incident.

Some think that the reason was more that Cain's offering was proud and or selfish, not the fact that he had not brought an animal. Cain needed to trade with Abel in order to get an animal, since he was a herdsman and Cain grew crops. The other differing point was that Cain brought some of his crop rather than the best like Abel did, bringing fat portions of some of the the firstborn.

An offering can be, but does not necessarily refer to a sacrifice.

God did demonstrate what constituted a sacrifice for Adam and Eve before they left the Garden in the previous chapter, Genesis 3. God made them clothes out of animal skins. Most people think of them dressed as a cave man and woman, but it was most likely sheep skins they were dressed in, and therefore they were wearing white. The animals were used to cover them, and represented the covering of their sins. They were made righteous again by the shedding of the innocent animals blood which represented the shedding of Jesus' blood, which if they believed, would make them truly righteous. I am sure they tried their hardest to be good parents, to raise their children well, teaching them how to serve God and passing on this story and belief. In fact, according to the Torah, almost everything is purified with blood; indeed, "without the shedding of blood there is no forgiveness of sins." Hebrews 9:22 CJB. This verse refers back to Leviticus 17:11 in the old testament.

Also, Cain and Abel were grown men - Cain reminds God that wherever he goes, people will want to kill him, surely evidence that by this time, his brothers and sisters had also grown up and reached adulthood. So I assume this was not the first sacrifice they had done, and that Cain had previously pleased God with his sacrifices.

So, why do you think God was displeased?

Image Source

The mark given to Cain by God is very interesting. Jewish sources (Rashi and the Zohar) claim that the mark was a Hebrew letter. I imagine that it was the last letter of the Hebrew alphabet, 'tav'  or "t" in English, which was in the shape of a cross and means "mark, sign, signal, or monument". Follow the transition of the shape of the letter 'tav' from early to modern Hebrew on the Ancient Hebrew Research Center website.

The purpose of this mark was to dissuade people from wanting to kill Cain, i.e. to save him. God continually offers us His grace, forgiveness and salvation, no matter how bad we think we are. I think there is a chance that Cain accepted God's grace and will be in Heaven.


Follow Faith and Felt Obsession on FacebookPinterest and You Tube

Did you learn anything through this quiet book page?

Thursday 26 May 2016

Psalm 100 - Sheep of His Pasture Quiet Book Page

In Psalm 100, we are likened to being sheep in God's pasture.


Memory Verse: "Know that the Lord is God.
It is he who made us, and we are his;
we are his people, the sheep of his pasture." Psalm 100:3 (NIV).

Materials needed to create the Sheep of His Pasture quiet book page:

  • A4 felt background sheet. I used white.
  • sheep button/s
  • farm, sheep or pasture scene material
  • tulle (soft is better)
  • sewing thread
  • texta
  • paper, ruler, pen... or this free template (this is my first attempt at embedding - if you can't access the template please let me know; I also apologise that Tahlia got to it and drew all over it before it got scanned... you should still be able to use it though!)


Before starting on this page, you may want to check out a very similar page I made for a Puzzle Quiet Book Page Swap. You might prefer the method I used there. It is more of a traditional button maze, whereas this page uses more of a marble maze design (although I am using a button not a marble).

1. If you want to make your own template, cut out a sheet of paper slightly larger than the size you want your maze to be and use it to mark out where you want your lines to go. Make sure there is enough room for your button to move between the lines, including extra space which will be taken up by the zig zag stitch.


I got my inspiration from Joan Ellis, a fellow member of the Quiet Book Club group on Facebook. She posted pictures of marble maze designs she had made, and she has kindly allowed me to share them with you!

EDIT - 2 photos have been removed

Her instructions for making actual marble mazes from material are as follows: Simply cut two same size rectangles. Stitch right sides together and leave a two inch opening. Turn right side out, press. Draw in your maze, stitch the lines securing the end and beginning of each seam, slip in the marble and sew closed. 

To make a template, use a clear ruler. Make the spaces 3/4 inch for a peewee and 1 inch for a player sized marble. To leave room for top stitching all around, she starts with a 1 inch margin around the edges and works her way in.

If you live in the Albuquerque area of New Mexico, USA, you should definitely check out Hip Stitch, a quilting store and sewing lounge where Joan teaches sewing and does free monthly demonstrations. They sell ready made marble mazes and kits so you can make your own. They even offer private sewing classes at a VERY affordable rate. Unfortunately Joan has already done a marble maze demo this year, but I'm sure if you asked nicely she could organise another at some point!

EDIT - 2 photos have been removed

I chose this last example of a continuous loop as I don't imagine that God's pasture has any dead ends!

2. Use your or my free template to cut out your scene material and tulle. Lay your material over the top of your maze template and use a texta to copy the maze lines onto your material if you are able to see through to do it. Otherwise copy them onto your tulle. I did it both ways and found it easier if the lines were marked on the material rather than the tulle because the tulle moves around a lot and it is more difficult to get the lines in the right spot when you are sewing.


3. Sew the material and tulle together along the outer edge of the maze, remembering to slip a button in between before you get to the end. You could use a few buttons, but mine have a flock already painted on them. Also, I didn't want to run into another button on the way around which might slow momentum on a continuous loop.

4. Clip the corners and fold the edges under. Pin it onto your background felt and sew it down around the edges using a zig zag stitch with a very small stitch length. Sew over the maze lines you marked on your material with the same zig zag stitch.

Finished!

Difficulty Level = Easy

You need very little skills to make this page :)

Key Learning Areas and Skills

  • Psalm 100 - This page tells about how we are like sheep in God's pasture
  • Imaginative Play - Pretend you are a sheep in the pasture, or a dog rounding up the sheep in the pasture, feed your sheep on a lush pasture of chamomile or burdock, etc
  • Button/Marble Maze - push and pull your button along a path
  • Fine Motor Skills - all quiet books encourage fine motor skill development
  • Hand-eye Co-ordination - all quiet books encourage hand-eye co-ordination

 Read the Chapter

Psalm 100

Devotional

Coincidentally or not, the number of this Psalm is also the number of sheep in the flock before one goes missing in Jesus' parable of the lost sheep (Luke 15).

As a farmer's daughter, I love the fact that God compares us to sheep rather than goats...

"Dumb sheep ahead" was tweeted by Adam Marshall on the 16th of March 2014.
Sheep are well known as being rather stupid. I don't think God is calling us stupid, so please hear me out.

We had both sheep and goats on our farm. If the sheep got out of the paddock and were wandering on the road, they had no idea how they got there, and you would have to take them around and open the gate for them to get back in. If the goats got out onto the road, they knew exactly how they got there and would often dart back through the same hole they had found/made. Goats are mischievous. I guess my point is that God is not laying blame on us, He is giving us the benefit of the doubt so to speak, saying we are a bit silly for getting lost or into trouble rather than saying we are aiming for it. What do you think?


Follow Faith and Felt Obsession on FacebookPinterest and You Tube

Are you a sheep of His pasture?

Thursday 17 March 2016

Puzzle Quiet Book Page Swap

I recently went in a quiet book swap with a group on Facebook.


We each made seven copies of our own page and sent them to the host. She sent us back one of our own pages, and six different pages made by the other participants. It is a great way to build a quiet book. You only have to think about one page layout so it saves on supplies and effort.

With not a lot of time before Christmas, this was meant to be a quick and easy basic swap.  The theme was puzzles, and the size of the pages was reduced to 8"x8", which makes it an ideal book for occupying the little ones while travelling.

This is the page I contributed:


It is a themed button maze - there are a couple of mobs of sheep in a bunch of paddocks. The gates can be opened and shut, and the sheep can be fed on a lush pasture of clover or a pile of hay, and you can bark at them while you do it all - whatever your imagination can muster.

I drew out where I wanted fences on a piece of paper so I could organize the paddock layout in my head. After sewing the buttons under a piece of tulle, I laid strips of rik rak down for the fences and sewed them down, leaving it open where the gates were to go. Cut the rik rak where the gates go and melt the ends with a match to stop it unraveling.

Done!


One of the other pages contributed was an entirely hand sewn Little Bo Peep - now that is dedication! One sheep is detatchable with velcro, and you can trace over the different paths to find which one leads home.


Our swap host made a cupcake puzzle and pocket. The pocket was made by laying two pieces of fabric over each other, turning the top edge of the top one down and adding a piece of velco to each respective side, then stitching around the three edges of the top layer of fabric - I loved the idea because it was really easy!


There were three tangram pages done in this swap. They were all made with an embroidery machine. This first one is of a rabbit. The theme went great with this bunny material I had, so I made a pocket for the pieces like the one made for the cupcake. Unfortunately I forgot to get a photo of this page with the pieces laid on it before it got given to it's new owner...


The next tangram puzzle was of a cute little house.


And the last tangram puzzle was of a horse. I love the colours chosen for this page. It came with it's own pocket built into the page by sewing down three edges of the horse tangram outline which had been embroidered onto felt.


My sister, whose Fairy Tale Quiet Book you have already seen, contributed this I-Spy page:


Again, layer two squares of fabric over the top of each other, right sides facing up. She cut an 'x' shaped opening in the middle of the top square of fabric and folded back the edges on them. Folding them back on themselves several times is a good idea to avoid them getting in the way when trying to find items. Then she inserted a smaller square of clear vinyl underneath, sewing around the inside edge, and zig zaging around the outer edges. She used her machine to do the 'Find 10 Things' lettering at the top. Next, she sewed the two squares of fabric together leaving a 1" gap around the edges to allow for binding, as well as a small opening so she could fill the space between them with ten small items and bean bag beans. She was going to use rice, but since we had to post the pages to the host and back, she decided bean bag beans would be a lighter and therefore cheaper option.

The ten items in our I-Spy page are a small plastic baby, a flower button, a Lego block, a wooden leaf picture, a wooden drum picture, a small wooden painted peg, a small glitter button, a wooden cat head picture, a wooden number '2', and a large google eye. In other versions, she has included small plastic bugs and animals. Small shells, gum-nuts, beads, paper clips, and any small, non-sharp household items would also work well.


Here's another of my 8"x8" material pages - the Easy Peasy Lei Flower Quiet Book Page.


Before the pages were made into a book, they made awesome quilts for Elsa.


Find a tutorial link and YouTube clips of how to bind the pages and book together on my page of Quiet Book Making Tips.

How I made a closure after binding my book! Post Binding Quiet Book Closure.


Follow Faith and Felt Obsession on FacebookPinterest and You Tube

Does joining a page swap tempt you? Comment below!