Showing posts with label flowers. Show all posts

Tuesday 16 April 2019

Spectacular Spring Lamb Easter Bonnet

Last Year we set the bar for the remaining years of Tahlia's primary school Easter Hat Parades. I set myself the challenge of making an admirable Christian hat (no eggs or bunnies) that would be far from embarrassing and that would get people talking about the Good News of Easter, um, I mean Passover.


This year I hope we have again risen to the challenge with our Spring Lamb Easter Bonnet.

This idea came with one week to go before the event. Thankfully. I had planned something else, but it just didn't have the pizzazz I was looking for and I never ended up buying all the needed items.

My first job was to secure a stuffed toy lamb - and not a Shaun the Sheep look-alike. It had to be without blemish like all Passover lambs. Happily my workmates were in the know about an awesome nearby op shop and enthusiastically took me on a lunch-time shopping adventure. Praise God this little cutie was waiting for me!


The inspiration for the Spring Lamb Easter Bonnet came from the 10th Plague from the First Passover.

You realise a lot of things when you try to convert Bible text into images. Obviously others have realised it before me because I found some awesome pictures online that demonstrate what happened to the Israelite's doors when they followed God's instructions to kill a lamb and use hyssop to paint blood on the lintel and both doorposts as protection against the death of their first born sons (Exodus 12:22).
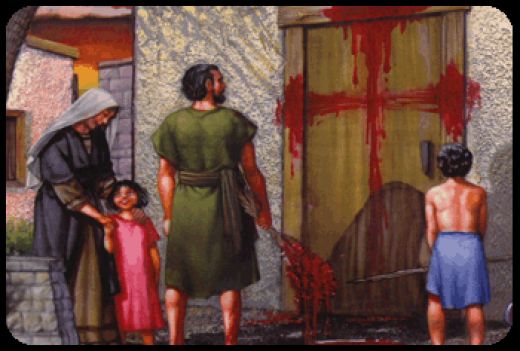

Image Source


Who knew there was so much imagery in the old testament around the cross?


Tahlia did get to show her hat to her class and talk about it. I'm not sure that what she said would have made a whole lot of sense to them, but it was good witnessing practice. And it was a wonderful learning experience for us to share together.

You might think that I made the hat, but let me reassure you, Tahlia helped a lot.

Most importantly, she proudly wore it on the day!


Together we stripped back the Palm Sunday Easter Bonnet from last year.

She stirred the paper mache glue mixture and applied another coat.


She re-painted the hat.


Tahlia insisted we iron the felt before making the flowers. A step I was thinking we might be able to skip.


She cut the pipe cleaners.

She cut the red, white and orange flower pieces out and even helped with hot gluing them all together.

I made the bunch of hyssop.


I rolled strips of red felt for the blood to fill the bowl and glued one end of the ribbon for the cross to it. I glued everything down - the ribbon to the screws and itself, the felt to the bowl and the bowl to the hat.


I used a small screw driver to make holes to insert the screws. I had planned on using nails but I couldn't find them. I think screws worked well anyway because they had a lip which stopped the ribbon slipping off.

Tahlia wanted to make a door for the archway but we ran out of time. I thought it would be better without, but I think Tahlia was right to want a door. It might have helped the ribbon cross stand out more.

She helped glue everything onto the hat.


So that the lamb was not ruined by hot glue I employed more felt and my secret weapon safety pins!


We watched quite a few YouTube videos on how to make felt flowers. These were our favourites:


If you can't work out how I made the pink carnations you will have to beg me to do a tutorial. I'm not planning to do it unless someone asks though!


EDIT:

See the other Easter Hats in this Trilogy

  1. Hosanna! Palm Sunday Easter Bonnet - focuses on Praising Jesus' ability to save
  2. Spectacular Spring Lamb Easter Bonnet - this one!
  3. Magnificent Butterfly Resurrection Easter Bonnet - focuses on the joy and hope of the Resurrection


Follow Faith and Felt Obsession on FacebookPinterest and You Tube
I would love to see and share your Christian themed Easter Hats!

Sunday 11 December 2016

Vashti's Quiet Book - Front Cover and Crown Pages

This is a quiet book I made for my niece Vashti.  My sister has added her own pages too.  Like most of my quiet books, I designed it to be added to and swapped around.


I used a pattern I found here for the front cover flowers, and embellished the flower centers with beadwork. The leaves from this pattern did not look like hydrangea leaves to me, so I used a leaf pattern I found here instead.  For the lettering, I printed a nice font from the computer to use as a pattern. The beads really made it come alive, hey!

I didn't sew the flowers back to back for stability like I do with most things.  It would take away from the effect, and it's not really meant to be played with anyway.


Since Vashti was named after a queen in the Bible, Mum, my sister and I made a crown with interchangeable jewels to stick on. I plan to do a tutorial in a separate post, as I made a similar page for one of the Bible chapters. Its pretty easy to see what we did anyway.


As a template for the crown, I used this colouring page from masivy.com. We used sticky velcro dots on the jewels, and sewed normal velcro onto the crown. I was a little worried that the sticky dots would come off easily but them seem to be fairly solid so far, and they have had a fair bit of use so I hear. This was Vashti's favourite page for a long time.

I also made a treasure chest to keep the extra jewels in. I used Stephanie's Treasure Quiet Book Page pattern from Imagine Our Life.


The jewels are actually kept in a zip lock bag inside the treasure chest because otherwise they would fall out the sides, but who wants to spoil a picture with that!


Follow Faith and Felt Obsession on FacebookPinterest and You Tube

Which page do you like the best?

Sunday 26 June 2016

Tahlia's Quiet Book - Front Cover and First Page

Here is the front cover and first page of Tahlia's first quiet book... with instructions on how to make the pages!


Tahlia is a Hebrew name, and means "dew from Heaven", and in a broader sense, "blessing" because essentially, dew is a blessing from God. So the tear shaped sparkles on the flower petals are to represent dew. She loves it!

I used the template provided by Rachel from the blog Lines Across available here for the flower, although I made a few modifications. I tacked down the petals with a sewing machine first, and sewed them onto the page rather than using glue. I want my creations to last, so machine sewing is a better option. I did glue down the flower center as it would have been difficult to sew. I did use the circle as a guide so I knew where to place the petals, although it wouldn't be necessary if felt is limited. Also, I found that the recommended number of petals was no-where near enough. I probably placed the petals nearer to the outside of the circle than Rachel did. In my creation, there are 17 of the largest petals in the outermost layer, 16 of the middle sized petal, and 14 in the inner layer of the smallest size.


The first page that you open up to is a back-to-back laminated Bible verse page. It has two verses making reference to dew from heaven, Zechariah 8:12 and Psalms 133:3. Both imply blessing, just like Tahlia is to us.

If you click on the H2919 in the above Zechariah link, it will explain the Hebrew meaning of the word translated as dew in English.
To make this page, I first printed the two verses on coloured paper, cut them out, and laminated them back to back. I trimmed the edge leaving a 5mm clear edge around it to ensure it was laminated properly, and to allow the ribbon that I sewed down on the page as a frame to show through. The corners are made from a square of felt folded and sewed down along the outer edges with a triangle of overhead plastic sandwiched in between. I have since discovered thick stiffened felt, and will probably just use a triangle of that if I do something similar again.

Tahlia was keen to get her hand in the photo!


Learning to tuck things in is an important skill for a toddler, and this page is a fun way to learn. It might seem pretty basic, but Tahlia does enjoy this page, and when the time comes to learn about the meaning of her name, I'm sure it will only gain significance.


My husband and I actually didn't know there were such verses in the Bible when we named Tahlia. We knew the meaning and that it was of Hebrew origin, but didn't know that there were verses containing the root word, albeit not the actual name. God showed me the Zechariah verse one day when Tahlia was only a few months old. After that I looked up the H2919 occurrence in the Bible and read all the other verses, of which there are thirty. My other favourite was Psalms 133:3, but there are plenty of other nice ones too. Perhaps she will prefer some of the others, and we can always laminate them and swap them over.


Follow Faith and Felt Obsession on FacebookPinterest and You Tube

Do you want to make a name page book for your little one?

Sunday 24 January 2016

Lei Flower Baby Doll Dress

Since our lei flowers have been out since my Easy Peasy Lei Flower Quiet Book Page post, I decided to make the baby doll dress I have been threatening for a while.


It has proved a great way of using up some of our leftover artificial lei flowers.

Another idea is to glue them down on your drawing or painting. We did that too, but I don't have a photo, sorry.

Materials needed to make our Lei Flower Baby Doll Dress:


  • a baby doll to measure
  • a baby singlet in stretch knit material, mine was size 00, but smaller is probably better
  • thread to match
  • artificial lei flowers
Put the singlet on the doll inside out. And pin down the sides so it fits your baby. When we got to this point, Tahlia said "No, not pins" and put baby safely away in her pram! I waited until she went to bed to continue, since she was being such a good Mummy.


Next, take the dress of the doll and adjust the pins so they are even and symmetrical.


Sew along your pinned lines. Make sure your armhole edges line up properly. Sew perpendicular to the edge at the armholes rather than in the same line you have been following. This creates a slight sleeve and works better for a thick edge. Trim the excess. Since it is stretch knit material, you do not need to finish the edges to prevent fraying.


Put the dress back on your baby doll and turn up the hem to mark the length you want.


Take the dress back off and pin and sew the hem close to the bottom edge. 


Trim the excess.


Lastly, turn the dress back in the right way and pin doubled lei flowers all around the edge and at one shoulder. Set your sewing machine to 0 stitch length, and put it on a wide zig zag setting. This will make it go back and forth over one spot, creating a short line. Use this setting to sew down each pile of lei flowers. Trim the thread.

Done!

We shall see if Tahlia is impressed or not in the morning!


Follow Faith and Felt Obsession on FacebookPinterest and You Tube

Do you have an easy way of making baby doll clothes? Comment below!

Thursday 7 January 2016

Easy Peasy Lei Flower Quiet Book Page

I am always trying to think of ways to make quick and easy quiet book pages that are tons of fun and look terrific, especially when making presents.

Here is an idea I came up with last night, that I think fits all of those requirements!

Here is how to make an artificial lei flower quiet book page:


Instead of having to cut out felt flowers and sew them all together, simply layer two artificial lei flowers on top of a piece of felt (to add stability) and sew a buttonhole to fit three buttons.  Make sure they are roughly the same size so the flowers are interchangeable. Cut the buttonhole open with a seam ripper.


Then trim the felt at the back.


Next, burn the ends of two ribbons and a piece of rik rak to prevent fraying, and sew them down for the flower stems. Then sew on your buttons at the top of each stem.


Done!

Key Learning Areas and Skills

  • Buttonholes - practice how to button a buttonhole.
  • Fine Motor Skills - all quiet books encourage fine motor skills through turning pages, and on this page, through buttoning.

Difficulty Level = Easy

This page was so easy that it came together very quickly whilst I was watching a movie with my husband last night. It requires very little sewing skills.

Having said that, I did have a lot of trouble working out my one step buttonhole function on my current sewing machine.  The manual it came with was for another model, which had a four step buttonhole function... Even after watching countless You Tube videos on how to do it, I still couldn't get it to work and had to call the company support line for help!

Here are the steps and settings I used for the one step buttonhole in case you have trouble, and also as a record for me in case I forget again next time:

  1. Set your stitch length to just under '1', or a very low setting equivalent on your machine. Apparently the 'F' setting on my machine is for stretch stitches.
  2. Set your stitch tension to around '4' or '5', or the normal mid-level setting equivalent on your machine.
  3. Turn the dial until you have selected the buttonhole function on the stitch selections.
  4. Change your normal foot to the buttonhole foot and insert your button into the measuring section at the back.
  5. Pull down the buttonhole lever. Remember to push it to the back position so it clicks forward when it reaches the end of the buttonhole and begins to do the other side, as it clearly instructs you to do on the lever itself (the one vital step I forgot lol).

Use up your Leftover Lei Flowers:

How to make a Lei Flower Baby Doll Dress


Here's some more of my 8"x8" material pages:


Follow Faith and Felt Obsession on FacebookPinterest and You Tube

What do you think - does it look easy peasy?