Thursday 13 October 2016

Tahlia's Quiet Book - Grapes, Butterfles, Bee and Potato Head Pages

These next quiet book pages form the major part of Tahlia's quiet book. Most of them were gifts made by other people to contribute to Tahlia's book.


The grapes and butterfly pages were made for Tahlia by my sister. At the time, grapes were one of her favourite foods. The string is meant to be a caterpillar and it can be threaded through the hole it has eaten in the leaf. The leaf pattern came from Purl Soho, and the grapes were drawn by my Mum. The butterfly was made using a colouring in sheet printed from the internet, and the cocoon and tree were drawn by my brother-in-law.


The butterfly racing page was made by my awesome friend!  The butterfly buttons on the ribbons came from an op shop.  There is no pattern for this one, but you could probably use something like this flower printed out in a few different sizes.


This page was made as an extra for Tahlia while we were making my friend a book at her baby shower.  It was made by my friend's mum.  Thanks heaps!  The bee came from a $2 shop.  The hive pattern was made by Stephanie from Imagine Our Life, and the flowers are from Purl Soho.


My Mum put in an amazing effort into helping me finish these pages.  We did Mr Potato Head about three times over for two friends books as well.  Thanks so much Mum!! The template was made by Jocelyn from Sunshine, Lollipops and Rainbows. The hats are reversible, some with a button on one side and not the other, and some with a patterned felt on the reverse. We also made two sets of eyes each, so there would be green, blue, brown and googly options.


I know the walking stick is meant to be a moustache, but this is for kids, right?


Follow Faith and Felt Obsession on FacebookPinterest and You Tube

Which page do you like the most out of these ones?

Monday 3 October 2016

Happy New Year!

It is now the Biblical (and Jewish) New Year, so I want to wish you a Happy New Year. May you be inscribed in the Book of Life!

Image Source

Actually, the Bible has two new years six months apart, much like we do today with the financial new year. This is the actual new year, not the one installed after the Exodus, which I have a feeling was done so that the month numbers would correspond with the new year and autumn festivals falling in a month numbered seven. Hopefully you will see the significance unfold in some future posts.

I began working on this blog at the Biblical New Year last year, so it is now the one year anniversary of Faith and Felt Obsession. I have had a great time learning and I hope to continue improving my sewing, crafting and blogging skills.

I find it fascinating that the Biblical New Year begins in Autumn (well in Jerusalem it is Autumn at this time of year). Spring is the logical time for the beginning of the year, or so I thought until I realised it wasn't in God's books. He created everything mature. Adam was fully grown, trees were fully grown, even fruiting so it seems. So I guess it follows that God created the world beginning in the mature season of Autumn.


Follow Faith and Felt Obsession on FacebookPinterest and You Tube

Do you celebrate the Biblical New Year?

Tuesday 6 September 2016

Genesis 5 - Lineage Birthday Cake Quiet Book Page

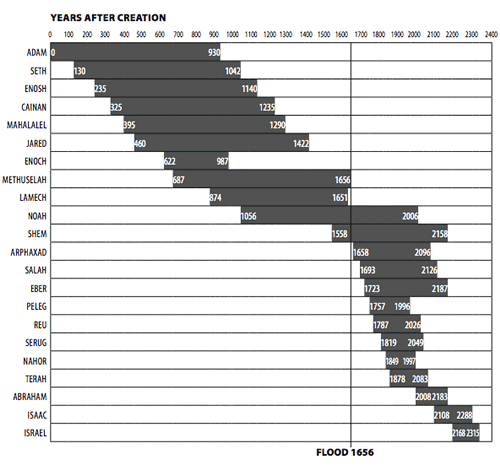
In Genesis chapter 5, we are given the lineage of Adam to Noah, along with their ages at death, and a secret message hidden in what many would consider a rather boring Bible passage.


Memory Verse: Now he called his name Noah, saying, “This one will give us rest from our work and from the toil of our hands arising from the ground which the Lord has cursed.” Genesis 5:29 NASB

Materials needed to create the Lineage Birthday Cake quiet book page:

  • A4 felt background sheet. I used mid blue.
  • felt scraps
  • sparkly felt for icing (optional)
  • sewing thread to match each colour of felt
  • magnets - I used 5mm craft neodymium magnets, but you need to be careful with these... they are very strong magnets so they are dangerous if swallowed
  • four small buttons
  • round black elastic
  • sewing machine with font function (or alternate method e.g. hand embroidery, fabric marker or transfer paper)
  • things to decorate the cake e.g. strawberries (optional).
  • the free template
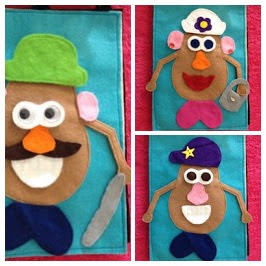
Use the complete cake guide to work out where to position your cake on the page. There are two options, one with candles and one without. Since the candles sit higher than the cake, I thought I better include them so you can see how high they would sit. But since they are very close to the edge of the pattern paper, I thought it might not print properly, so I did one without as well.

Place pins as markers through each 'X'. This is where your magnets will be sewn down under the small squares of felt. Sew your magnets in position, ensuring that they are sewn down with the same side (north or south pole) facing up so that the candles all face the same way when put on the cake.


Write out your lettering using your chosen method (ensuring it will fit into that amount of space) and cut out one side of your candle set.

The name and age at death/translation side (and corresponding meaning side) should say:
  • Adam 930 (Man)
  • Seth 912 (Appointed)
  • Enosh 905 (Mortal)
  • Keenan 910 (Sorrow)
  • Mahalalel 895 (The Blessed God)
  • Jared 962 (Shall Come Down)
  • Enoch 365 (Teaching)
  • Methuselah 969 (His Death Shall Bring)
  • Lamech 777 (Despairing)
  • Noah (Comfort and Rest)
Next, cut out ten flames (not twenty) as it is easier to sew small sections onto a larger sheet of felt than sewing two small sections to each other. It makes it easier to keep things straight and lined up in the sewing machine, especially when you are also going to be inserting flames and magnets between the two parts. I found the idea for this method on the blog Laura Thoughts, so for a better explanation on how to do it, please visit here.


Sew the flames down first and cut them out. Insert them under the top ends of the candles when you pin them on to the corresponding candle side. Make sure you line up the lettering properly on the opposite side.

Start sewing the candles from the bottom end, and when you get back around (but before you get right to the end), insert a magnet into the candle and then sew it closed. You can use a wooden skewer to help push the magnet in. Again, make sure you put the magnet in with the correct pole facing down so that the name side of the candle will face outwards when placed into the cake.


Check that the lettering has been lined up and sewn correctly, then cut out your candles.

Cut out your cake sections. I doubled each of my chocolate cake sections, but the felt I was using was rather thin. if you use thicker felt you will not have to.

Cut out and sew the icing sections to the top of each cake section. Use the complete cake guide to position them on your page in line with the magnet squares and sew them onto the page by the sides and bottom, leaving the section that has the icing sewn on it free to make a pocket for the candles. Do not sew down over the icing.

Cut out your bunting from the corresponding colours as indicated on page for of the template. I wrote the English words grammar words 'IS', 'BUT' & 'AND' on the back of the blue bunting, so it can be folded over when you line up the candles and help reveal the message - although I have just discovered I placed the words in the wrong order on the bunting... oh dear! At least we can still use it on the side without the writing and insert the words in our heads.

Fold your length of elastic in half, and starting at the folded end, wrap your bunting around both strings and pin. Leave a small loop of elastic at each end and spaces where indicated so you can button it onto the page. When everything is lined up and you have worked out how much length you will need, tie the ends of the elastic together and hide the knot inside the last piece of bunting.


The bunting colours have been co-ordinated so that there is blue bunting the same colour as the candles in all the spots where an English word needs to be inserted for the grammar to make sense. There is no magnet inside the blue bunting, but sew all the rest with a magnet inside for the candle to attach to so you can reveal the hidden message by lining them up. Again, ensure that the magnet's pole is positioned so that the meaning side of the candle faces outwards when attached to the bunting. Just sew in a V shape, going over the top of the elastic so it stops the bunting moving around and the magnet can't fall out.


"but" and "the" are the wrong way around :(

Lay out the bunting on the page above the cake and mark and sew the buttons in place.

I couldn't decide if I wanted to include the strawberries, and how to attach them. I was considering hot glue or press studs, but I ended up just putting them in a small zip lock bag in the middle pocket. That way they can be played with but are not permanently attached.


Finished!

Difficulty Level = Hard

Probably the most difficult aspects of creating this page is getting the magnets into the candles and bunting while sewing. You could make them slightly wider or hand sew those sections. Also, lining up the wording is a little confusing. If you don't have a machine with an alphabet, you could use a fabric marker, iron on transfer paper, or hand embroidery instead. Using a fabric marker or transfer paper might make it less confusing as you could do the writing after the candle and bunting are sewn together.

Key Learning Areas and Skills

  • Genesis 5 - This page tells the story of the secret message hidden in the lineage of Adam to Noah
  • Imaginative Play - mmm, cake!
  • Ordering - place the name candles in the correct order of creation/birth
  • Magnets - the candles can be transferred from the cake to the bunting to reveal the hidden message
  • Tucking - the candles have to be tucked under the flap of cake to magnet on properly
  • Buttoning - the bunting elastic onto the page
  • Reading - the names, meanings, and ages
  • Decoding - find the hidden message
  • Fine Motor Skills - all quiet books encourage fine motor skill development
  • Hand-eye Co-ordination - all quiet books encourage hand-eye co-ordination

 Read the Chapter

Genesis 5

Devotional

The idea for this page came from a combination of things... and very importantly, from a poem by Emily Hunter from The Bible-Time Nursery Rhyme Book. It was a very treasured book in my childhood - a gift from my parents for my third birthday. Now that Tahlia is three, I am greatly enjoying sharing it with her too. It comes VERY HIGHLY recommended from me!

Image Source
The poem that inspired me is about Methuselah, and how he would need sooooo many candles on his birthday cake. It has a picture of a massive tiered cake with a tonne of candles on it, and I always loved that page as a child.

The other thing that inspired this page was hearing about the hidden message in the meaning of the names in this lineage. I heard it first in a sermon I think. You can find a detailed explanation here.

Basically, when you read the meaning of each name in the lineage as a list, a secret message is revealed.

Adam = Man
Seth = Appointed
Enosh = Mortal
Kenan = Sorrow
Mahalalel = The Blessed God
Jared = Shall come down
Enoch = Teaching
Methuselah = His death shall bring
Lamech = The Despairing
Noah = Comfort (or Rest)

Man (is) appointed mortal sorrow; (but) the Blessed God shall come down teaching (that) His death shall bring (the) despairing comfort/rest."


Hidden messages like this are evidence of God's design and inspiration in the Bible writings.

Methuselah has a double hidden meaning, because when he died, the flood came. It is thought that his name was intended to be a prophecy of the flood via his father Enoch. You can read more about this topic here.

Patriarchs from Adam to Israel (Jacob)
Image Source 

The ages of the people in this chapter also holds significance, something I noticed when making this quiet book page. They all lived very long lives, but since Noah wasn't yet dead, his age at death is not mentioned until later in Genesis. I think it is rather significant that his death is not recorded in this section because through the story of the flood (the first destruction of the earth) Noah represents the faithful generation that will be living at Jesus' second coming, those who will not see death in the final destruction. They will receive comfort and rest.


Follow Faith and Felt Obsession on FacebookPinterest and You Tube

Are you excited to study the "boring" Bible passages now?

Wednesday 24 August 2016

Tahlia's Quiet Book - Teddy Page

Here is another page my Mum and I made for Tahlia's original quiet book. I am including the free template so you can make one for someone special too!


This teddy was originally a full teddy that my Mum designed and had her primary school craft class make.  We cut him off at the shoulders and put a ribbon to learn to tie around his neck. This is proving to be a challenging task, but one that has been of interest to Tahlia for quite a while now. She undoes the bow very quickly, and then pretends to do it back up. She watches carefully as someone does it up for her.


We also made his ears able to flap, which I am so happy about because Tahlia has found that she can play peek-a-boo by covering his eyes with his ears!!


Since I got the idea of making quiet books around the time of my friend's baby shower, I decided we should make her one at the party.................... Right.................... Probably not a good idea. Mum and I had to finish off a lot of pages. Actually we were making two of each page at that party since my friend's sister was also planning a baby. So, along with a few others, Mum and I made this page three times, phew!

The other teddies we made had blue and green eyes. Tahlia ended up with the pink ones because she was the only baby with a known sex at the time. They all ended up being girls though! Anyway, I'd like to teach her about having 'pink eye' and how to treat it with pretend eye drops. We could get some real imaginary play going on at the vet or doctor's clinic.


Materials needed to create the Teddy Quiet Book Page:

  • A4 felt background sheet in cream
  • felt scraps in tan
  • ribbon
  • black wool
  • black thread
  • two large buttons
  • my Mum's teddy template... Thanks Mum!


How to create the Teddy Quiet Book Page:

  • Cut out each ear twice and sew together to strengthen.
  • Cut a length of ribbon and burn the ends to stop it fraying.
  • Cut out the head and body section and pin in place with the ribbon and ears positioned underneath. Sew down.
  • Mum embroidered his mouth and nose for me with some black wool.
  • Attach the eyes with black thread.

All Done!


Follow Faith and Felt Obsession on FacebookPinterest and You Tube

Do you like Teddy pages?

Monday 18 July 2016

Genesis 4 - Cain and Abel Quiet Book Page

In Genesis chapter 4, God accepts Abel's offering but does not accept Cain's.


Memory Verse: Then the Lord said to Cain, “Why are you angry? Why is your face downcast? If you do what is right, will you not be accepted? But if you do not do what is right, sin is crouching at your door; it desires to have you, but you must rule over it.” Genesis 4:6,7.

Materials needed to create the Cain and Abel quiet book page:

  • A4 felt background sheet. I used dark green.
  • felt scraps in thick white, thin white, stone, and wheat colours
  • sewing thread to match each colour of felt
  • hot glue gun and glue sticks
  • various blind samples in stone and stick colours and patterns
  • red and wheat coloured wool scraps
  • an altar template - I used this activity page from Calvary Kids
  • a sheep template - I used this image from Free Bible Stories For Children
  • my wheat sheaf and altar sticks template
  • instructions on how to do the wheat embroidery stitches by Mary Corbet on YouTube
Cut out the altar template as a complete altar, leaving space around the edge. Cut four of this from stone coloured felt and sew them doubled up to strengthen them. Sew them down leaving the edges that face the middle of the page open so that the altars become a pocket to store the other items in.


Cut the stones out of the template. Cut two lots of stones from blind samples, one from a light stone colour, and one from a darker stone colour. Hot glue them onto the altars using a mixture of light and dark stones on each altar.

Cut out the sticks background template and cut out doubles from dark brown felt. Sew them back to back. Cut out the sticks from a mottled brown blind sample and hot glue them onto the backgrounds.

Cut one the complete sheep template and cut one from some fairly thick white felt. Then cut off the legs and face of the sheep from the template. and cut out two lots from some thinner white felt. Sew them onto the sheep as it's wool coat, one on each side. Cut out the ears from the thinner felt and attach by hand or using a zero stitch length zig zag setting on your machine.


Tie some red wool around the legs of the sheep.

Cut out the wheat sheaf template and cut one from some fairly thick felt. Cut out two from wheat coloured felt. Hand embroider the wheat on first, then sew on either side of the thick felt with the wheat coloured wool layered in between. Tie the wool into a bow.

Finished!

Difficulty Level = Intermediate

The sheep and bundle of wheat are the slightly harder elements of this page. You could simplify it by finding images online to print onto transfer paper and then ironing them onto the felt instead. This was the first hand embroidery I have ever done (aside from a few cross stitches and things as a child).

Key Learning Areas and Skills

  • Genesis 4 - This page tells the story of Adam and Eve's sons Cain and Abel, and the devastating result of sin
  • Ordering - place the sticks and sheep/wheat in the correct order on top of the altar
  • Fine Motor Skills - all quiet books encourage fine motor skill development
  • Hand-eye Co-ordination - all quiet books encourage hand-eye co-ordination

 Read the Chapter

Genesis 4

Devotional

There is debate regarding why God was displeased with Cain's offering due to the fact that there are no recorded instructions given by God prior to this incident.

Some think that the reason was more that Cain's offering was proud and or selfish, not the fact that he had not brought an animal. Cain needed to trade with Abel in order to get an animal, since he was a herdsman and Cain grew crops. The other differing point was that Cain brought some of his crop rather than the best like Abel did, bringing fat portions of some of the the firstborn.

An offering can be, but does not necessarily refer to a sacrifice.

God did demonstrate what constituted a sacrifice for Adam and Eve before they left the Garden in the previous chapter, Genesis 3. God made them clothes out of animal skins. Most people think of them dressed as a cave man and woman, but it was most likely sheep skins they were dressed in, and therefore they were wearing white. The animals were used to cover them, and represented the covering of their sins. They were made righteous again by the shedding of the innocent animals blood which represented the shedding of Jesus' blood, which if they believed, would make them truly righteous. I am sure they tried their hardest to be good parents, to raise their children well, teaching them how to serve God and passing on this story and belief. In fact, according to the Torah, almost everything is purified with blood; indeed, "without the shedding of blood there is no forgiveness of sins." Hebrews 9:22 CJB. This verse refers back to Leviticus 17:11 in the old testament.

Also, Cain and Abel were grown men - Cain reminds God that wherever he goes, people will want to kill him, surely evidence that by this time, his brothers and sisters had also grown up and reached adulthood. So I assume this was not the first sacrifice they had done, and that Cain had previously pleased God with his sacrifices.

So, why do you think God was displeased?

Image Source

The mark given to Cain by God is very interesting. Jewish sources (Rashi and the Zohar) claim that the mark was a Hebrew letter. I imagine that it was the last letter of the Hebrew alphabet, 'tav'  or "t" in English, which was in the shape of a cross and means "mark, sign, signal, or monument". Follow the transition of the shape of the letter 'tav' from early to modern Hebrew on the Ancient Hebrew Research Center website.

The purpose of this mark was to dissuade people from wanting to kill Cain, i.e. to save him. God continually offers us His grace, forgiveness and salvation, no matter how bad we think we are. I think there is a chance that Cain accepted God's grace and will be in Heaven.


Follow Faith and Felt Obsession on FacebookPinterest and You Tube

Did you learn anything through this quiet book page?