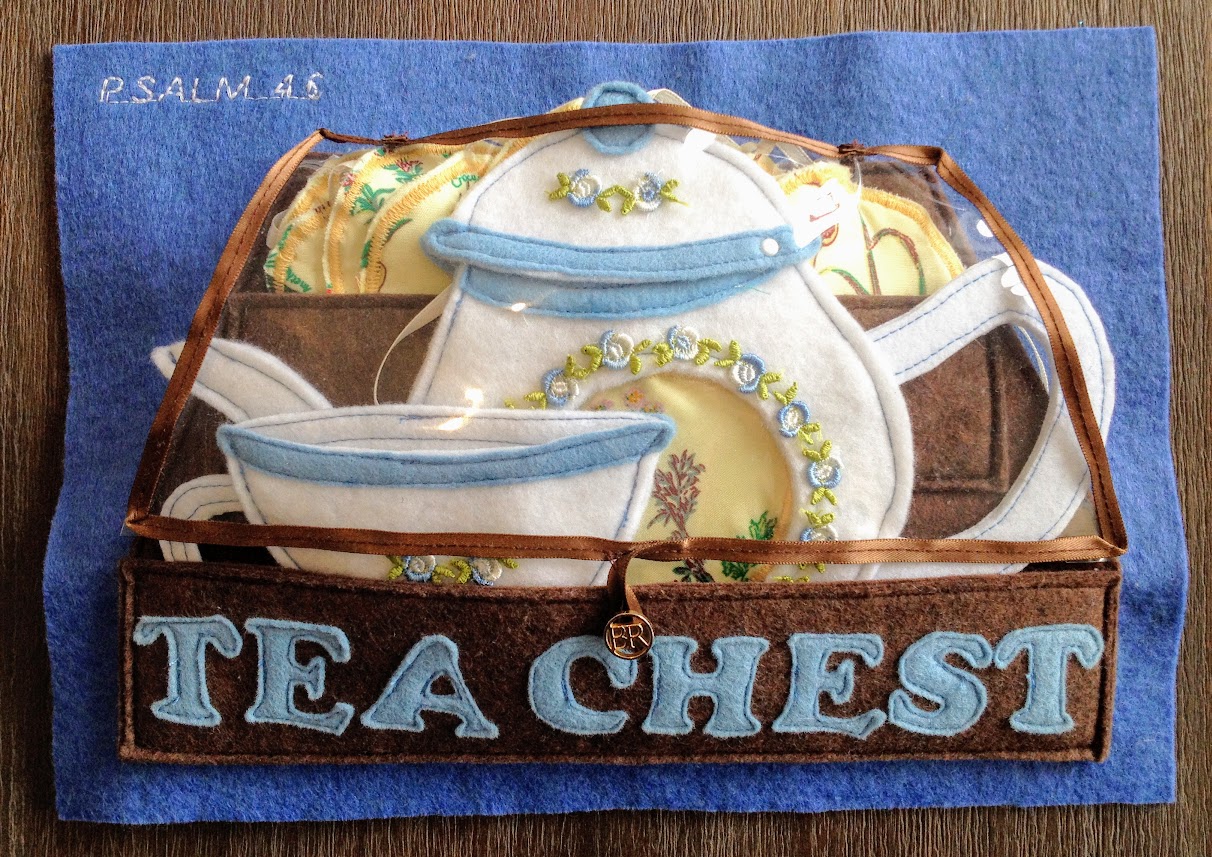
Psalm 46 tells us to "be still and know that I am God".
Cut out your strips of ribbon or contrast felt sections. If using ribbon (recommended to reduce the thickness when sewing it together), melt the ends with a match to prevent fraying. Sew in place.
Pin the tea cup/s together and sandwich the handle/s in between the two layers. If you are only making one tea cup, remember to put the handle on the opposite side to the teapot so you can hold one in each hand and still see the pretty decorations. I put both mine on the same side and had to undo it later and swap the handle to the other side on my tea cup to please Tahlia. She wasn't happy she couldn't see the decorations on the tea cup while pouring her cup of tea. I did four tea cups for my niece, so I did two of each side for her.
Sew the tea cup together. You may need to use the hand knob on your machine to get through the thickness of the stiffened felt when sewing through the handle.
Hot glue your embroidered flower embellishments in place.

Though the tempest rages around us, we can sit and confidently enjoy a cup of tea knowing that God is in control. We may be overwhelmed by the things we experience, but to God all our trials are like a storm in a tea cup. He can sort our problems and give us calm in the midst of the storm. Take a moment today to talk over your problems with Him over a cuppa. It will be time well spent.

Memory Verse: "Be still, and know that I am God; I will be exalted among the nations, I will be exalted in the earth!" Psalm 46:10.
Materials needed to create a Be Still and Know that I Am God Tea Set quiet book page:
- A4 felt background sheet. I used mid blue.
- about 4 sheets of brown felt
- thin brown and cream ribbons
- clear vinyl/plastic scraps
- small button - I used one with a shank (loop at the back)
- printed herb material
- wadding / batting scraps - ask your quilting friends
- white felt
- stiffened white felt (for the teapot and tea cup handles)
- light blue felt scraps
- light blue ribbon to match the light blue felt (optional but easier)
- light blue embroidered flowers etc to decorate
- sewing thread to match/contrast
- hot glue gun and glue
- printer to print the templates and the words "tea chest" in a nice font to use as a template - I used Cooper Black in size 120.
- I used the following colouring sheets as templates for the teapot and teacup - they may need shrinking to a size you are happy with. I think I printed the teacup to fit about four on an A4 page.
- a cup or glass to use as a tea bag and teapot cutout template. Check that it fits inside the teapot and tea chest pocket when you print it out.
- my free tea chest template (minus lettering)
Tea Chest: First cut out some lettering that will fit on your front tea chest pocket. Sew it onto the front single layered pocket piece. Next, cut out the base of the tea chest and sew it down onto the same coloured felt to double and strengthen it. Do the same with both pocket pieces. Cut them all out and sew the doubled pocket pieces in position on the base.

Cut out the lid from your vinyl and edge it with the brown ribbon. Start a little off the midpoint of the bottom edge and end back at the midpoint, overlapping your starting point. Form a loop at the end by folding the ribbon back under itself before finishing. Stop sewing before you get to the end of the ribbon to leave a loop of ribbon. You will use this ribbon loop to hook over the button and close the lid. Re-enforce the stitching here several times as mine is already starting to pull off.
To enable easier movement of the vinyl through your sewing machine, you can do several things. I wedged a piece of paper between the sections of my sewing machine so it would slide properly and not stick to the plastic on my machine. You can use scotch / frosted sticky tape on the bottom of your sewing machine foot for the same reason, but I found I didn't need to as I was sewing on top of the ribbon.

If you want to store your tea pot in the tea chest like I did here, you may need to make some hinges. This allows for a gap at the top which you may need if your teapot is too tall like mine was. I have made two versions of this tea set - one for the Quiet Book Bible Project, and one for my niece. Since I want everything to fit on one page for the Bible Quiet Book Project, I needed to store the teapot and cup in the tea chest - one of the reasons there is only one cup featured here. (Also, the Bible verse is rather conducive to one cup - it can be hard to be still at a tea party)! The version I made for my niece didn't require everything to fit on one page so she has a double page spread. My sister made her a storage pocket to keep her teapot and cups in.

Create two ribbon hinges for the lid by cutting two small strips about 8cm long and melting the edges with a match to prevent fraying. Fold them in half and sew them to the top of your lid. I put my machine on zig zag stitch with a stitch length of zero to go backwards and forwards over the same spot. I did this twice in an 'x' shape on the top of the folded ribbon hinges.
Pin the other end of the ribbon hinges underneath the top edge of the base and sew the base down around all sides except the right or left slanted side. That will create a secret pocket to store extra tea bags in if needed.
If you are not using hinges, sew the base down to the page leaving the same gap on one of the slanted sides to form a secret pocket. Then sew down the lid on top of the base along the top edge only.
Sew your button to the middle of the front pocket that says "tea chest" and use the ribbon loop to close the lid.

Tea Bags: Use your cup or glass to mark circles over the printed herbs on your material. Cut them out in a square shape leaving plenty of room around your circles. Then cut another square the same size from each of the herbs as well.
Sandwich a piece of wadding or batting between the two squares of material, right sides facing out. One of the squares should have a circle traced around one of the herbs. The other side should be the same herb but without a circle traced around it.
Cut as many 20cm lengths of ribbon as tea bags you are making. I made twenty tea bags because that is how many different printed herbs there were on my material. Melt the ends using a match to prevent fraying.
Pin the sandwiched tea bags together around the circle. Slip both ends of a length of ribbon between the wadding and the side with the circle traced on it and pin it in place. This will form a ribbon loop for your tea bag. Set your sewing machine to zig zag and a stitch width of just under 1 (like you would when sewing a buttonhole). Sew around the circle shape. Cut out your tea bags ensuring you do not cut off the ribbon loop whilst doing it.

Tea Pot: Cut out your teapot template from the colouring page. You will need to print it out several times and cut out the teapot handle with extensions at the ends to allow it to be sewn in place between two layers of felt. Also, cut the teapot bodies a slightly smaller width and slightly taller at the top to allow it to fit underneath the lid so it can close properly.
Cut your handle from white stiffened felt. Cut two teapot bodies and two teapot lids from white felt. If your child is right handed, draw around the cup or glass on the inside of the front teapot body. Cut out the hole. Lay a piece of clear vinyl over the space and sew around the circle to form a window into the teapot. That way you can see which type of tea you are pouring each time. Trim the excess.
There are tips for sewing with vinyl listed above in the tea chest section.
I purposely used a thread in the contrast colour so I would not have to keep swapping colours on my machine so frequently.
Cut out your strips of ribbon and contrast felt sections (the knob at the top of the tea pot and the edges of the teapot and tea cups). If you are using felt you will have to print out a couple of copies of the templates and eyeball some of those sections from that. If using ribbon (recommended to reduce the thickness when sewing it together), melt the ends with a match to prevent fraying. Sew all sections in place. If using ribbon, only sew along the bottom edge of the ribbon at the edge of the teapot body where you will be joining on the lid. This will enable you to fold back the ribbon and allow you to put a split pin through without damaging the ribbon.
Pin the teapot bodies together and sandwich the handle in between the two layers. I chose not to sew the spout closed. Pin the lid together too. Sew both together. You may need to use the hand knob on your machine to get through the thickness of the stiffened felt when sewing through the handle.
Use a darning needle to make holes for the split pins and insert them. I used one on each side.

Hot glue your embroidered flower embellishments in place.
Tea Cup/s: Cut your template from the colouring page in a similar manner to the teapot. Cut your handle/s from white stiffened felt.
To enable easier movement of the vinyl through your sewing machine, you can do several things. I wedged a piece of paper between the sections of my sewing machine so it would slide properly and not stick to the plastic on my machine. You can use scotch / frosted sticky tape on the bottom of your sewing machine foot for the same reason, but I found I didn't need to as I was sewing on top of the ribbon.
If you want to store your tea pot in the tea chest like I did here, you may need to make some hinges. This allows for a gap at the top which you may need if your teapot is too tall like mine was. I have made two versions of this tea set - one for the Quiet Book Bible Project, and one for my niece. Since I want everything to fit on one page for the Bible Quiet Book Project, I needed to store the teapot and cup in the tea chest - one of the reasons there is only one cup featured here. (Also, the Bible verse is rather conducive to one cup - it can be hard to be still at a tea party)! The version I made for my niece didn't require everything to fit on one page so she has a double page spread. My sister made her a storage pocket to keep her teapot and cups in.
Create two ribbon hinges for the lid by cutting two small strips about 8cm long and melting the edges with a match to prevent fraying. Fold them in half and sew them to the top of your lid. I put my machine on zig zag stitch with a stitch length of zero to go backwards and forwards over the same spot. I did this twice in an 'x' shape on the top of the folded ribbon hinges.
 |
| I used a ruler to make sure the angle was 45 degrees. |
Pin the other end of the ribbon hinges underneath the top edge of the base and sew the base down around all sides except the right or left slanted side. That will create a secret pocket to store extra tea bags in if needed.
If you are not using hinges, sew the base down to the page leaving the same gap on one of the slanted sides to form a secret pocket. Then sew down the lid on top of the base along the top edge only.
 |
| You should be able to fold this little corner back so you can sew the tea chest onto the page without sewing over the top of the upper pocket. |
Sew your button to the middle of the front pocket that says "tea chest" and use the ribbon loop to close the lid.
Tea Bags: Use your cup or glass to mark circles over the printed herbs on your material. Cut them out in a square shape leaving plenty of room around your circles. Then cut another square the same size from each of the herbs as well.
Sandwich a piece of wadding or batting between the two squares of material, right sides facing out. One of the squares should have a circle traced around one of the herbs. The other side should be the same herb but without a circle traced around it.
Cut as many 20cm lengths of ribbon as tea bags you are making. I made twenty tea bags because that is how many different printed herbs there were on my material. Melt the ends using a match to prevent fraying.
Pin the sandwiched tea bags together around the circle. Slip both ends of a length of ribbon between the wadding and the side with the circle traced on it and pin it in place. This will form a ribbon loop for your tea bag. Set your sewing machine to zig zag and a stitch width of just under 1 (like you would when sewing a buttonhole). Sew around the circle shape. Cut out your tea bags ensuring you do not cut off the ribbon loop whilst doing it.
Tea Pot: Cut out your teapot template from the colouring page. You will need to print it out several times and cut out the teapot handle with extensions at the ends to allow it to be sewn in place between two layers of felt. Also, cut the teapot bodies a slightly smaller width and slightly taller at the top to allow it to fit underneath the lid so it can close properly.
Cut your handle from white stiffened felt. Cut two teapot bodies and two teapot lids from white felt. If your child is right handed, draw around the cup or glass on the inside of the front teapot body. Cut out the hole. Lay a piece of clear vinyl over the space and sew around the circle to form a window into the teapot. That way you can see which type of tea you are pouring each time. Trim the excess.
There are tips for sewing with vinyl listed above in the tea chest section.
I purposely used a thread in the contrast colour so I would not have to keep swapping colours on my machine so frequently.
Cut out your strips of ribbon and contrast felt sections (the knob at the top of the tea pot and the edges of the teapot and tea cups). If you are using felt you will have to print out a couple of copies of the templates and eyeball some of those sections from that. If using ribbon (recommended to reduce the thickness when sewing it together), melt the ends with a match to prevent fraying. Sew all sections in place. If using ribbon, only sew along the bottom edge of the ribbon at the edge of the teapot body where you will be joining on the lid. This will enable you to fold back the ribbon and allow you to put a split pin through without damaging the ribbon.
Pin the teapot bodies together and sandwich the handle in between the two layers. I chose not to sew the spout closed. Pin the lid together too. Sew both together. You may need to use the hand knob on your machine to get through the thickness of the stiffened felt when sewing through the handle.
Use a darning needle to make holes for the split pins and insert them. I used one on each side.
Hot glue your embroidered flower embellishments in place.
Tea Cup/s: Cut your template from the colouring page in a similar manner to the teapot. Cut your handle/s from white stiffened felt.
Cut out your strips of ribbon or contrast felt sections. If using ribbon (recommended to reduce the thickness when sewing it together), melt the ends with a match to prevent fraying. Sew in place.
Pin the tea cup/s together and sandwich the handle/s in between the two layers. If you are only making one tea cup, remember to put the handle on the opposite side to the teapot so you can hold one in each hand and still see the pretty decorations. I put both mine on the same side and had to undo it later and swap the handle to the other side on my tea cup to please Tahlia. She wasn't happy she couldn't see the decorations on the tea cup while pouring her cup of tea. I did four tea cups for my niece, so I did two of each side for her.
Sew the tea cup together. You may need to use the hand knob on your machine to get through the thickness of the stiffened felt when sewing through the handle.
Hot glue your embroidered flower embellishments in place.
Finished!
Difficulty Level = Difficult.
I have suggested a few changes to make it a little easier. I wish I had thought of them earlier!
Key Learning Areas and Skills
- Psalm 46 - Learn to be still and trust God to help us through our problems
- Imaginative Play - Practice relaxing, "let go and let God" while talking things over with Him over a cup of tea
- Herbal Medicine - Get informed about what each herb looks like, which parts to use, and what properties they have
- Fine Motor Skills - all quiet books encourage fine motor skill development
- Hand-eye Co-ordination - all quiet books encourage hand-eye co-ordination
Read the Chapter
Psalm 46Devotional
Though the tempest rages around us, we can sit and confidently enjoy a cup of tea knowing that God is in control. We may be overwhelmed by the things we experience, but to God all our trials are like a storm in a tea cup. He can sort our problems and give us calm in the midst of the storm. Take a moment today to talk over your problems with Him over a cuppa. It will be time well spent.