Showing posts with label Difficulty Level = Hard. Show all posts

Friday 14 December 2018

Genesis 39 - The Temptation of Joseph Quiet Book Page

Genesis 39 demonstrates Joseph's integrity.

Memory Verse: "No one is greater in this house than I am. My master has withheld nothing from me except you, because you are his wife. How then could I do such a wicked thing and sin against God?” Genesis 39:9

Materials needed to create The Temptation of Joseph quiet book page:

  • A4 felt background sheet - I used black
  • sublimation printed Ancient Egypt dress-up dolls by Gabi's Paper Dolls (I only printed some of the female costumes and the dolls) - you can read how I had it done on my Sublimation Printing on Felt - Test post
  • Veltex material (also called loop fabric or industrial webbing) in skin colour
  • Velcro dot
  • hot glue gun and glue
  • Double sided iron-on interfacing scrap
  • gold coloured material that won't fray - I used pleather but it was difficult to sew due to it's stretchiness (made easier by gluing first)
  • clear craft glue if using pleather to make sewing easier - I used polyacetic acid & ethylene resin based glue
  • decorative material
  • two decorative buttons
  • jump ring tassel
  • gold ribbon
  • gold elastic
  • felt in gold/straw colour
  • sewing thread to match
  • my free template (Egyptian wardrobe only)
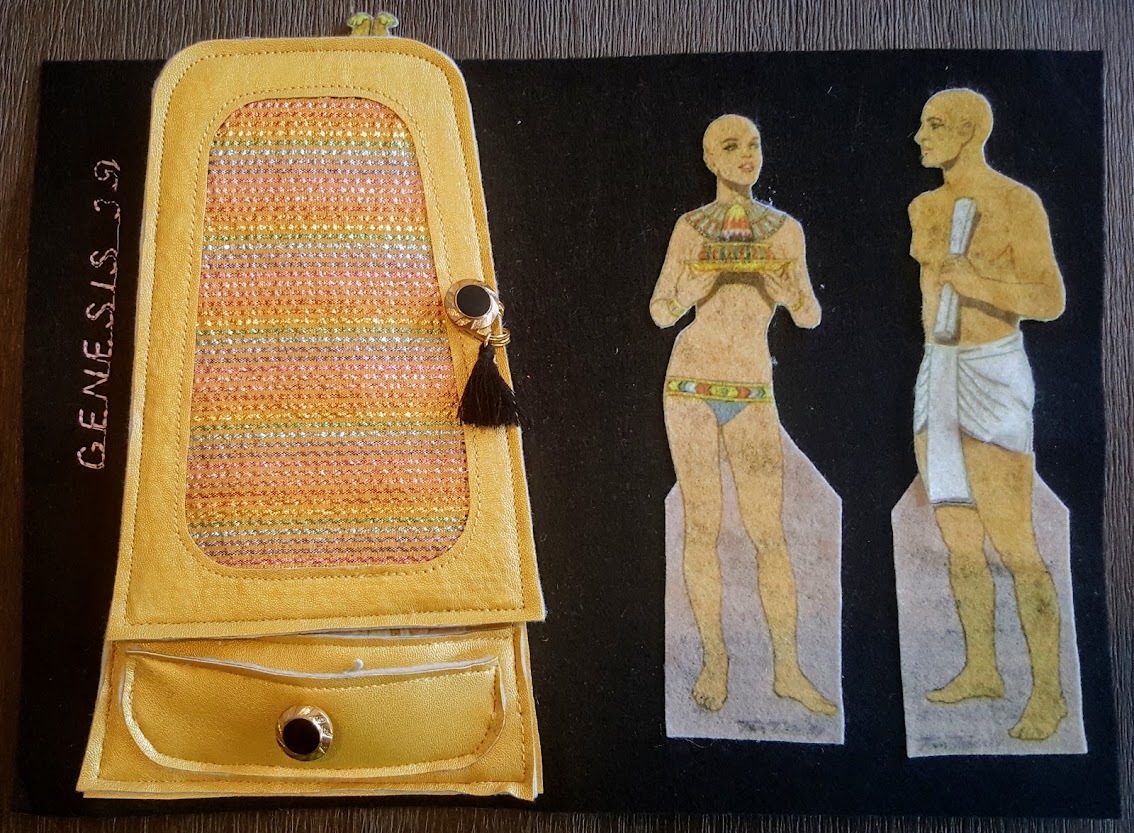
First cut out your paper dolls, clothes and wigs, cutting off the tabs as you go. Then use your male paper doll to cut out a section of Veltex and double sided iron-on interfacing to the same shape as his torso/legs.


This one is Tahlia's favourite dress


Arrange your pieces onto the background and iron on the Veltex to the background in the correct position using the interfacing. Sew around the edge to hold in place.


Potiphar's wife acting like a 'cougar'... - this one is my Grandma's fav dress


Hot glue the feet of the male doll to the background in place over the Veltex. Cut out his undergarment and finish gluing down his legs. Hot glue the Velcro dot to the back of his undergarment and place in position. Then line up the head and glue the remainder of his body down. Hot glue the woman into position.


To make the wardrobe, trace the pieces using the template onto the back of your pleather using pen - this will avoid puncturing the pleather unnecessarily. Cut them out. For the decorative panel, cut the size to the back piece and then trim down slightly so it doesn't show on the edge of the wardrobe when layered. Using the clear craft glue, glue the decorative panel to the gold/straw felt and allow it to dry. Then glue the gold edging on top and allow to dry. Sew the inner section around the decorative panel.


Glue two sections of gold ribbon on the back to form hinges for the front door of the wardrobe. Then glue some pleather to the back of your felt and allow to dry. Sew around the outside edge of your wardrobe door and then cut it out, making sure not to cut off the hinges.


I found I had to shorten the bottom of the wardrobe base by around 5 mm and overlap the door over the lower section of the wardrobe front slightly to fit it on my page. I didn't change the pattern as you may be using a different size page to me.

Glue the pleather wardrobe base to the background page and insert the hinges from the door underneath on one side and insert a short loop of gold elastic with a jump ring tassel threaded onto it on the other side where you want the latch to be. Allow to dry and sew in place, reinforcing the stitching over the hinges and elastic loop.


Glue the remaining pleather pieces to the gold/straw felt and sew along the top edge of the draw and lower section of wardrobe front. Cut the draw out and sew the lower edge in place over the lower section of the wardrobe front. Then sew the lower section of the wardrobe front down over the base on the bottom and sides to form a pocket. To complete the wardrobe, hand sew your buttons on.

Finished!


Difficulty Level = Hard

It will be easier if you use something other than pleather that stretches! If you use pleather, be sure to use the glue.


"Hey Joseph, want to see my secret garden?"


Key Learning Areas and Skills

  • Genesis 38 - This page teaches about how we need to be prepared to suffer even when we do the right thing.
  • Buttoning - Open and close the wardrobe
  • Tucking - Tuck the wigs into the wardrobe draw
  • Imaginative Play - dress up Potiphar's wife in all her outfits
  • Velcro - rip off Joseph's undergarment (and re-position them)
  • Fine Motor Skills - all quiet books encourage fine motor skill development
  • Hand-eye Co-ordination - all quiet books encourage hand-eye co-ordination


Read the Chapter

Genesis 39


Devotional

I admire the way that Jacob brought up Joseph. He was only around 17 when he was sold as a salve and yet His devotion to God is to be greatly admired. It must have been difficult to follow God in the situation he found himself in, and it would have been easy to go along with new cultures and customs and tell himself that God had forgotten him, so he may as well do likewise.


"Hey Joseph, do you want some 'trifle'..."


There are a few boundaries Joseph put in place to reduce the chances of finding himself in less than ideal circumstances. You can read about Joseph's 5 Steps to Avoid Temptation: Genesis 39:6-23 on the God Running blog. He had resolved to keep himself from "strange" women (those who did not follow God) as told in the story of Joseph and Asenath, translated by H. F. D. Sparks. He must have envisaged a celibate life, exiled in the land of Egypt. And not only exiled, but imprisoned. Nevertheless, as stated at the end of the blog post mentioned above, God preserved his life in that the punishment due Joseph was death. I noticed that Joseph was sold to Potiphar the Captain of the Guard (Genesis 37:36) - and the same titled person is in charge of the prison. It looks like Potiphar realises that Joseph is innocent because instead of putting Joseph to death, he saves face by putting him in his prison, but eventually puts him in charge of it just as he had done with his household (Genesis 40:3-4). Despite his circumstances, Joseph sticks to his values and God rewards him with freedom, power, and a beautiful convert, Asenath.

There are so many parallels between the story of Joseph and Jesus in the Bible, and I can only see more told through the love story of Joseph and Asenath.


Dreamcoat Part 8 - Potipher


Follow Faith and Felt Obsession on FacebookPinterest and You Tube

Hearing from you gives me great encouragement!

Friday 12 January 2018

Psalm 46 - Be Still and Know that I Am God Tea Set Quiet Book Page

Psalm 46 tells us to "be still and know that I am God".


Memory Verse: "Be still, and know that I am God; I will be exalted among the nations, I will be exalted in the earth!" Psalm 46:10.

Materials needed to create a Be Still and Know that I Am God Tea Set quiet book page:

  • A4 felt background sheet. I used mid blue.
  • about 4 sheets of brown felt
  • thin brown and cream ribbons
  • clear vinyl/plastic scraps
  • small button - I used one with a shank (loop at the back)
  • printed herb material
  • wadding / batting scraps - ask your quilting friends
  • white felt
  • stiffened white felt (for the teapot and tea cup handles)
  • light blue felt scraps
  • light blue ribbon to match the light blue felt (optional but easier)
  • light blue embroidered flowers etc to decorate
  • sewing thread to match/contrast
  • hot glue gun and glue
  • printer to print the templates and the words "tea chest" in a nice font to use as a template - I used Cooper Black in size 120.
  • I used the following colouring sheets as templates for the teapot and teacup - they may need shrinking to a size you are happy with. I think I printed the teacup to fit about four on an A4 page.
  • a cup or glass to use as a tea bag and teapot cutout template. Check that it fits inside the teapot and tea chest pocket when you print it out.
  • my free tea chest template (minus lettering)

Tea Chest: First cut out some lettering that will fit on your front tea chest pocket. Sew it onto the front single layered pocket piece. Next, cut out the base of the tea chest and sew it down onto the same coloured felt to double and strengthen it. Do the same with both pocket pieces. Cut them all out and sew the doubled pocket pieces in position on the base.


Cut out the lid from your vinyl and edge it with the brown ribbon. Start a little off the midpoint of the bottom edge and end back at the midpoint, overlapping your starting point. Form a loop at the end by folding the ribbon back under itself before finishing. Stop sewing before you get to the end of the ribbon to leave a loop of ribbon. You will use this ribbon loop to hook over the button and close the lid. Re-enforce the stitching here several times as mine is already starting to pull off.

To enable easier movement of the vinyl through your sewing machine, you can do several things. I wedged a piece of paper between the sections of my sewing machine so it would slide properly and not stick to the plastic on my machine. You can use scotch / frosted sticky tape on the bottom of your sewing machine foot for the same reason, but I found I didn't need to as I was sewing on top of the ribbon.


If you want to store your tea pot in the tea chest like I did here, you may need to make some hinges. This allows for a gap at the top which you may need if your teapot is too tall like mine was. I have made two versions of this tea set - one for the Quiet Book Bible Project, and one for my niece. Since I want everything to fit on one page for the Bible Quiet Book Project, I needed to store the teapot and cup in the tea chest - one of the reasons there is only one cup featured here. (Also, the Bible verse is rather conducive to one cup - it can be hard to be still at a tea party)! The version I made for my niece didn't require everything to fit on one page so she has a double page spread. My sister made her a storage pocket to keep her teapot and cups in.


Create two ribbon hinges for the lid by cutting two small strips about 8cm long and melting the edges with a match to prevent fraying. Fold them in half and sew them to the top of your lid. I put my machine on zig zag stitch with a stitch length of zero to go backwards and forwards over the same spot. I did this twice in an 'x' shape on the top of the folded ribbon hinges.

I used a ruler to make sure the angle was 45 degrees.

Pin the other end of the ribbon hinges underneath the top edge of the base and sew the base down around all sides except the right or left slanted side. That will create a secret pocket to store extra tea bags in if needed.

If you are not using hinges, sew the base down to the page leaving the same gap on one of the slanted sides to form a secret pocket. Then sew down the lid on top of the base along the top edge only.

You should be able to fold this little corner back so you can sew the tea chest
onto the page without sewing over the top of the upper pocket.

Sew your button to the middle of the front pocket that says "tea chest" and use the ribbon loop to close the lid.


Tea Bags: Use your cup or glass to mark circles over the printed herbs on your material. Cut them out in a square shape leaving plenty of room around your circles.  Then cut another square the same size from each of the herbs as well.

Sandwich a piece of wadding or batting between the two squares of material, right sides facing out. One of the squares should have a circle traced around one of the herbs. The other side should be the same herb but without a circle traced around it.

Cut as many 20cm lengths of ribbon as tea bags you are making. I made twenty tea bags because that is how many different printed herbs there were on my material. Melt the ends using a match to prevent fraying.

Pin the sandwiched tea bags together around the circle. Slip both ends of a length of ribbon between the wadding and the side with the circle traced on it and pin it in place. This will form a ribbon loop for your tea bag. Set your sewing machine to zig zag and a stitch width of just under 1 (like you would when sewing a buttonhole). Sew around the circle shape. Cut out your tea bags ensuring you do not cut off the ribbon loop whilst doing it.


Tea Pot: Cut out your teapot template from the colouring page. You will need to print it out several times and cut out the teapot handle with extensions at the ends to allow it to be sewn in place between two layers of felt. Also, cut the teapot bodies a slightly smaller width and slightly taller at the top to allow it to fit underneath the lid so it can close properly.

Cut your handle from white stiffened felt. Cut two teapot bodies and two teapot lids from white felt. If your child is right handed, draw around the cup or glass on the inside of the front teapot body. Cut out the hole. Lay a piece of clear vinyl over the space and sew around the circle to form a window into the teapot. That way you can see which type of tea you are pouring each time. Trim the excess.

There are tips for sewing with vinyl listed above in the tea chest section.

I purposely used a thread in the contrast colour so I would not have to keep swapping colours on my machine so frequently.

Cut out your strips of ribbon and contrast felt sections (the knob at the top of the tea pot and the edges of the teapot and tea cups). If you are using felt you will have to print out a couple of copies of the templates and eyeball some of those sections from that. If using ribbon (recommended to reduce the thickness when sewing it together), melt the ends with a match to prevent fraying. Sew all sections in place. If using ribbon, only sew along the bottom edge of the ribbon at the edge of the teapot body where you will be joining on the lid. This will enable you to fold back the ribbon and allow you to put a split pin through without damaging the ribbon.

Pin the teapot bodies together and sandwich the handle in between the two layers. I chose not to sew the spout closed. Pin the lid together too. Sew both together. You may need to use the hand knob on your machine to get through the thickness of the stiffened felt when sewing through the handle.

Use a darning needle to make holes for the split pins and insert them. I used one on each side.


Hot glue your embroidered flower embellishments in place.

Tea Cup/s: Cut your template from the colouring page in a similar manner to the teapot. Cut your handle/s from white stiffened felt.

Cut out your strips of ribbon or contrast felt sections. If using ribbon (recommended to reduce the thickness when sewing it together), melt the ends with a match to prevent fraying.  Sew in place.

Pin the tea cup/s together and sandwich the handle/s in between the two layers. If you are only making one tea cup, remember to put the handle on the opposite side to the teapot so you can hold one in each hand and still see the pretty decorations. I put both mine on the same side and had to undo it later and swap the handle to the other side on my tea cup to please Tahlia. She wasn't happy she couldn't see the decorations on the tea cup while pouring her cup of tea. I did four tea cups for my niece, so I did two of each side for her.

Sew the tea cup together. You may need to use the hand knob on your machine to get through the thickness of the stiffened felt when sewing through the handle.

Hot glue your embroidered flower embellishments in place.

Finished!

Difficulty Level = Difficult.

I have suggested a few changes to make it a little easier. I wish I had thought of them earlier!

Key Learning Areas and Skills

  • Psalm 46 - Learn to be still and trust God to help us through our problems
  • Imaginative Play - Practice relaxing, "let go and let God" while talking things over with Him over a cup of tea
  • Herbal Medicine - Get informed about what each herb looks like, which parts to use, and what properties they have
  • Fine Motor Skills - all quiet books encourage fine motor skill development
  • Hand-eye Co-ordination - all quiet books encourage hand-eye co-ordination


Read the Chapter

Psalm 46

Devotional


Though the tempest rages around us, we can sit and confidently enjoy a cup of tea knowing that God is in control. We may be overwhelmed by the things we experience, but to God all our trials are like a storm in a tea cup. He can sort our problems and give us calm in the midst of the storm. Take a moment today to talk over your problems with Him over a cuppa. It will be time well spent.


Follow Faith and Felt Obsession on FacebookPinterest and You Tube

Do you find yourself praying while you sip on a cuppa?

Tuesday 6 September 2016

Genesis 5 - Lineage Birthday Cake Quiet Book Page

In Genesis chapter 5, we are given the lineage of Adam to Noah, along with their ages at death, and a secret message hidden in what many would consider a rather boring Bible passage.


Memory Verse: Now he called his name Noah, saying, “This one will give us rest from our work and from the toil of our hands arising from the ground which the Lord has cursed.” Genesis 5:29 NASB

Materials needed to create the Lineage Birthday Cake quiet book page:

  • A4 felt background sheet. I used mid blue.
  • felt scraps
  • sparkly felt for icing (optional)
  • sewing thread to match each colour of felt
  • magnets - I used 5mm craft neodymium magnets, but you need to be careful with these... they are very strong magnets so they are dangerous if swallowed
  • four small buttons
  • round black elastic
  • sewing machine with font function (or alternate method e.g. hand embroidery, fabric marker or transfer paper)
  • things to decorate the cake e.g. strawberries (optional).
  • the free template
Use the complete cake guide to work out where to position your cake on the page. There are two options, one with candles and one without. Since the candles sit higher than the cake, I thought I better include them so you can see how high they would sit. But since they are very close to the edge of the pattern paper, I thought it might not print properly, so I did one without as well.

Place pins as markers through each 'X'. This is where your magnets will be sewn down under the small squares of felt. Sew your magnets in position, ensuring that they are sewn down with the same side (north or south pole) facing up so that the candles all face the same way when put on the cake.


Write out your lettering using your chosen method (ensuring it will fit into that amount of space) and cut out one side of your candle set.

The name and age at death/translation side (and corresponding meaning side) should say:
  • Adam 930 (Man)
  • Seth 912 (Appointed)
  • Enosh 905 (Mortal)
  • Keenan 910 (Sorrow)
  • Mahalalel 895 (The Blessed God)
  • Jared 962 (Shall Come Down)
  • Enoch 365 (Teaching)
  • Methuselah 969 (His Death Shall Bring)
  • Lamech 777 (Despairing)
  • Noah (Comfort and Rest)
Next, cut out ten flames (not twenty) as it is easier to sew small sections onto a larger sheet of felt than sewing two small sections to each other. It makes it easier to keep things straight and lined up in the sewing machine, especially when you are also going to be inserting flames and magnets between the two parts. I found the idea for this method on the blog Laura Thoughts, so for a better explanation on how to do it, please visit here.


Sew the flames down first and cut them out. Insert them under the top ends of the candles when you pin them on to the corresponding candle side. Make sure you line up the lettering properly on the opposite side.

Start sewing the candles from the bottom end, and when you get back around (but before you get right to the end), insert a magnet into the candle and then sew it closed. You can use a wooden skewer to help push the magnet in. Again, make sure you put the magnet in with the correct pole facing down so that the name side of the candle will face outwards when placed into the cake.


Check that the lettering has been lined up and sewn correctly, then cut out your candles.

Cut out your cake sections. I doubled each of my chocolate cake sections, but the felt I was using was rather thin. if you use thicker felt you will not have to.

Cut out and sew the icing sections to the top of each cake section. Use the complete cake guide to position them on your page in line with the magnet squares and sew them onto the page by the sides and bottom, leaving the section that has the icing sewn on it free to make a pocket for the candles. Do not sew down over the icing.

Cut out your bunting from the corresponding colours as indicated on page for of the template. I wrote the English words grammar words 'IS', 'BUT' & 'AND' on the back of the blue bunting, so it can be folded over when you line up the candles and help reveal the message - although I have just discovered I placed the words in the wrong order on the bunting... oh dear! At least we can still use it on the side without the writing and insert the words in our heads.

Fold your length of elastic in half, and starting at the folded end, wrap your bunting around both strings and pin. Leave a small loop of elastic at each end and spaces where indicated so you can button it onto the page. When everything is lined up and you have worked out how much length you will need, tie the ends of the elastic together and hide the knot inside the last piece of bunting.


The bunting colours have been co-ordinated so that there is blue bunting the same colour as the candles in all the spots where an English word needs to be inserted for the grammar to make sense. There is no magnet inside the blue bunting, but sew all the rest with a magnet inside for the candle to attach to so you can reveal the hidden message by lining them up. Again, ensure that the magnet's pole is positioned so that the meaning side of the candle faces outwards when attached to the bunting. Just sew in a V shape, going over the top of the elastic so it stops the bunting moving around and the magnet can't fall out.


"but" and "the" are the wrong way around :(

Lay out the bunting on the page above the cake and mark and sew the buttons in place.

I couldn't decide if I wanted to include the strawberries, and how to attach them. I was considering hot glue or press studs, but I ended up just putting them in a small zip lock bag in the middle pocket. That way they can be played with but are not permanently attached.


Finished!

Difficulty Level = Hard

Probably the most difficult aspects of creating this page is getting the magnets into the candles and bunting while sewing. You could make them slightly wider or hand sew those sections. Also, lining up the wording is a little confusing. If you don't have a machine with an alphabet, you could use a fabric marker, iron on transfer paper, or hand embroidery instead. Using a fabric marker or transfer paper might make it less confusing as you could do the writing after the candle and bunting are sewn together.

Key Learning Areas and Skills

  • Genesis 5 - This page tells the story of the secret message hidden in the lineage of Adam to Noah
  • Imaginative Play - mmm, cake!
  • Ordering - place the name candles in the correct order of creation/birth
  • Magnets - the candles can be transferred from the cake to the bunting to reveal the hidden message
  • Tucking - the candles have to be tucked under the flap of cake to magnet on properly
  • Buttoning - the bunting elastic onto the page
  • Reading - the names, meanings, and ages
  • Decoding - find the hidden message
  • Fine Motor Skills - all quiet books encourage fine motor skill development
  • Hand-eye Co-ordination - all quiet books encourage hand-eye co-ordination

 Read the Chapter

Genesis 5

Devotional

The idea for this page came from a combination of things... and very importantly, from a poem by Emily Hunter from The Bible-Time Nursery Rhyme Book. It was a very treasured book in my childhood - a gift from my parents for my third birthday. Now that Tahlia is three, I am greatly enjoying sharing it with her too. It comes VERY HIGHLY recommended from me!

Image Source
The poem that inspired me is about Methuselah, and how he would need sooooo many candles on his birthday cake. It has a picture of a massive tiered cake with a tonne of candles on it, and I always loved that page as a child.

The other thing that inspired this page was hearing about the hidden message in the meaning of the names in this lineage. I heard it first in a sermon I think. You can find a detailed explanation here.

Basically, when you read the meaning of each name in the lineage as a list, a secret message is revealed.

Adam = Man
Seth = Appointed
Enosh = Mortal
Kenan = Sorrow
Mahalalel = The Blessed God
Jared = Shall come down
Enoch = Teaching
Methuselah = His death shall bring
Lamech = The Despairing
Noah = Comfort (or Rest)

Man (is) appointed mortal sorrow; (but) the Blessed God shall come down teaching (that) His death shall bring (the) despairing comfort/rest."


Hidden messages like this are evidence of God's design and inspiration in the Bible writings.

Methuselah has a double hidden meaning, because when he died, the flood came. It is thought that his name was intended to be a prophecy of the flood via his father Enoch. You can read more about this topic here.

Patriarchs from Adam to Israel (Jacob)
Image Source 

The ages of the people in this chapter also holds significance, something I noticed when making this quiet book page. They all lived very long lives, but since Noah wasn't yet dead, his age at death is not mentioned until later in Genesis. I think it is rather significant that his death is not recorded in this section because through the story of the flood (the first destruction of the earth) Noah represents the faithful generation that will be living at Jesus' second coming, those who will not see death in the final destruction. They will receive comfort and rest.


Follow Faith and Felt Obsession on FacebookPinterest and You Tube

Are you excited to study the "boring" Bible passages now?

Tuesday 17 May 2016

Chicken in a Manger - Two Versions

Reuse the manger at your church during the rest of the year with this creative idea...

I took Tahlia to Bible class at a church in Melbourne, and she absolutely loved one of the play activities they had for the littlies. They had put some stuffed chickens in the manger and they were sitting on blown eggs. There were empty egg cartons so they could go egg collecting! She loved it so much, I had to come home and make something similar.

When I told my friend about the plan, she hunted the net and found a pattern for a stuffed chicken that lays eggs. With the temptation of even more ways to play, she convinced me to make that version rather than the very simple version I had shown her photos of.

I would like to show you both versions!

Easy No-Sew Chicken 


This chicken is very basic, but still such wonderful fun! It consists of three main pieces of felt hot glued together, plus the wings, comb and wattle. You can hot glue them on too. Just use a colouring page of a large chicken like this one and use it as a template to cut out your pieces. You may have to print it out a couple of times to get all the pieces.


Here is a diagram showing the names of the various chicken parts:

Image Source

Depending on the colouring page you choose, glue the two side pieces together to about an inch under the wattle, and a couple of inches down the tail. Perhaps on the one I suggested, you might want to only glue to the edge of the wattle and the tip of the tail.


Once it is dry, spread the sides out and sit it on a piece of paper so you can tip it back and forth and mark some beginning, end and middle points so you can draw a rough eye/segment shape on a piece of paper for the bottom section. It may help to stuff the unfinished chook first to get a more accurate shape. When you are happy with it, cut it out of felt and hot glue it to the bottom edges, leaving room so you can stuff it if you haven't already. Then complete the gluing.

Wait until it is stuffed to glue on the wings so you get a better idea of where they look good. You can glue on the wattle and comb now too, and add eyes if you like. Or you could just draw or paint them on instead.


Collecting the eggs was tonnes of fun!!

Here is a YouTube demo of how to blow eggs out of their shells so you can use them for collecting:


Egg-Laying Chicken:

The pattern is available to purchase from ikatbag. Here are a couple of her photos:


Her pattern comes with a pattern for a chick too!


The pattern recommends you use knit material. I made mine out of felt, and am regretting it. It is started to pill immediately. And as you may already know, I like to double my felt whenever it is not attached to anything else, such as the collar and tail.  Because of that it was rather difficult to sew some sections together, particularly where the the tail joins the body. I did get a little confused with the egg channel - don't try the more difficult sections late at night when you really just need to go to bed! Go to bed!!!


I used a cardboard glad wrap tube to fill the egg channel while I stuffed the chicken so it would leave enough room for the eggs to fit through.


My friend who convinced me to make this version made the orange one...


Why not add a duck in there too!


I made 'hay' by ripping up some calico off cuts into strips. I think it would have made it easier for the chicken to sit on the eggs better if I had made some more.


I bought some rubber bouncing eggs after Easter - they bounce unevenly and are hard to catch. They look very realistic until you touch them.


Relating Chickens In Church...

  • Which came first, the chicken or the egg?? We know the answer to that one as God made everything mature in the Garden of Eden.
  • Jesus said He wanted to gather the Israelite's under His wings like a mother hen, but alas they were unwilling. See Matthew 23 and Luke 13.
  • Ask, Seek, Knock!  “Is there any father here who, if his son asked him for a fish, would instead of a fish give him a snake? Or if he asked for an egg would give him a scorpion? So if you, even though you are bad, know how to give your children gifts that are good, how much more will the Father keep giving the Holy Spirit from heaven to those who keep asking him!” Luke 11:11-13.


"Bok!"


Follow Faith and Felt Obsession on FacebookPinterest and You Tube

Can you think of any other ways you can use a manger during the year?